All Posts By

Vas Sladek

One sad fig tree

By | Trees | No Comments

Why so sad?

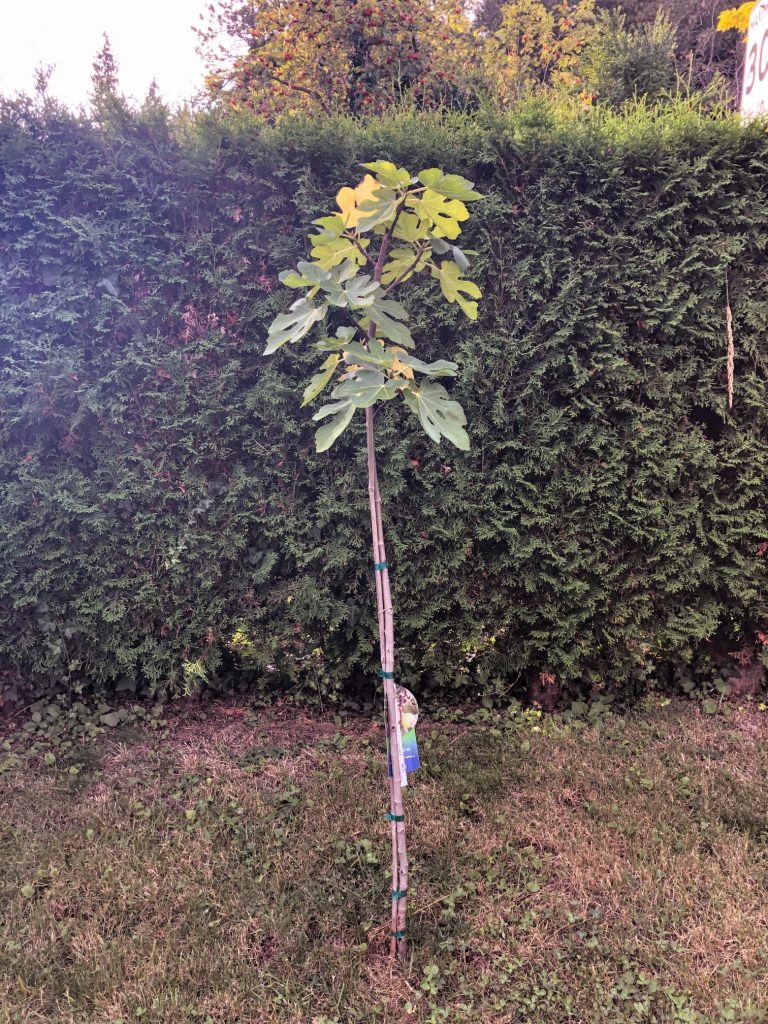
When you buy a fig tree, you definitely expect to harvest some figs after three years. And yet, here we are, three seasons in and the tree looks pretty sad. Why?

There are many possible reasons. So, let’s take a look at the most obvious.
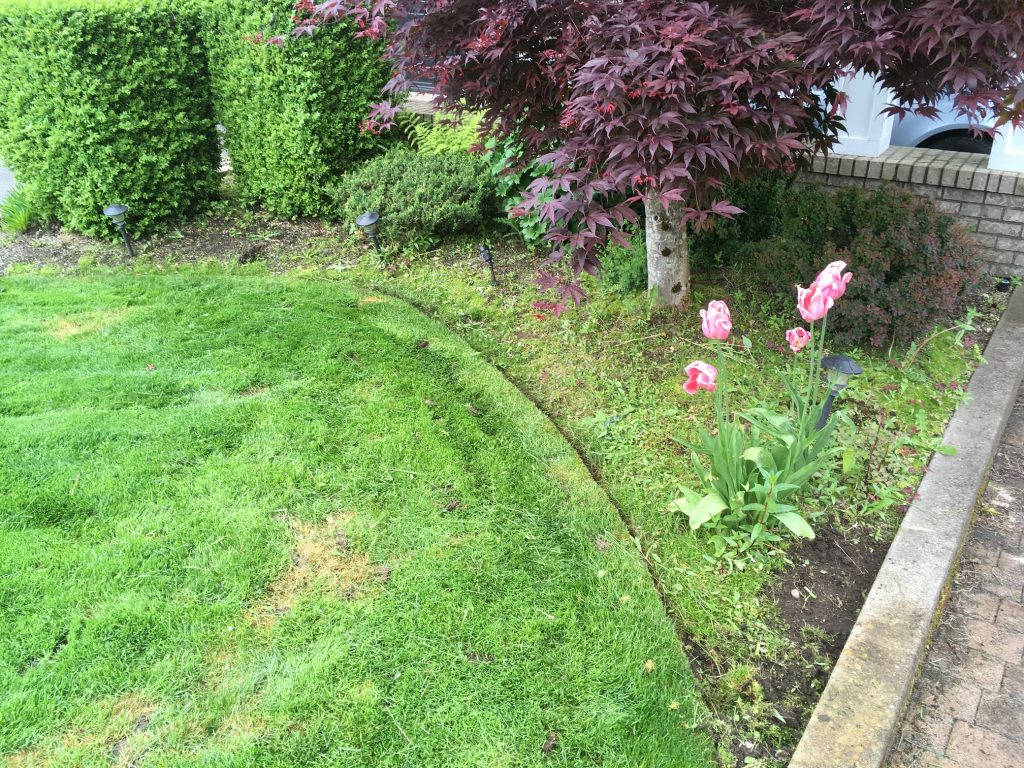
Competition

Lawns are known to outcompete young trees planted in lawns like this one. Less water and nutrient availability means less growth.

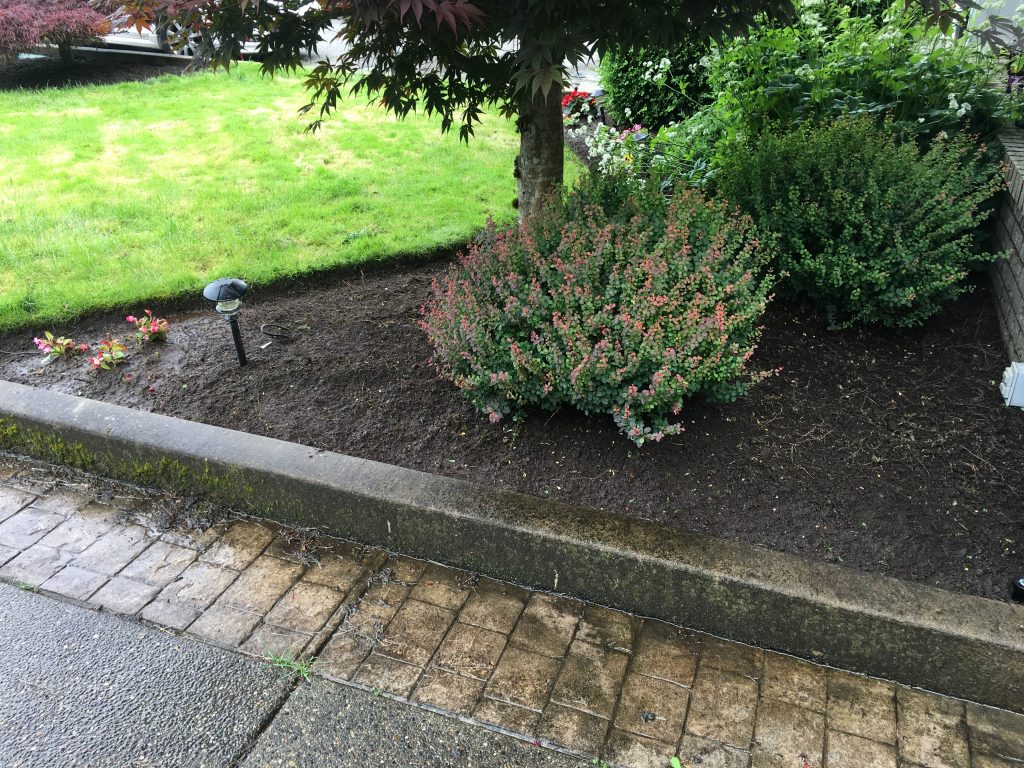
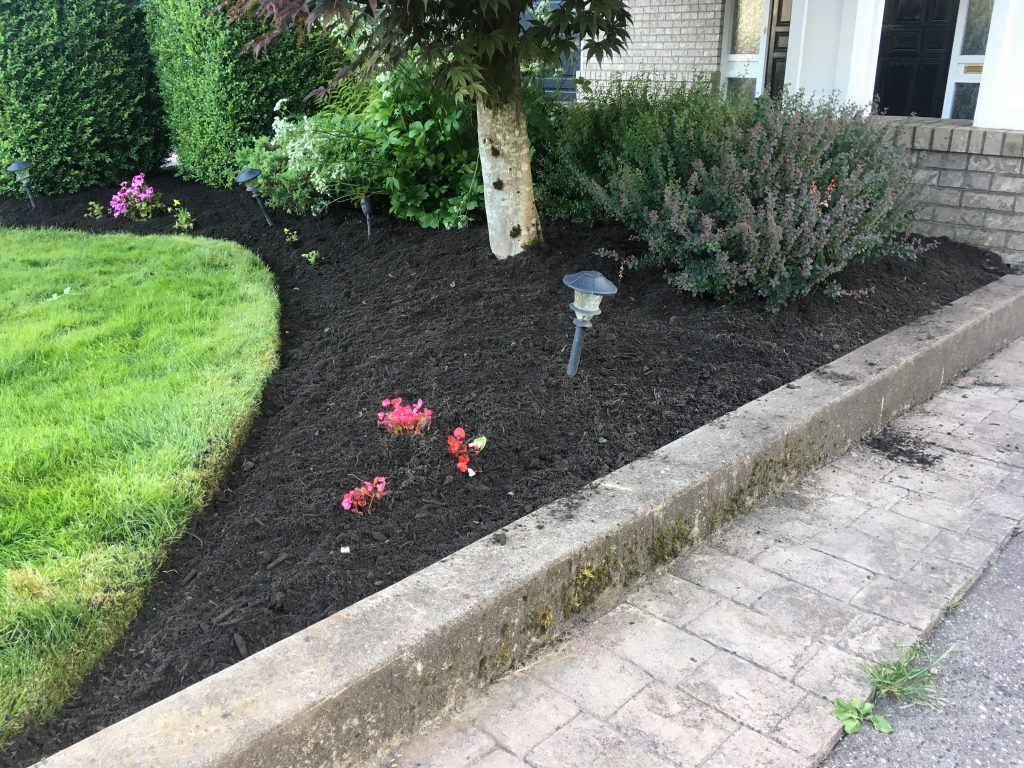
One way you can help the tree is by establishing a tree well. The grass will not be a factor inside the tree well so the fine surficial tree roots can collect nutrients; and the well itself collects water. Adding a layer of mulch would keep the root zone cool and weed-free.

Speaking of water, it’s not clear how much water this fig tree received after planting. New trees require extra water so they can get established.

The tree well also eliminates any potential tree versus lawncare machine collisions. I can’t say for sure from the photo if the tree sustained any injuries. But, I wouldn’t bet against it. By establishing a tree well, you create a nice buffer between the tree and machines.

When collisions do occur and the bark gets damaged, the tree must use up precious energy for repairs instead of growth. That means no figs for you.

Bamboo out

Nurseries install bamboo stakes so the tree doesn’t get damaged in transport or at the retail center. The bamboo stake should be removed at the time of planting. Or, if you’re really worried, a few months later. I think the Canadian landscape standards recommend stake removal after fourteen months.

Keeping stakes on means that the tree never forms any reaction wood in response to windy conditions. It makes the tree weak and reliant on the stakes.

Also, the cedar hedge behind the tree could be depriving the fig tree of the sunlight hours it needs to thrive.

Case closed?

Be very careful when planting trees in lawns. Always establish a tree well around the tree and mulch it. Remove any staking and never get too close to the tree with your lawn mower or edger.

The owner of the fig tree received a lot of feedback and I hope she makes some changes. Soon.

When beginners blow

By | landscape maintenance | No Comments

Basic mistakes

Landscape maintenance professionals are developed, not created overnight. It takes constant training and monitoring to make new workers into skilled machines.

Of course, without clear directions, mistakes will happen; they will happen even with clear directions. Once you’ve identified the mistakes, review them with your workers and pray they don’t repeat them.

In a recent blog post I covered poor blowing practices. Here we’ll take a look at two blowing mistakes that came to my attention recently.

Choked drains

This is a picture from the United States. The contractor’s new hire was asked to blow and he made a big pile of debris. But, instead of picking it up, he tried to make it disappear down a drain. That’s not a good plan.

While there’s some logic to it, like less labour and zero green waste to dump, this sort of work later leads to flooding in most places. I know, for example, that the City of Vancouver (British Columbia, Canada) hands out fines for this kind of work. As soon as the rains come, the streets flood and upset residents call the city to fix it.

There are no short-cuts here; you must blow the debris into a pile and remove it. It’s that easy. This was a good learning experience for a new employee.

Lawn or sidewalk?

What do you with your piles? Here we had a veteran part-time employee and he left the pile in the middle of the sidewalk. So, afterwards I gently reminded him that debris piles left on lawns are easier to pick up and don’t require additional blowing.

Always pick your words carefully, because veteran part-timers appreciate corrections less. But make the corrections immediately. Remember, foremen and supervisors have to act fairly but firmly!

The other problem is sidewalk access. As soon as you make a pile like this, the only wheelchair user in the complex emerges and you’ll be lucky if you don’t get the one-finger salute. I did see an elderly dog owner with a bad hip crossing the lawn.

Pro tips

When you’re doing a clean-up blow, always blow debris into piles and pick them up. Debris doesn’t belong in drains or on the street.

Blowing your piles onto lawns makes pick-up easier, doesn’t require re-blow and it doesn’t create sidewalk obstruction.

Train your workers well! And homeowners should adopt the same strategies.

Cheapest fix for European chafer beetle damaged lawns

By | Lawn Care | No Comments

Here to stay

The European chafer beetle is here to stay so let’s not despair. You can easily fix your damaged lawn with some soil and seed. Now, I know some homeowners get tired of this but there are new products coming online to help them fight against this pest. Watch for my future blog posts.

Study case

When the owner of this lawn first approached me in late fall, I told him to hold on until spring so we could bring in soil and seed. In spring the seed would have the required moisture and temperature levels to take. I couldn’t do much in late fall.

The front half of the lawn was in bad shape. I didn’t have to dig too much to see European chafer grubs. Luckily, the lawn area is small so the cheapest fix with some soil and seed would be fairly easy.

The client wasn’t just worried about his lawn. What would the neighbors say about his lawn when the whole neighborhood was lush green? With a shiny white Porsche parked in his garage, I knew this client was used to getting results.

Spring

New soil and seed.

The cheapest fix is also extremely easy. Bring in good, weed-free soil. I like lawn and garden mix which costs roughly C$30 per yard. Use good commercial seed which germinates in 7-10 days.

Apply the seed and use a rolling pin to press it into the soil. You can also step on it after raking it over lightly.

Water your lawn gently so you don’t dislodge the new seed. That’s it. Some soil, good seed, water and a bit of labor. What’s there to stress about?

Much better in summer 2020.

Baby it!

The lawn looked great in summer and we gave it summer fertilizer (22-2-22). So, when you get your lawn back, take better care of it. Spring, summer and fall fertilizer helps. So does proper watering.

Every time this client calls me over to cut his lawn, his frugal, stay-at-home mother beats me to it. I think she cuts it a bit too short but all I can do is mention it.

So, let’s review. Don’t panic when your beautiful lawn looks awful overnight. Bring in some good quality, weed-free soil and good commercial seed.

Once you get your lawn back, water it properly and don’t cut it too short. Apply fertilizer seasonally.

Weeding 101 with Red Seal Vas

By | gardening, weeds | No Comments

Basics you must know

Proper weeding technique comes up a lot as new workers come on board. In your own residential garden, there is very little pressure. You can weed when and how you like. But in commercial settings, weeding is just like any other task; it has to get done quickly and efficiently.

I’m creating yet another blog post on weeding because I’m still seeing workers sitting on their butts, hand-picking weeds while listening to their favorite podcasts. It’s comfortable but it’s terribly slow.

Do it like Vas

Here’s how you do it. Stay on your feet as much as possible and always use tools. It could be a cultivator or, if you must get on your knees, a hand tool. I consider hand picking tiny weeds a form of punishment. When I do it my fingers hurt and I know I’m NOT getting the weed roots out. It looks OK for a day and then the weeds come right back because you failed to cultivate the bed.

Exceptions

There are exceptions, of course. One involves giant trophy weeds that were obviously missed for a while. Those we hand pick because it’s easy. Just remember to train your people not to tolerate large weeds. It looks awful and reflects badly on your service.

The second exception is weeds inside groundcover where tools can’t really enter without damaging the groundcover. Recall that groundcover does what it says, it covers the ground and keeps weeds away. When you find a few sticking out, pick them out.

Stuck in groundcover, you must hand pick these weeds.

Obviously, hand pick trophy weeds.

Helping Pierre

My client Pierre (his real name) is funny because he calls his weeds “herbs”. He’s at that stage where paying me to weed makes more sense than doing it himself. His shiny black Mercedes in the driveway is a hint.

Pro tip:

Armed with this blog post, you can actually make good extra coin for weeding people’s gardens. Nobody likes to weed. I will do it anytime because seeing my kids fed gives me enormous pleasure.

His front bed was weedy but it was hardly a disaster. His mulch is settling now and decomposing; plus, wind and birds bring in weed seeds all the time. I probably blow some seeds his way when I maintain his neighbor’s place directly above.

I used a four-prong cultivator from RONA because the weeds were easy to uproot in mulch. You can use the sharper Dutch hoe for stubborn masses of weeds. Run the cultivator through a section and collect the weeds into a bucket or tarp. That’s it. Repeat this until you cover the entire front. I charged Pierre the low sum of C$60 for 70 minutes of labor. That will buy a few apps.

The bonus? Using a cultivator leaves the bed fluffy and fresh looking. That’s something your hand-picking colleagues will never accomplish. A few weeks later, only a few weeds are showing and the bed looks good. The dry weather also helps.

A few weeks later, this cultivated and weeded front still looks good. I only found a few weeds and I won’t let them get far.

Weed like a pro

Let’s review. When weeding, stay on your feet and use tools. Cultivators, rakes and buckets are best, plus small hand tools. Uproot the weeds and collect them. Hand picking should be left for giant trophy weeds.

How blower maniacs start wars

By | landscape maintenance, Landscaping Equipment | No Comments

Don’t start wars

Not too long ago, I walked home to my condo complex on a windy day and a blower maniac stopped me dead in my tracks. The dude emerged from his complex across the street blowing debris into the middle of the street. Once there, the mess was at the mercy of the wind. Some of it crossed over to my complex and some of it went back. Back to where it should have been blown into a pile and collected. The way all good neighbors do it.

I waited and I waited, the dude went back in, sat down and cracked open a beer now that his work was done. Since I have a rule about not picking fights at the end of the day, I went home shaking my head at the amateurish work I had just witnessed.

It just so happens that our company maintains my complex so I instructed our crew, like any good supervisor would, to make some blower “mistakes” on their next visit.

It happens a lot

This kind of poor clean-up blowing happens a lot. A few weeks later I was working at my commercial sites on a Saturday morning. When I looked up from my pruning, I saw another blower maniac. This dude was in the middle of the road without a safety vest, which is extremely unsafe. His blower was hanging from one shoulder, as if he was in a rush. Worse still, he was blowing debris towards my site with amazing resolve. Lucky for him, I was far away and busy. I’m also not in the habit of picking fights. I take numbers and bring my blower over later.

I’m absolutely certain this is the same geek who blows leafy debris onto my clean sites in fall.

Work like a professional

There is no excuse for blowing debris into the road, making it someone else’s problem. It’s no joke. Online I read about a sad case from the USA where a motorcyclist was killed after crashing on grass clippings blown into the road.

Always blow debris into piles, collect it and dispose of it with your green waste. The only time you can tolerate some debris in the road is on super windy days.

Blow along your curbs without stepping too far into the road and definitely wear a high-visibility vest. Put the blower on both shoulders the way the manufacturer intended it to be used.

Always be a good neighbor. I know where you work.

How to quickly upgrade tired beds

By | landscape maintenance, weeds | No Comments

The problem

This same scenario replays itself over and over: I am on site to execute a simple lawn cut and the homeowner has questions, like what to do about his tired beds. Can I help? Of course I can! I love to help and solve people’s problems. It’s a simple two-step process which requires a bit of time and money.

The front beds were weedy and had so little soil in them they were showing landscape fabric. This made them extremely difficult to weed but with the right tools, it was a quick two-hour session.

Very few people enjoy garden weeding. This applies equally to homeowners and professional landscapers. But Red Seal Vas loves side-hustling and his kids often require food and new apps. I will weed for cash.

Weeds on top of landscape fabric.

Weed like a pro

Let’s get this straight: weeding is done with tools and on your feet, unless you’re picking huge trophy weeds. Huge weeds must be hand picked.

Normally I like to use a four prong cultivator to uproot weeds and then a rake to remove the green waste. I try to remove very little soil but I don’t always succeed. In this case, the homeowner’s landscape fabric made cultivation difficult so I used a Dutch hoe to slice the weeds off.

Now, what do you do once the beds are clean? The answer takes us to step two.

Nicely weeded.

Step two

In step two we had soil delivered from Meadows Landscape Supply in Pitt Meadows, BC. Two yards of lawn and garden soil mix delivered to the drive way. The soil will cost you roughly $30/yard, plus delivery. Warning: the delivery isn’t cheap.

I’m proud to report that my two yard estimate was dead on; and so was my installation time. Remember, I’m doing a side-hustle after hours, not a regular by the hour job, so I quoted a price for the install and banged it in 75 minutes.

The soil will settle but everything got covered in a few inches of fresh soil giving us an instant dark, sharp look. The plants will also appreciate it; and any future weeding should be easier. And the weeds will come back, eventually. Wind and animals import seeds all the time. But for now, any weeds I failed to uproot are buried under fresh soil and deprived of the light they need to thrive.

Fresh soil.

Easy upgrades

Don’t be afraid to upgrade your garden beds. All you need is some tools, time and a bit of cash. In this project, it took me two hours to weed the beds and 75 minutes to install the soil. And now when the homeowner comes home, he’s greeted by dark and fresh-looking beds. And I can afford to buy new apps for my teenagers.

On the simple beauty of lawn mulching

By | Lawn Care | No Comments

Simple pleasures

I know this photo doesn’t look like much. It’s a commercial site lawn with too many weeds in it but this photo makes me smile! Why? Because I remembered to mulch the lawn.

Since I don’t always get to mulch lawns it was nice to do it at this commercial site where I’m in charge. So, I locked the mower in its mulch position and started mowing.

Good or bad?

Now, I know that some lawn “experts” online disagree with the idea that leaving grass clippings in the lawn is free fertilizer. I’ve run into a few on sites like Quora.com and they gave me a lot of unsolicited-but always appreciated!- feedback.

Don’t worry about them. Leaving grass clippings in the lawn is good for your lawn.

It also makes mowing much easier because you don’t have to stop to empty your mower bag; and there aren’t any green waste disposal issues. That made me very happy on this early Saturday morning. I just mowed without stopping and I didn’t have to worry about tarp collection. Good progress makes me happy when I’m not working by the hour. The morning sun also helps.

Of course, dry conditions are best for mulching. Don’t do it in wet conditions because the grass will get clumpy and it will stick to your mower deck. It will also clump up on top of your lawn and ruin the neat look we are after.

Mulch on dry days when you barely even notice the clippings.

As we slowly exit July, our West Coast lawns are slowing down and, where there isn’t any irrigation, they may go dormant. So, this is a perfect time to try lawn mulching if your mower model allows for it. You’ll have more fun and your lawn will thank you.

Testing Sellstrom premium ear muffs

By | Reviews | No Comments

It’s loud out there

Landscapers are constantly exposed to noise from mowers and small engines so hearing protection is mandatory. All landscapers in British Columbia are required to wear hearing protection and, in the field, I insist on it. And yet, many times young dudes opt to keep in their headphones which just adds to the noise.

As I make my way through my 21st season in the field, I notice my hearing slipping ever so slightly. One hint is people telling me to stop yelling. So, hearing protection is a must for me. Of course, I have a problem on very busy days; I tend to leave my ear muffs on site or in someone’s truck. This is why I found myself at a safety store recently looking for new ear muffs.

Sellstrom

I had two choices: buy the usual 3M Peltor set for C$40 or the shiny orange Sellstrom pair in the $20 range. I tried the new Sellstrom 427 Premium Ear Muff just so I could answer this one burning question in this blog post.

Can you protect your hearing and save money at the same time?

Let’s see.

Features

I love the shiny orange color look of the Sellstrom ear muffs and how it matches my company uniform.

The headband is made with soft EVA foam and very comfortable.

By far the best feature is the “slim” design which makes the ear muffs comfortable and ultra-lightweight. I love that the unit folds! This makes it easy for me to throw into my work bag.

Nicely folded!

NRR

The Sellstrom 427 Premium Ear Muff has a Noise Reduction Rating (NRR) of 27 dB. So, does that help you when you operate a lawn mower (90 dB) for many hours?

This is the calculation you must perform. 27 dB – 7/2= 10. This means that your actual noise exposure while using a 90 dB lawn mower is 80 dB. That’s not great.

Conclusion

If you care about your hearing, don’t go cheap on ear protection. The Sellstrom 427 Premium Ear Muffs have a low dB rating of 27. The 3M Peltor set costs double but it has a rating of 101 dB. Spend the extra cash on a better set. I will switch back to Peltor as soon as I lose my Sellstrom set somewhere…..

Why botany rules!

By | Plants | No Comments

Botany can be super fun and I will prove it with this blog post. The star of this post is a structure called an involucre. The best definition I could find online is:

“a highly conspicuous bract or bract pair or ring of bracts at the base of an inflorescence.”

Don’t worry, it will makes sense right away. I have examples coming below.

Carpinus betulus

Carpinus betulus

This is a branch from a Hornbeam tree and right away you’ll notice the three-pronged involucre that partially covers the seeds at the base. That’s the point of involucres: they partially cover the seeds. Now, as for the leaves, they look like birch leaves so it explains the specific epithet “betulus”.

Carpinus betulus (Hornbeam) is an attractive landscape tree with good fall colours and its signature involucres give away its name.

Davidia involucrata

So, now after reading the headline above you should know what’s coming.

Ghost tree

The ghost tree (Davidia involucrata) has massive involucres, so conspicuous that they make the flowers, which are partially covered, look like ghosts. This is why it’s one of my favourite trees and why it populates my list of easy to identify trees.

Once you know it you will never forget it.

I took this picture inside a rooftop daycare centre in Vancouver so you can see that landscape architects have a good sense of humour. They planted these trees inside raised cement, bench-like boxes, which guarantees that the little kids must look up at the ghosts. I wonder what the kids think. Perhaps to them the flowers look like handkerchiefs, another common name for this tree.

Eventually, the bracts fall off and all you have left is a large nut.

Conclusion

An involucre refers to a bract or bracts that partially cover a flower. As a structure it makes the trees fun to observe and easy to identify. How many others do you know? Don’t forget to share with a comment and picture.

Deep edging faux pas

By | Edging, landscape maintenance | No Comments

Deep edging is an easy but labour-intensive landscape task. It gives our planted beds a nice definition and, if you read this blog regularly, you will know how to do it.

Deep edging 101

  1. Grab an edging shovel and drive it into your bed edge at ninety degrees. This will give you a nice sharp edge.
  2. The depth depends on conditions and your needs. Personally, I love deep, ankle-busting edges but it makes me extremely unpopular at work.
  3. If your edging generates grassy chunks, shake off the soil and discard the grass.
  4. The last step is cleaning up the chunks with a rake or cultivator so the bed surface is nice and smooth without visible chunks.

One exception

There are exceptions in life and in landscaping. I’m repeating myself a little bit but only because I ran into this one deep edging exception last week.

Pro tip: Training never really ends. Pay attention to all new workers.

Everything ran smoothly for hours until we hit a nicely mulched bed. This is where we have to disconnect the autopilot. The edging chunks landed on top of the mulch and now this blog post is called a deep edging faux pas.

It’s a mistake because the chunks mess up the nice, ordered look of the mulched bed. Instead, we have to do one of two things.

  1. Deep edge the bed but do not kick the soil up. Just leave it dislodged so we can manually remove it without messing up the bark mulch.
  2. Or you can rake the bark mulch away from the edge, deep edge, remove any excess soil and, lastly, rake the bark mulch back into its original place.

In this particular case, we didn’t do any major harm. I picked up the chunks and cultivated the bark mulch to incorporate any soil into the mulch. And the client will never know.

Conclusion

Deep-edging is an easy landscape task but be careful when you deep edge freshly mulched beds. You have to take a few extra steps to deep edge these areas.