Monthly Archives

April 2017

Coquitlam rose

By | Events, Species | No Comments

I love the idea of one city buying the naming rights to a rose variety. But having said that, I’m not really a great fan of roses. Their fragrances are intoxicating and I love the feel of their petals. But it’s unlikely you will ever see me joining a rose society. I personally prefer trees and forests; and wild plants. Roses with their prickles were always associated with some princess getting pricked and falling asleep for a hundred years. And yet, the idea of having my own rose variety is appealing.

Coquitlam rose

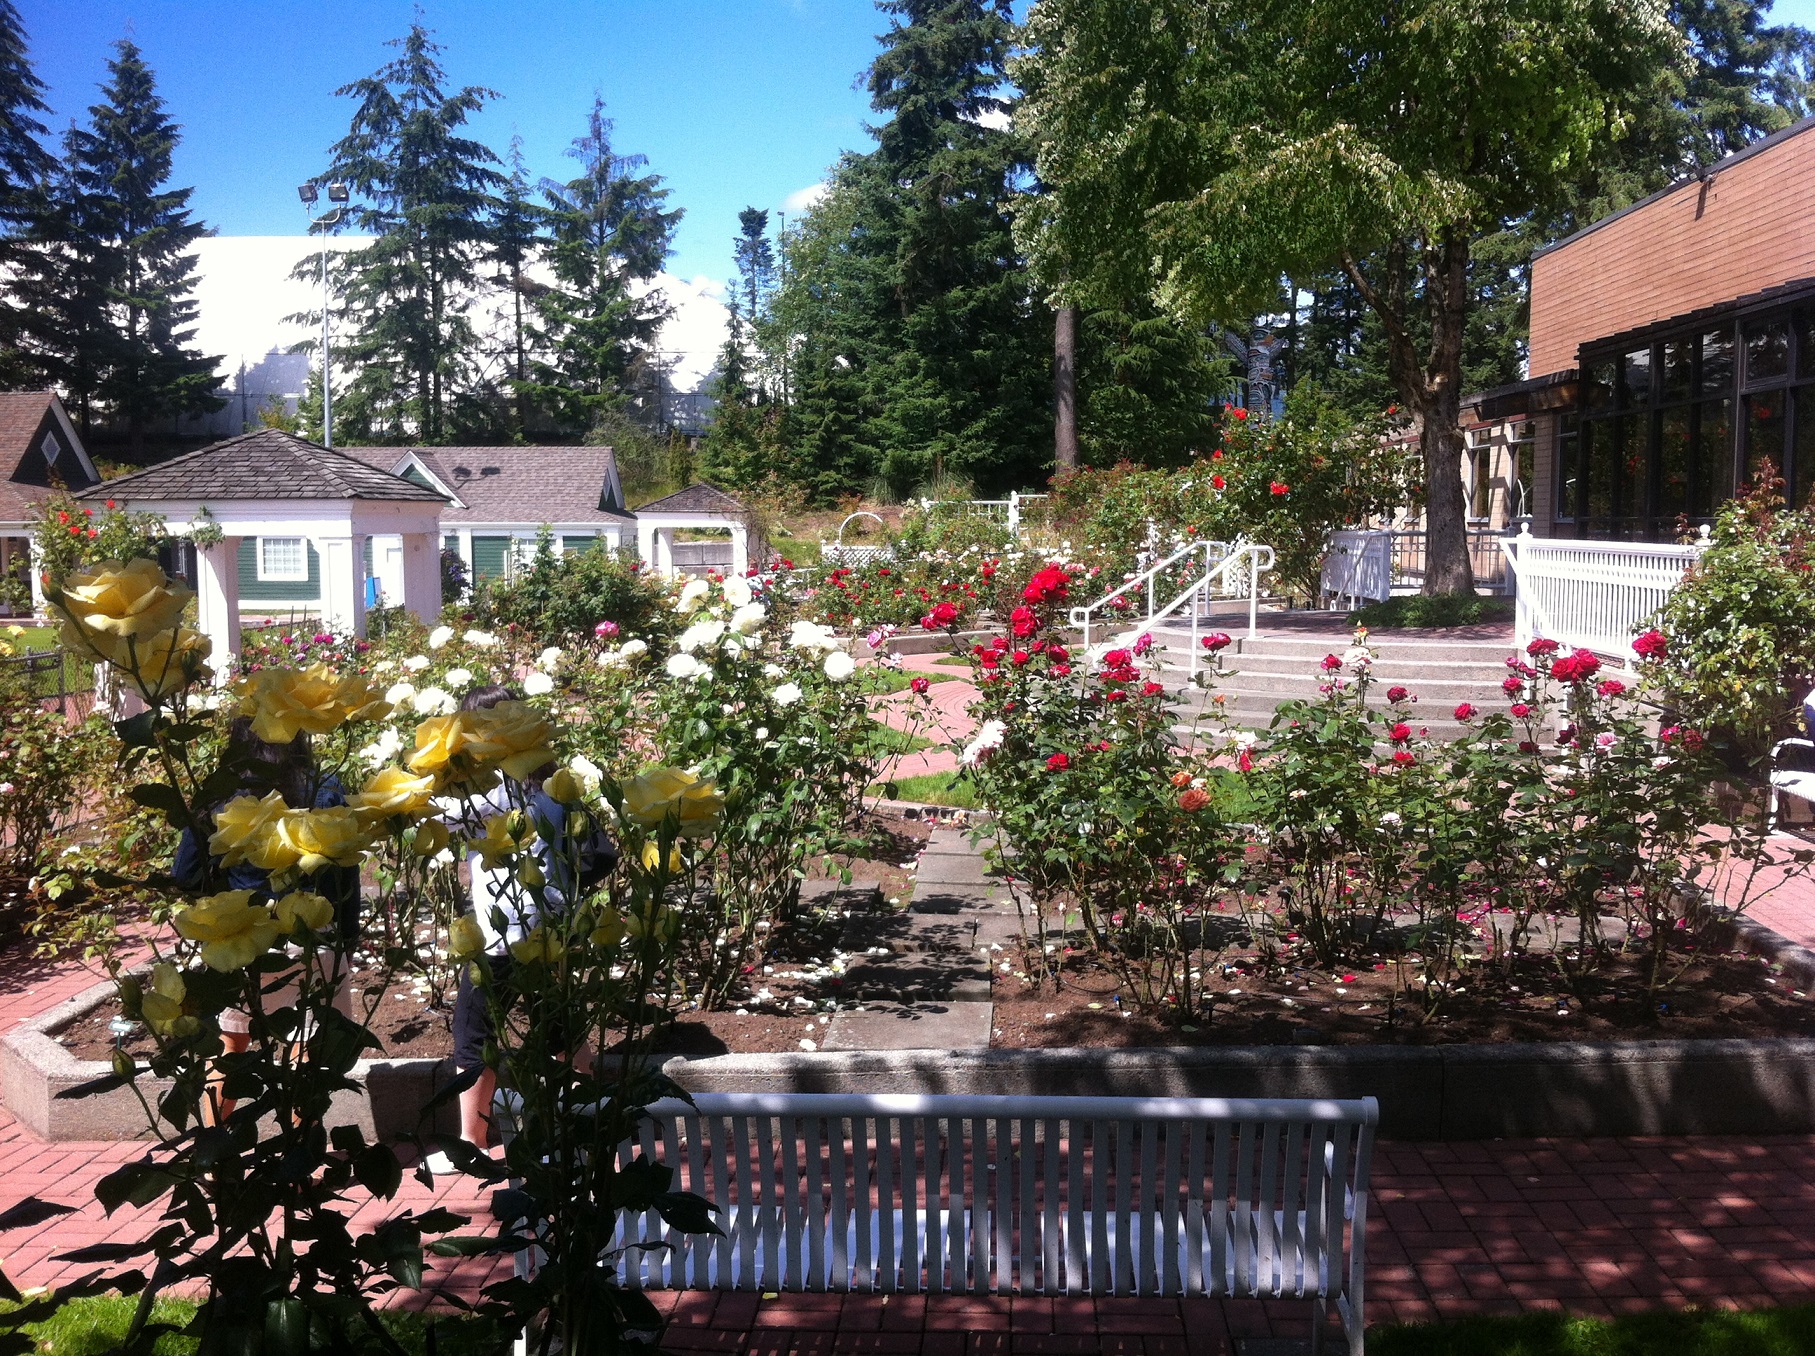
As a landscape blogger I had to be there for the official unveiling of the Coquitlam rose. It happened at the beautiful Centennial Rose Garden at the Dogwood Pavilion. Incidentally, I have good memories from the adjoining parking lot. I visited many farmer’s markets there; and I maintained the green spaces when I worked for the parks department there in 2014.

The rose garden is well worth the visit. If you are in the area definitely stop by.


IMG_5187b


Having elected to not return to the City of Coquitlam, I hung back until the officials cleared out so as to avoid any awkward moments. Then I took as many pictures of the new Coquitlam rose as I wanted. And I surveyed the bowling green next door for chafer damage since I got to witness nematode applications there the year before.
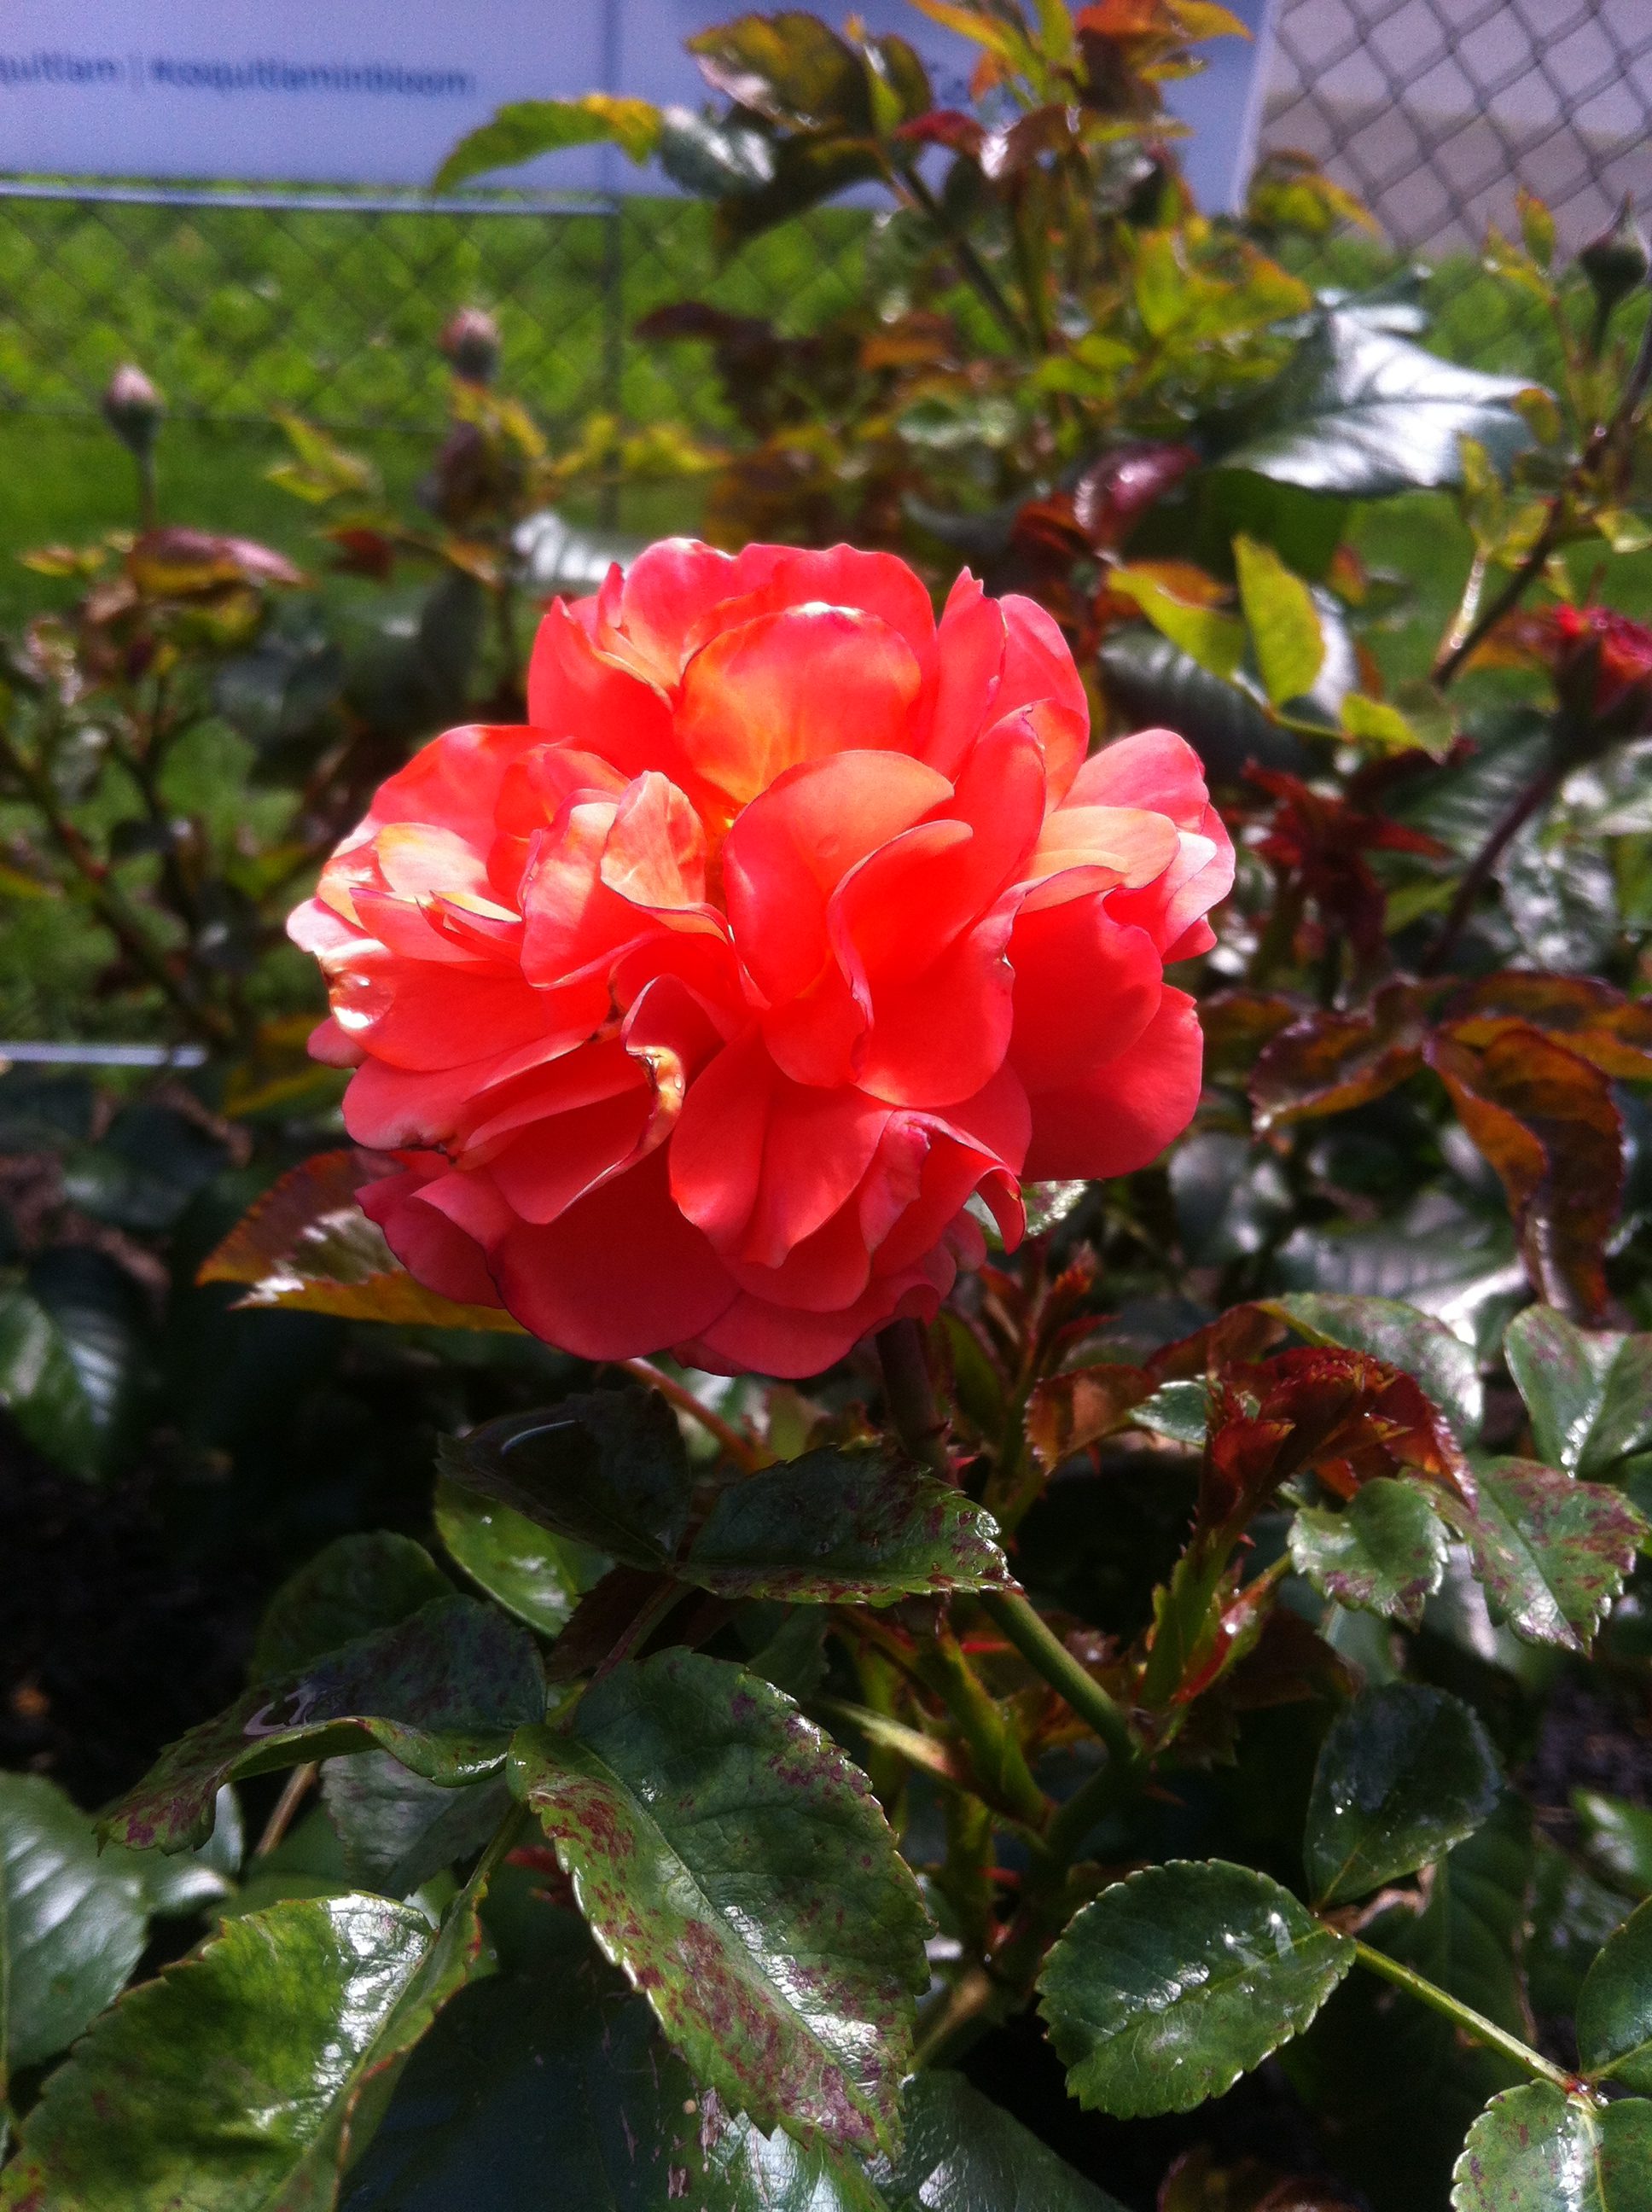
The rose

The Coquitlam rose is salmon-colored and locally bred. It’s hardy, disease resistant and long blooming. That’s a nice list. The official unveiling took place at the Centennial Rose Garden at the Dogwood Pavilion. The Coquitlam rose is also planted at city hall and at the Inspiration Garden.

You can watch a video on the Coquitlam rose by Jennifer Urbaniak who runs the fun activities in Coquitlam parks. Jennifer also sat the Red Seal challenge examination with me at Kwantlen Polytechnic University. Our fear of failure and embarrassment pushed us in the right direction. We both passed! She snagged a sweet full-time job and I became a landscape senior supervisor in the private sector. Both Red Seals win!

Go visit the Coquitlam rose in 2017 and see what you think.


IMG_5177


How to give your lawn a facelift with power rake and soil

By | Lawn Care, Strata Maintenance | 3 Comments

Yes, it’s finally spring on the West Coast, so why not give your lawn a facelift? Perhaps you have bare spots showing in your lawns. Let’s add a light layer of top soil and over seed it. Or there is too much thatch and moss in your lawn. In that case, we can bring out a power rake and comb out the offenders from your lawn.

With moisture and higher temperatures your lawn should perk up very soon.

I did some of this work last week so let’s recap the steps so you can do it for your own lawn. Or you can hire a good landscape company that will do it for you Properly.


Power raking 101

The power rake doesn’t look like much but it packs a punch, if you let it punch. The key issue is the height level of your tines. If you drop them low, the machine will rip up your lawn. So be ready for some bare brown spots that will need an application of good, weed-free top soil and over seeding.

If you set the machine high, you will just tickle your lawn. So experiment and adjust the height depending on the condition of your lawn.

The key number two is clean up time. Don’t underestimate your clean up times. If you hit your lawn hard, expect to rake up a lot of debris. Budget your time accordingly.

If your lawn is fine

If your lawn only suffers from some bare spots, then skip the power raking step and move on to top dressing. We need good quality top soil, most likely turf blend. Turf blend contains a higher percentage of sand. It should also come from a good source and be weed-free. There is nothing worse than saving a few dollars per yard only to introduce weeds into your landscape.


IMG_2840


The rule for top-dressing is to rake the soil in nicely so that your bare spots are covered but the rest of your grass isn’t smothered. Rake the soil nicely into your existing grass. It should still be visible.

Over seeding is also very easy. Just beware of wind. Apply seed carefully around bed edges so you don’t create a headache for later. Monitor your lawn for seed germination and re-apply as required. With some moisture and higher temperatures everything should be fine.


step 1 power rake

IMG_2829 (1)


step 2 rake up

IMG_2834


step 3 top dress with soil

IMG_2831 (1)


step 4 rake in the soil

IMG_2830 (1)


step 5 over seed

IMG_2843 (1)


Your lawn will thank you for your hard work!

Stihl LawnGrips Pro 6 boots: the landscape tool for your feet

By | Landscaping, Reviews | 4 Comments

After destroying my Stihl LawnGrip Pro shoes in the field, it was time to upgrade. I finally found some time to visit my favourite dealer, Tri-City Power Equipment in Coquitlam. I had a pair of the NEW Stihl LawnGrips Pro 6 boots put away. They are designed specifically for landscape professionals and they look good.


IMG_2865 (1)


First impressions

These boots feel more like hiking boots compared to the previous LawnGrips Pro shoes and the shoelaces feel much stronger. On the previous model the laces would snap at the worst possible moment or they would come undone.

The outsole is the same and I know from experience that it does offer great traction on fresh-cut or wet turf.

Stihl also added four reflective bars on the side for extra visibility.


Stihl notes

  • 3-D ring closure pairs for better fit and easy boot entry
  • moisture wicking 300g Dri Tec lining
  • patented Grip-N-Go outsole engineered for superior traction on fresh-cut or wet turf
  • cushioned polyurethane midsole for all-day comfort and support on the job
  • steel shank and composite diffusion plate provides protection and stability
  • multi-directional, angled cleats are designed to keep you from slipping
  • steel toe complies with ANSI and ASTM standards
  • CSA Green Patch certified
  • constructed with naturally water-repellant leather (use of waterproofing products recommended


Why Vas loves these shoes

  • They are made specifically for landscape professionals!
  • Comply with safety standards; steel toe boots are mandatory
  • The outsole really prevents slips on freshly-cut or wet grass; this is important when you are pushing a mower
  • Decent retails cost. At $129.95 retail it’s still a good deal compared to other work boots; and other boots aren’t designed specifically for landscape professionals. If you get to know your dealer, you won’t have to pay exact retail. So get to know your dealer.
  • Stihl has great products, from machines to clothes.


If your work boots are getting old and you work in landscaping, give these new boots a try.


IMG_2864 (1)


IMG_2867 (1)


(Disclaimer: I am not associated in any way with Stihl Canada or Tri-City Power Equipment. This review is my personal take on these shoes.)


Equipment rodeos

By | Events | No Comments

Equipment rodeos irritate me because deep down, I’m not a machine guy. I prefer working with living plant material. So when private companies and municipalities organize machine rodeos, I laugh and shake my head in private.

Training rodeos

Just today I ran into a rodeo report on social media. Totallandscapecare.com reports that various LandCare branches in the United States ran machine training rodeos. Basically, new and returning workers use machines to negotiate various obstacle courses. In one example, two workers with backpack blowers attempt to blow tennis balls into garbage bins.

It’s a fun way to train new workers. Allegedly. I would disagree. I prefer to train new workers on actual work sites where I can guide them through actual work situations. Then, I observe them and use them to create new blog posts. It’s still fun but mostly for me. The workers get the pleasure of my company.

Real training

Instead of machine rodeos which create noise and air pollution we have come up with a better way to train new workers. Starting this season, we will take new guys to commercial sites and let them practice under my watchful guidance. These are real sites with real clients. The only difference is that minor mistakes will not be as critical as they would be on large strata sites. It’s a win, win situation because the workers get training and extra paid weekend shifts. When we send them out to our foremen they should be ready for lawn care and bedwork. Easy!

Ultimate rodeo

I experienced my first equipment rodeo when I worked at the City of Coquitlam. Several equipment operators were diverted from field work to create a machine “dance” complete with a music soundtrack. Since the city was competing in the Communities in Bloom competition, the idea was to take the judges and let them take in a unique equipment rodeo at the end of the tour.

And unique it was. With music blaring, several tractors and front loaders filed out onto the baseball field. There they danced and raised their buckets, nicely synchronized with the music. When a concerned tax payer voiced his disapproval of the spectacle I quietly laughed. None of the dozens of workers witnessing the rodeo would dare speak up. After all, it was the idea of a high-ranking manager. I can write this post now because I am no longer employed by the City of Coquitlam.

At the time I thought it was a crazy idea. I think so still. We all enjoyed the easy afternoon because once the rodeo was over, nothing much happened.

Happy ending

In the end, Coquitlam won! Unlike the equipment rodeo, the Communities in Bloom Canada competition is a brilliant idea. Judges tour cities and evaluate them on several categories like cleanliness and urban forestry. Competing cities are forced to examine and improve their urban environment. I just wish equipment rodeos would go away.

Tree planting with West Coast landscape professional Vas

By | Arborist Insights, Trees | No Comments

I love planting trees and shrubs. The world can always use more trees and shrubs. But don’t dismiss tree planting as easy. It has to be done right. The International Society of Arboriculture (ISA) sells a book called “The science of tree planting.” Case closed.

Our mission today was to plant trees on a wild bank to provide residents with a screen. As the trees mature they should obscure the power station visible in the distance.

We planted two tree species (Acer rubrum and Thuja plicata) and one shrub (Pieris japonica.)


Step 1 At the nursery

Always be nice to the workers at the nursery. You don’t want them loading your precious plants like pigs. My job was to count the plants and anchor them in the back of the truck. The key is to always handle your trees by the root ball not by the stem. Taking liberties with the stems could damage the tree.


IMG_2055n

I love tree nurseries! You can improve your plant ID skills and off-road in company trucks. Handle your trees with care.


Step 2 Digging

We predetermined our hole locations the day before. The digging was awful because of the wildness of the bank. The bank  was covered with woody debris, ivy and bramble. For this reason I used a tarp for “parking” soil from the hole. I used a shovel to measure the size of the root ball. I also had to adjust for the string and burlap wrapped around the stem. The root flare is actually lower than where the string and burlap meet.


IMG_2078n

Thuja plicata with wire cage, string and burlap. Watch your back, this required heavy lifting.


Step 3 Placing the tree

Once the hole was ready, we carefully placed the tree in the hole. Remember to handle the trees by the root ball NOT by the stem. Once the placement is correct, it’s time to anchor the tree by backfilling the hole to about half way. Another key is to backfill your planting holes with the same material you dug up and placed on your tarp. Some people are tempted to backfill their holes with beautiful new soil but it doesn’t work. Water finds it much easier to enter your planting hole than the surrounding soil and your hole will become waterlogged. This will turn your new tree into a joystick and it will crash down eventually. Use the original material from your digging.


IMG_2064n

Cut off string and burlap to the top of the cage. Bend wire edges back or cut them out.


Step 4 Removing string, burlap and wire

Once our tree was anchored in the hole, we cut and removed the string. The top of the wire cage is either cut away or bent back into the hole. The top third of the burlap is also removed. Use scissors or a knife.

Now you’re ready to complete backfilling your hole. Always make sure soil doesn’t go over the root flare. The root flare should be visible. Mounding soil over your stem leads to problems.

Cut all strings on the Thuja plicata stems to free the branches.


IMG_2066n

Partially backfilled for anchoring; note removed burlap and string, wire bent back and tree root flare located.


Step 5 Final touches

Remove all flagging and name tags. Top dress with aged mulch or soil amender. Also take pictures for your files. Monitor your trees just in case if staking is required. The Acer rubrums are tall and if they move, they will get staked. Just remember to remove the stakes after one season. Leaving them on longer prevents the tree from forming reaction wood.

With April rains expected to continue, no watering was required but it is a consideration if you’re planting during a warm, sunny spell.

Pick up any garbage and do a courtesy blow of your work area.


IMG_2070n

All done! Note power station in the background.


IMG_2073n

Two Acer rubrum trees. Note top-dressed tree wells. No staking required but landscape maintenance crews will monitor.


I’m curious to see how many seasons it will take for the trees to obliterate the view of the power station.


Native Indian plum

By | Species | No Comments

The Indian plum shrub, Oemleria cerasiformis, is the first native Pacific Northwest deciduous shrub to flower in spring. I keep seeing it on our strata sites, especially on wild forested edges. Yesterday, while I was preparing a new bed for planting, a resident asked me about it. And I had no idea what it was called. I knew it was a native but the botanical name takes some getting used to.

So I finally took the time to look it up and give it its own blog post. After the harsh winter we have just experienced, it’s very nice to see the white creamy flowers and green leaves. And I will be able to answer people’s questions about it.

Oemleria cerasiformis is medium to tall shrub, about 1-5m tall, with clumped arching stems which are pith chambered.

The white flowers are in loose drooping clusters. Male and female flowers are found on separate shrubs so insects are required for pollination. As the season progresses, we get orange fruit. The fleshy drupes look like plums as they ripen and turn blue. The plums are bean shaped, about 1 cm long, and birds love them. From my reading I understand that the plums don’t last very long. Birds really love them.

Leaves are alternate, deciduous and lanceolate. Crushed, they smell like cucumbers.

The Indian plum shrub is commonly associated with Cornus sericea, Sambucus racemosa and Symphoricarpos albus.


IMG_2047n

White flowers and green foliage on my dirty hand; spring has arrived!


Oemleria_cerasiformis_jko100108242042207

Early summer fruit; orange (Photo by permission from nwplants.com)


oem_cer_jko_indian_plum_female060707small1

Ripe fruits look like plums and birds love them! (Photo by permission from nwplants.com)


The Indian plum shrub is very noticeable as I write this in mid-April. It deserves to be planted in people’s gardens. The creamy white flowers are great and birds love this shrub.

Now I just have to practice the botanical name. Oemleria cerasiformis.

Tree well mulch mountains disaster

By | Arborist Insights, landscape maintenance | No Comments

Mulch mountains in tree circles is a disaster that just won’t go away. I had written a short blog post about this in 2015. Fast forward to February 8, 2017. Sitting in on a lecture by Dr. Bruce Fraedrich of Bartlett Tree Experts, I was reminded of this issue again.

According to Dr. Fraedrich, he has been talking about this issue for over 25 years! The issue isn’t going away. In his presentation he showed one tree well mulch mountain with his child; the other photo was with his grandchild. Point made.

Why mulch?

There are many benefits to putting mulch into tree wells. If it’s installed properly. Four key benefits are listed below.

  1. Water conservation.
  2. Weed reduction, assuming we install the mulch at a decent depth. Going light on mulch can actually encourage weeds to grow.
  3. Improved soil quality.
  4. Enhanced plant growth.


The key issue


IMG_5742ee


The installation workers, presumably landscapers, piled the mulch way over the root flare. It looks pretty. But it’s bad for the tree. Why?

Piling mulch against the trunk of trees and shrubs creates a dark, moist, low oxygen environment to which above-ground tissues are not adapted. See the picture below. Fungal diseases require precisely this kind of moist environment to grow and reproduce; and to eventually enter the plant.

Opportunistic pests are also more likely to invade a plant whose bark is wet due to excessive mulching.

It is also possible to get adventitious roots developing in the moist zone. These roots grow and circle the tree potentially causing girdling.


IMG_574ee0


Solutions

Extend the existing tree circle out farther, if possible. Then remove all excess mulch from the trunk and use it in the extended circle zone. If the circle can not be enlarged then still remove the excess mulch and use it elsewhere.

The look we want is donut-shaped. This will protect  the soil environment and above-ground tissues.

Include this work in your regular landscape maintenance. Periodically check your tree wells and remove any excess mulch from tree trunks. Train all staff.

Coordinate with installers. Sometimes they are young labourers with strict time guidelines. Sometimes companies send people to blow mulch in. They need good directions and supervision.