Monthly Archives

April 2020

Why botany rules!

By | Plants | No Comments

Botany can be super fun and I will prove it with this blog post. The star of this post is a structure called an involucre. The best definition I could find online is:

“a highly conspicuous bract or bract pair or ring of bracts at the base of an inflorescence.”

Don’t worry, it will makes sense right away. I have examples coming below.

Carpinus betulus

Carpinus betulus

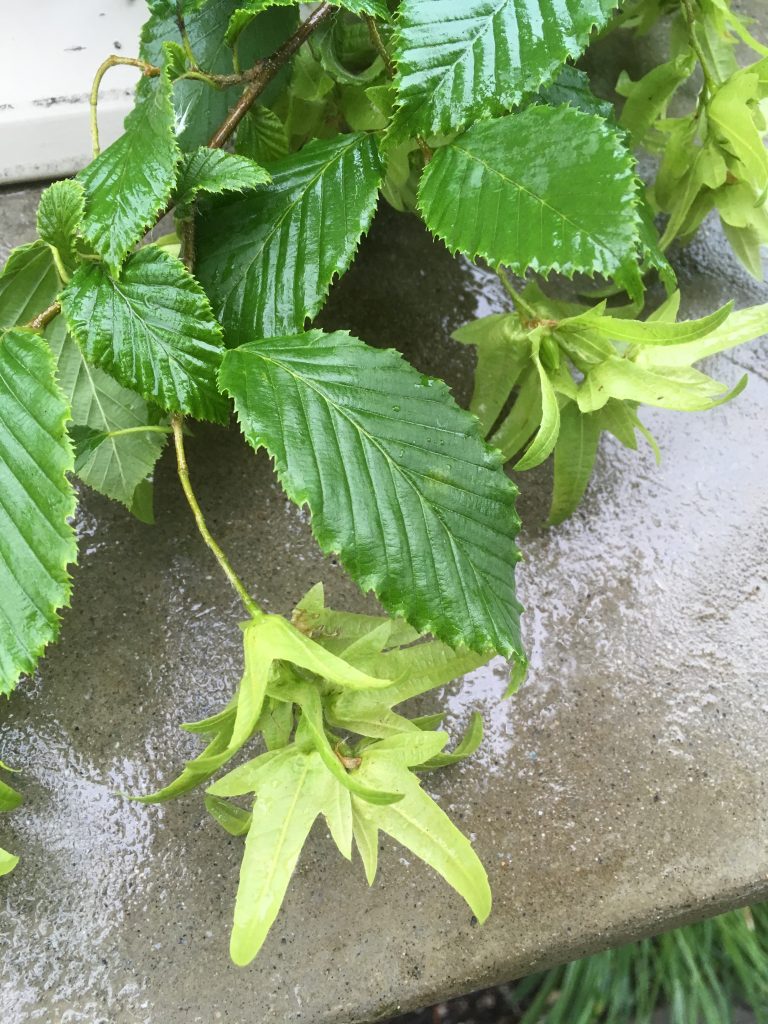
This is a branch from a Hornbeam tree and right away you’ll notice the three-pronged involucre that partially covers the seeds at the base. That’s the point of involucres: they partially cover the seeds. Now, as for the leaves, they look like birch leaves so it explains the specific epithet “betulus”.

Carpinus betulus (Hornbeam) is an attractive landscape tree with good fall colours and its signature involucres give away its name.

Davidia involucrata

So, now after reading the headline above you should know what’s coming.

Ghost tree

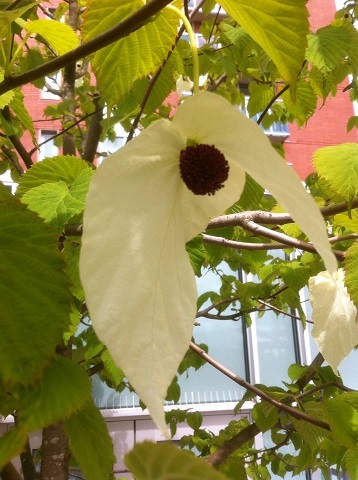
The ghost tree (Davidia involucrata) has massive involucres, so conspicuous that they make the flowers, which are partially covered, look like ghosts. This is why it’s one of my favourite trees and why it populates my list of easy to identify trees.

Once you know it you will never forget it.

I took this picture inside a rooftop daycare centre in Vancouver so you can see that landscape architects have a good sense of humour. They planted these trees inside raised cement, bench-like boxes, which guarantees that the little kids must look up at the ghosts. I wonder what the kids think. Perhaps to them the flowers look like handkerchiefs, another common name for this tree.

Eventually, the bracts fall off and all you have left is a large nut.

Conclusion

An involucre refers to a bract or bracts that partially cover a flower. As a structure it makes the trees fun to observe and easy to identify. How many others do you know? Don’t forget to share with a comment and picture.

Deep edging faux pas

By | Edging, landscape maintenance | No Comments

Deep edging is an easy but labour-intensive landscape task. It gives our planted beds a nice definition and, if you read this blog regularly, you will know how to do it.

Deep edging 101

  1. Grab an edging shovel and drive it into your bed edge at ninety degrees. This will give you a nice sharp edge.
  2. The depth depends on conditions and your needs. Personally, I love deep, ankle-busting edges but it makes me extremely unpopular at work.
  3. If your edging generates grassy chunks, shake off the soil and discard the grass.
  4. The last step is cleaning up the chunks with a rake or cultivator so the bed surface is nice and smooth without visible chunks.

One exception

There are exceptions in life and in landscaping. I’m repeating myself a little bit but only because I ran into this one deep edging exception last week.

Pro tip: Training never really ends. Pay attention to all new workers.

Everything ran smoothly for hours until we hit a nicely mulched bed. This is where we have to disconnect the autopilot. The edging chunks landed on top of the mulch and now this blog post is called a deep edging faux pas.

It’s a mistake because the chunks mess up the nice, ordered look of the mulched bed. Instead, we have to do one of two things.

  1. Deep edge the bed but do not kick the soil up. Just leave it dislodged so we can manually remove it without messing up the bark mulch.
  2. Or you can rake the bark mulch away from the edge, deep edge, remove any excess soil and, lastly, rake the bark mulch back into its original place.

In this particular case, we didn’t do any major harm. I picked up the chunks and cultivated the bark mulch to incorporate any soil into the mulch. And the client will never know.

Conclusion

Deep-edging is an easy landscape task but be careful when you deep edge freshly mulched beds. You have to take a few extra steps to deep edge these areas.

Colour from a COVID19 spring

By | Company News | No Comments

Spring colour

Spring 2020 is a bit strange because of the coronavirus but we can still enjoy the new spring colours as they emerge. Some of the plants are also super fragrant, like Skimmia and Daphne.

  1. Doronicums are very happy, simple flowers, I first encountered when I worked for a municipality in 2014. Mass-planted they look stunning in the early season landscape. Why I still don’t have any on my patio is a mystery. Full sun.
  2. Camellias are landscape favourites and it’s easy to see why. The flowers are beautiful and the foliage glossy.
  3. Skimmias are super fragrant at the moment. I noticed the fragrance before I noticed the source of it. Then, I stole a bit of company time to enjoy the scent until the resident behind the window started wondering about me.
  4. Oxalis is an all-star for shady corners, especially when mass-planted as it was here, correctly, under Rhododendrons. In small clumps it could be mistaken for a weed.
  5. Salmonberry (Rubus spectabilis) is a West Coast native shrubs. The flowers eventually turn into edible berries. Local bears love them but I had to talk my little kids into trying them.
  6. Daphne is also very fragrant but I had to get closer to catch the pleasant scent. Trust me, get closer.
  7. Viburnum tinus is a nice shrub but it’s often attacked by the beetle Pyrrhalta viburni.
  8. Plum blossoms are just as beautiful as cherries and they remind me of my time in Japan. Here the tree brightens up the entrance.

Conclusion

What plants are you enjoying this spring? COVID19 may be dominating the news and affecting our lives but it’s important to stop and enjoy the colour in our gardens. For me it’s a dose of the familiar, in a super strange season. The odd fragrant plant also helps. Enjoy the spring!

Tree staking 101

By | Arborist Insights, Landscaping, Trees | 2 Comments

Tree staking seemed really easy to understand and pull-off. Ever since I started landscaping in 2000, I’ve used two or three stakes with good quality arbortie to stake newly planted trees.

But now, thanks to my landscape professional friends in the United States, I know that there is more to staking than meets the eye. And I love the idea of learning new techniques even twenty seasons later.

Pro tip: Always be open to new ideas and techniques. There’s so much to learn.

Regular staking

I have had lots of practice with tree staking because I have twenty seasons in the field; and because I went through the Landscape Industry Certified program. There, one of the practical stations was tree planting and staking. Let’s ignore tree planting for now. I will cover it in a separate blog.

Depending on the specifications, I had to drive the tree stakes just outside of the root ball or inside. To pull it off, you’ll need a metal stake pounder and ear protection.

First, the pounder goes on the top of the stake and then you stand it up, line it up and drive it in. As the metal pounder hits the stake, it gets very loud quickly. That’s why my failure to wear ear protection during testing cost me points.

Incredibly, I would need three attempts to pass this practical station.

Second, you secure good quality arbor tie to the stakes and loop it around the tree. It should be just tight enough; not too tight and not too loose.

Pro tip: Tree stakes should only stay on for a maximum of 14 months. Beyond that the tree will get “lazy”; it won’t form the reaction wood it needs to grow strong and withstand future wind storms.

One example of standard tree stakes.

Staples

Stapled pine tree in Florida.

This was news to me. Instead of above-ground stakes this pine in Florida is stapled with stakes. First, four stakes are driven into the root ball and then both pairs are connected together.

Obviously, the wood size would increase with a bigger root ball. Here it’s a 2×2″.

Advantages

  • The stakes are mostly hidden so they don’t stick out like regular wooden stakes, which many people consider unsightly.
  • The tree develops reaction wood as it moves in response to wind events. In this example, the pine survived a recent hurricane storm that hit Florida.
  • There’s no need to go back and remove the stakes.
  • Nobody will forget to remove the stakes.
  • There is zero chance of girdling because there is no arbor tie connecting branches to the stakes.

Conclusion

Keep your eyes and mind open to new ideas and techniques. I was blown away by the stapling technique even though it’s not new. It was new to me and I would love to try it one day.

A great new Honda push mower for 2020

By | machines, Reviews | No Comments

I love Honda commercial lawn mowers because the engines are great and the mowers stand up to a lot of beating during the season. And now Honda came out with a great new push mower model: HRN 216.

The new HRN 216

Recently I got to use the new Honda HRN 216 push mower as our cutting season started. And just barely, with the COVID19 pandemic raging in British Columbia and everywhere else.

Honda put a new powerful GCV170 engine into this new mower and I’m sure it will do well all season with heavy weekly use.

Improvements

There are some important improvements to note. One, this new mower produces finer clippings which means that more clippings fit into the bag. This results in less time spent emptying the mower bag and more time mowing. I suspect this will make all landscape company owners very happy.

And two, because the mower produces finer clippings, they become better mulch. And finer clippings means that fewer clumps are created and grass distribution is better.

Remember, mulching grass clippings is free fertilizer and I recommend it. One problem with mulching has always been the clumpy look on top of the lawn and this new beast should eliminate the problem. (I have yet to try the mulching function.)

The green mulching lever is easy to use and doesn’t require any tools.

Three, Honda shows clogging tests on their website and promises superior clogging toughness. Maybe I will get to test it in the field, especially on wet days.

Weak point

While Honda produces great engines, one problem (not exclusive to Honda mowers) has been the wheel adjustment levers. As the mowers see heavy use, the wheel adjusters become loose or break right off.

The new HRN 216 has dual-lever height adjustments which means that you only have to worry about two levers, not four.

Conclusion

In conclusion, I can’t wait to test this new Honda mower more extensively in the field. I want to see the finer clippings and less clogging. Assuming Honda delivers on its promises, this new mower will be a beast.

Keep your blades sharp and have a great season.

Tri-City Power Equipment

Phone: (604)520-3000 

Fax: (604)524-1777

98 Fawcett Road, Coquitlam BC 

V3K 6V5