Monthly Archives

July 2018

Hydrangea horror shows to avoid

By | Pruning, Species | No Comments

Hydrangeas are beautiful workhorses in our West Coast landscapes. Healthy Hydrangeas reward us with lots of beautiful flowers, many of them in big mop heads. I’m so used to seeing them I don’t even take pictures of them every season.

Lately, I’ve been running into Hydrangea horror shows and so I thought this whole thing begged for its own blog post.


IMG_8165

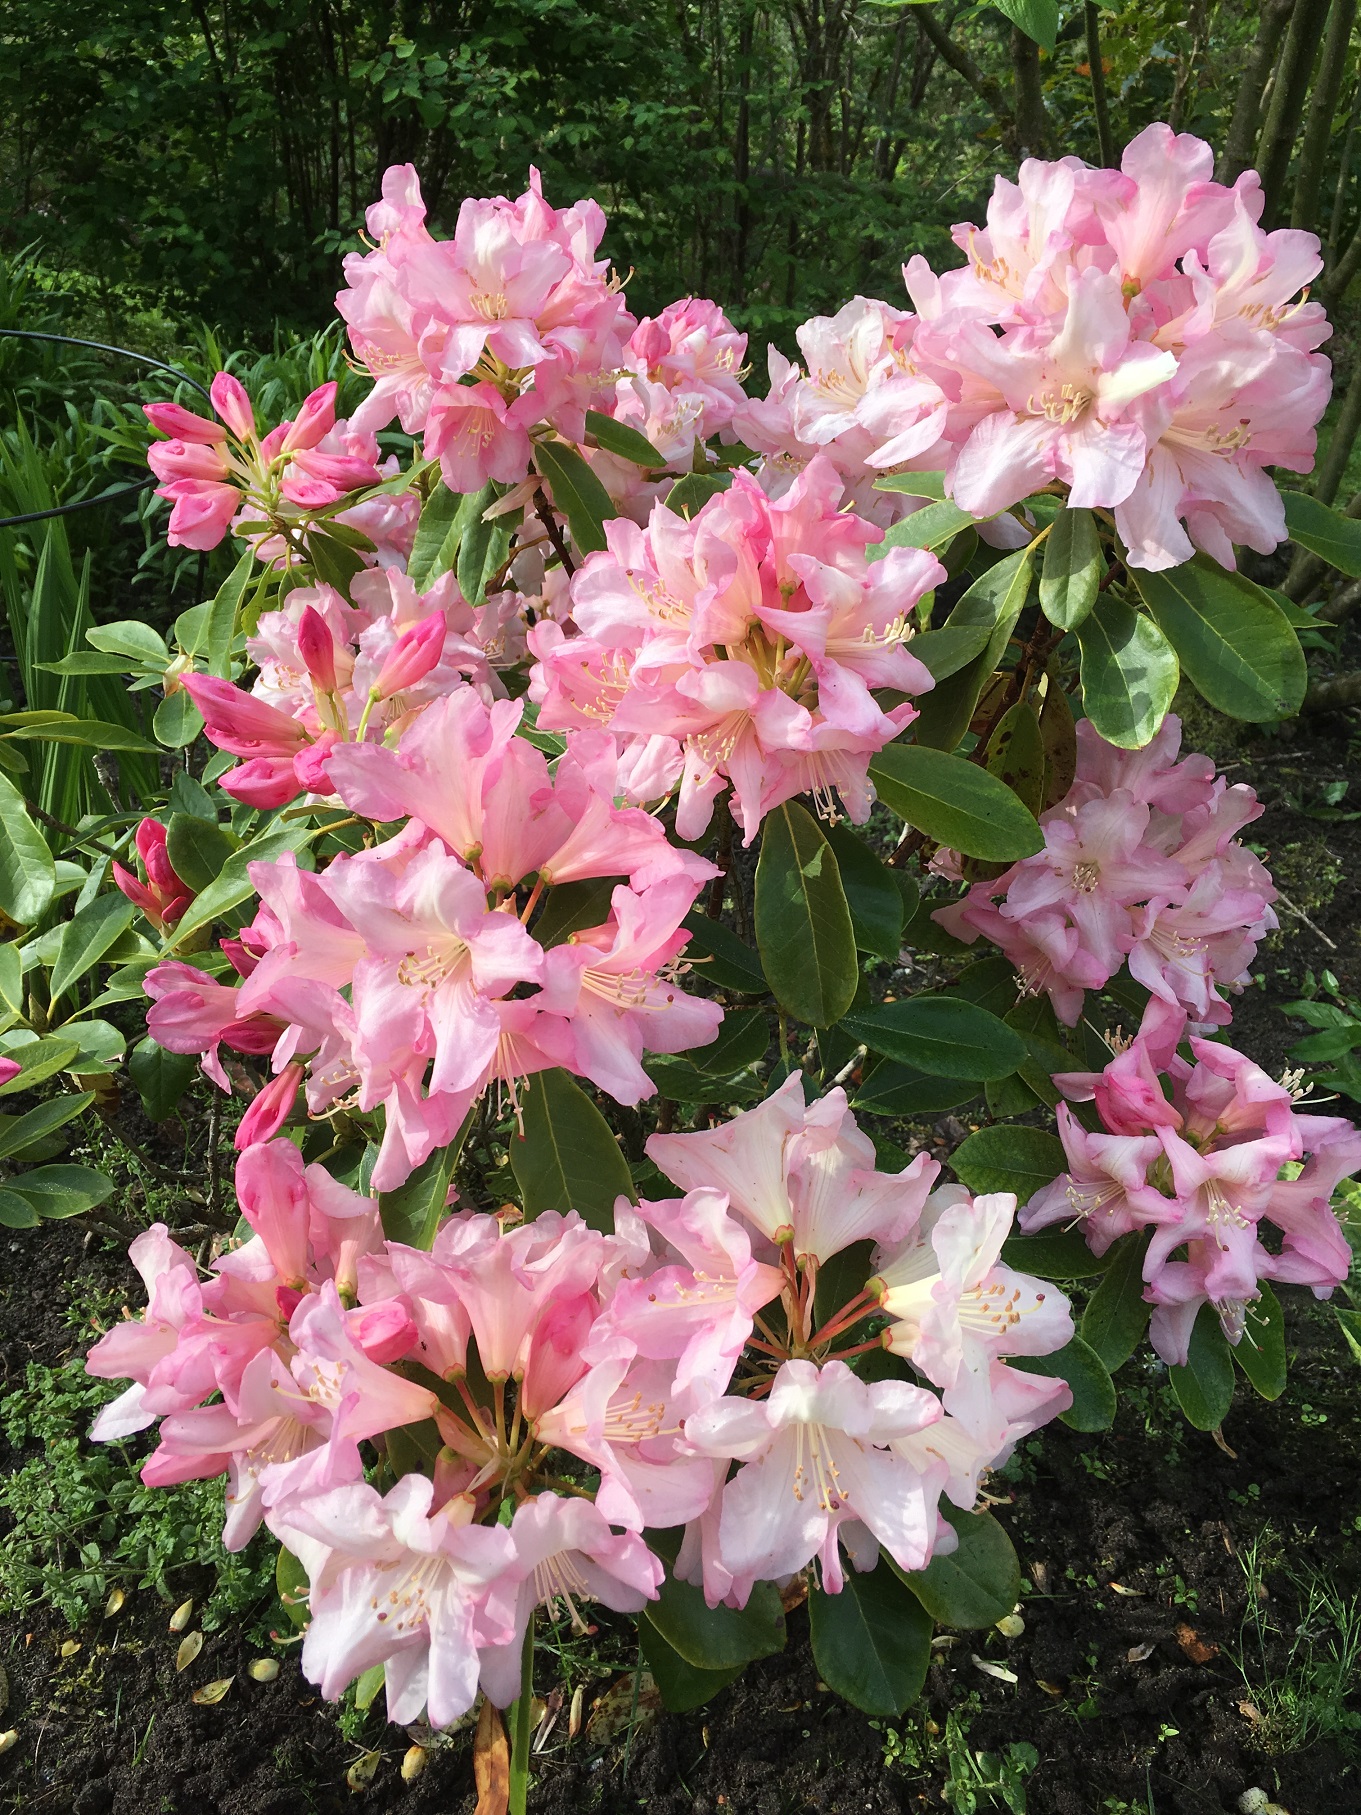
Hydrangeas come in all sorts of colours and we love them all.


Pruning


When it comes to pruning, we can follow the same general rule: prune after flowering. Some people leave the spent flower heads on all winter so they have something to look at. Add a bit of frost and you have a nice show in your winter garden.

Alas, strata landscape bosses like everything tidy so the flowers are deadheaded and the overall size of each shrub is reduced. The key is not removing the old second year canes on which the current year flowers emerge. There are some varieties that flower on all canes but most follow this rule.

If you remove too much of the old second year cane, all you will get next season is greenery. Flowers won’t come until the second season.

This is where problems arise. Homeowners torch their Hydrangeas almost to the ground and when the shrubs fail to flower in the following season, the frustrated owners hack them back. And so it goes until I correct them.


IMG_9519

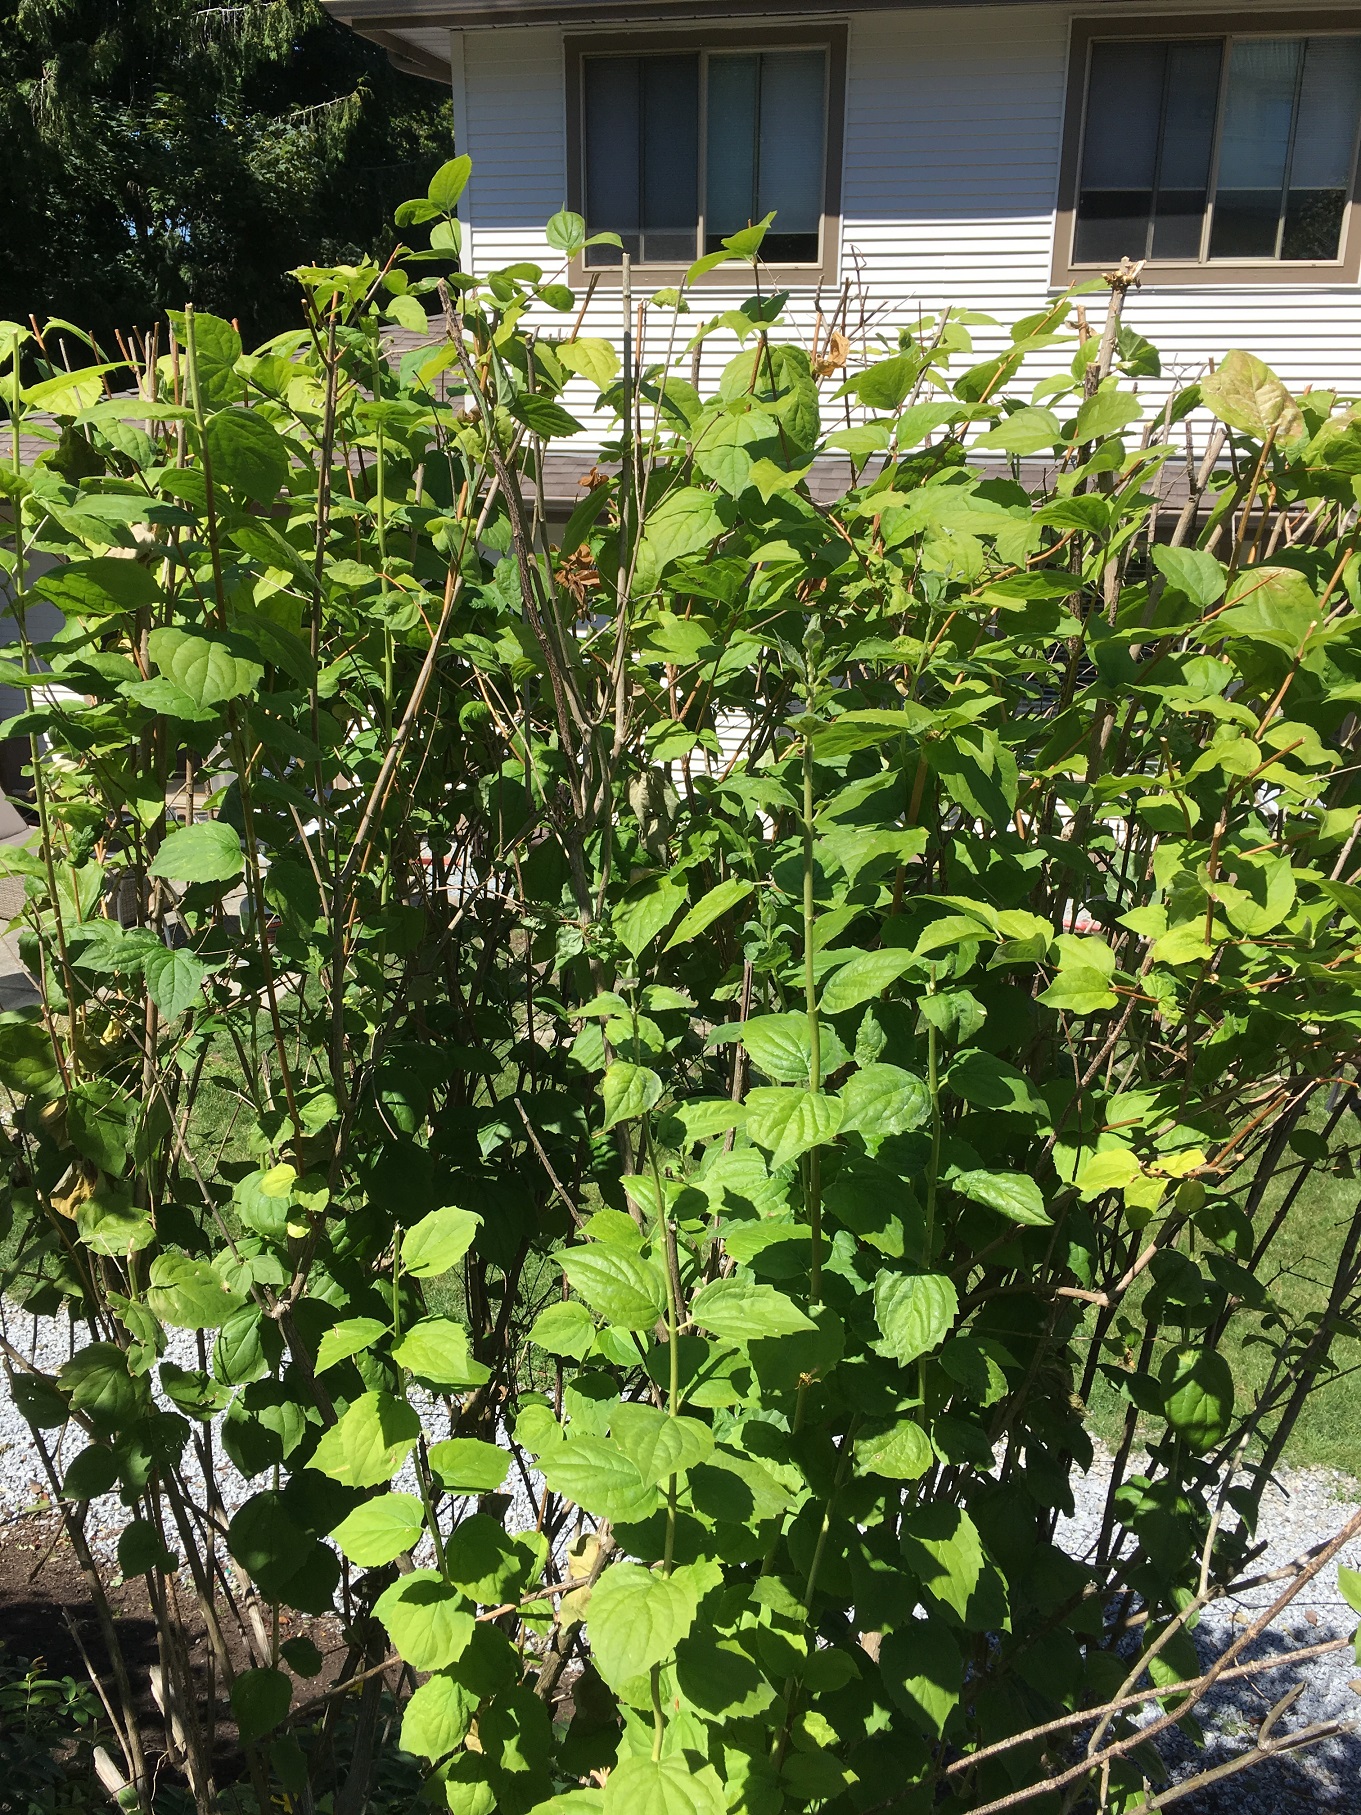
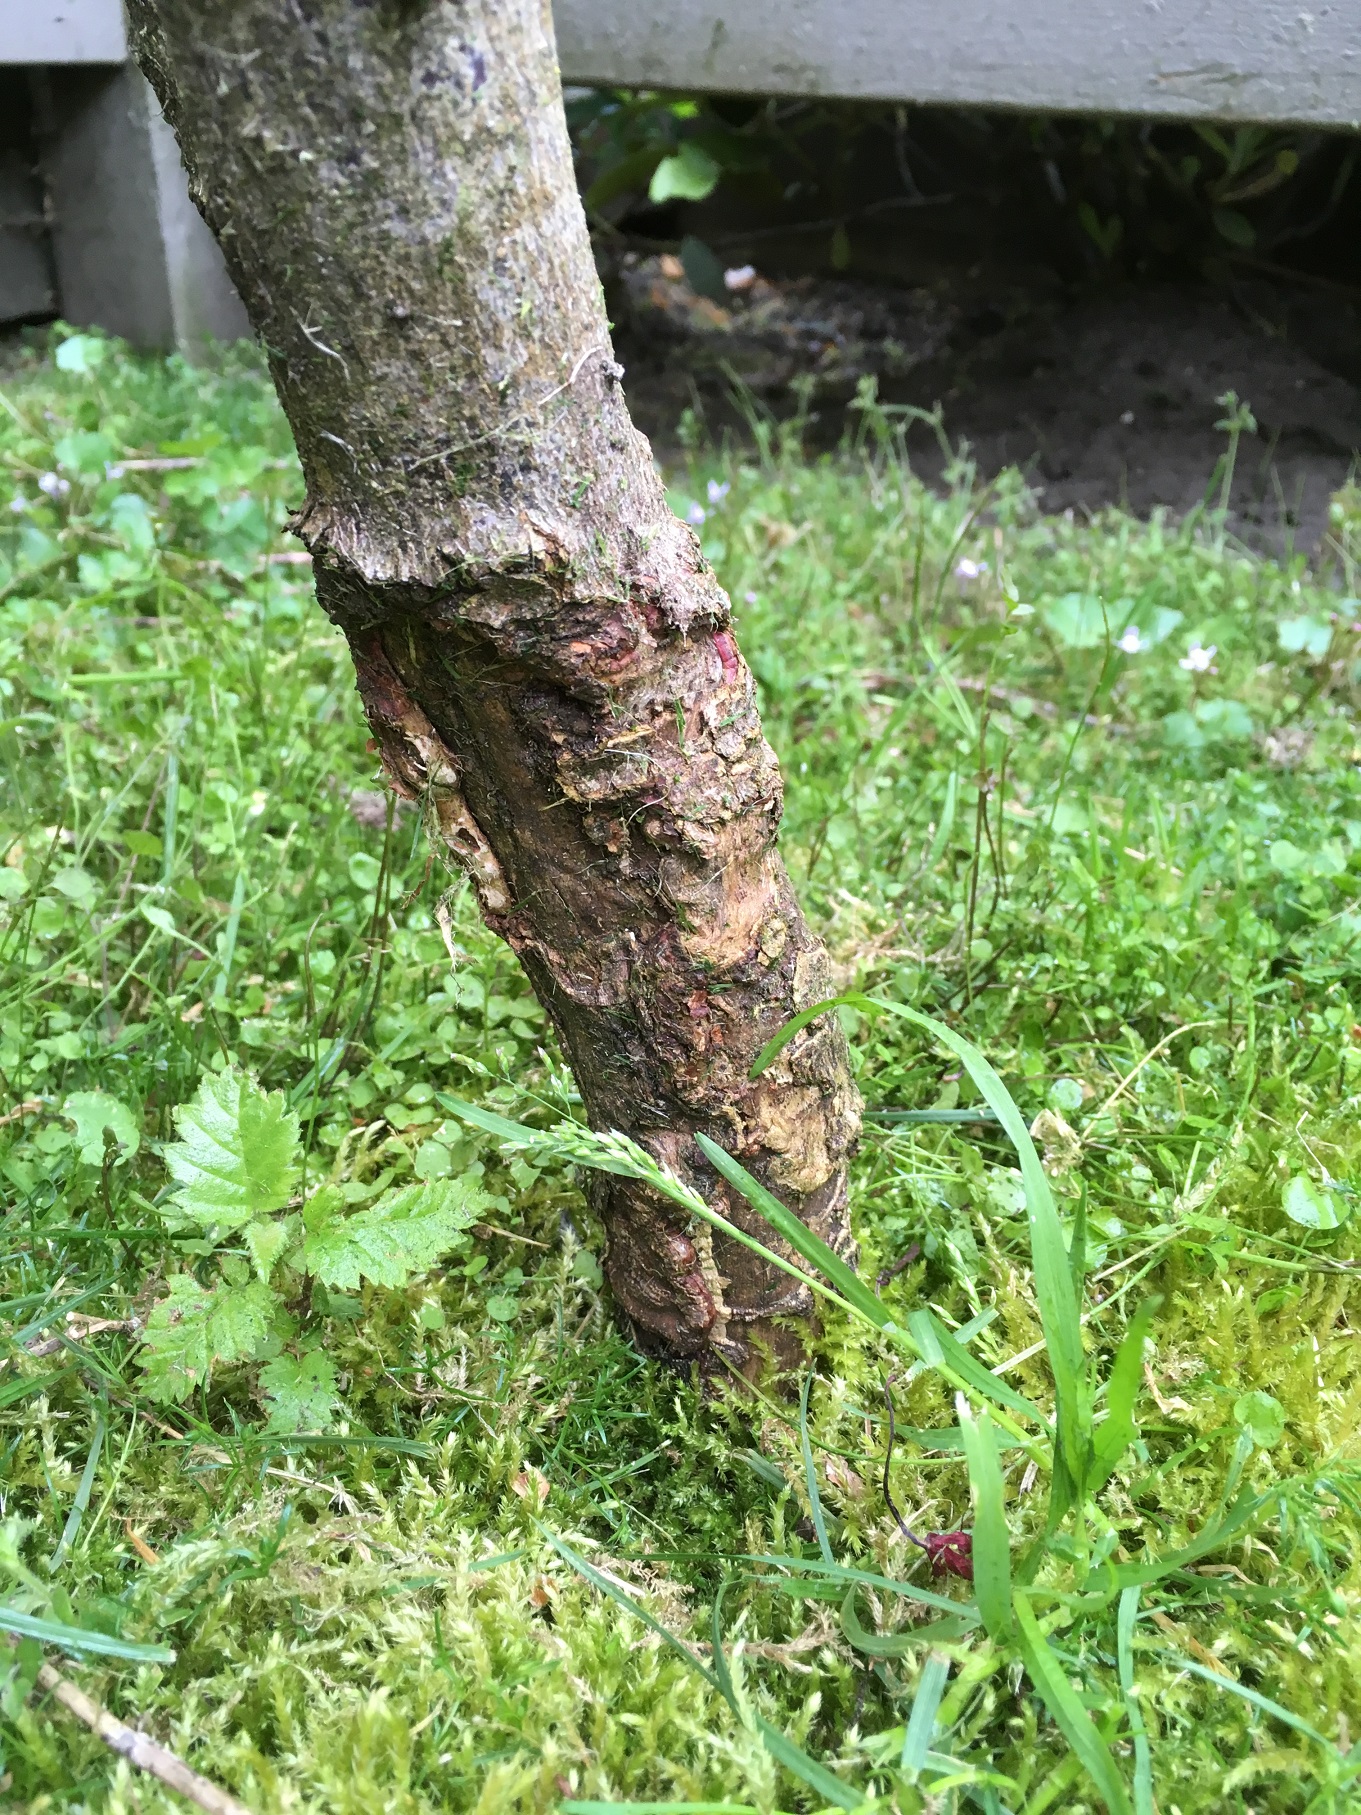
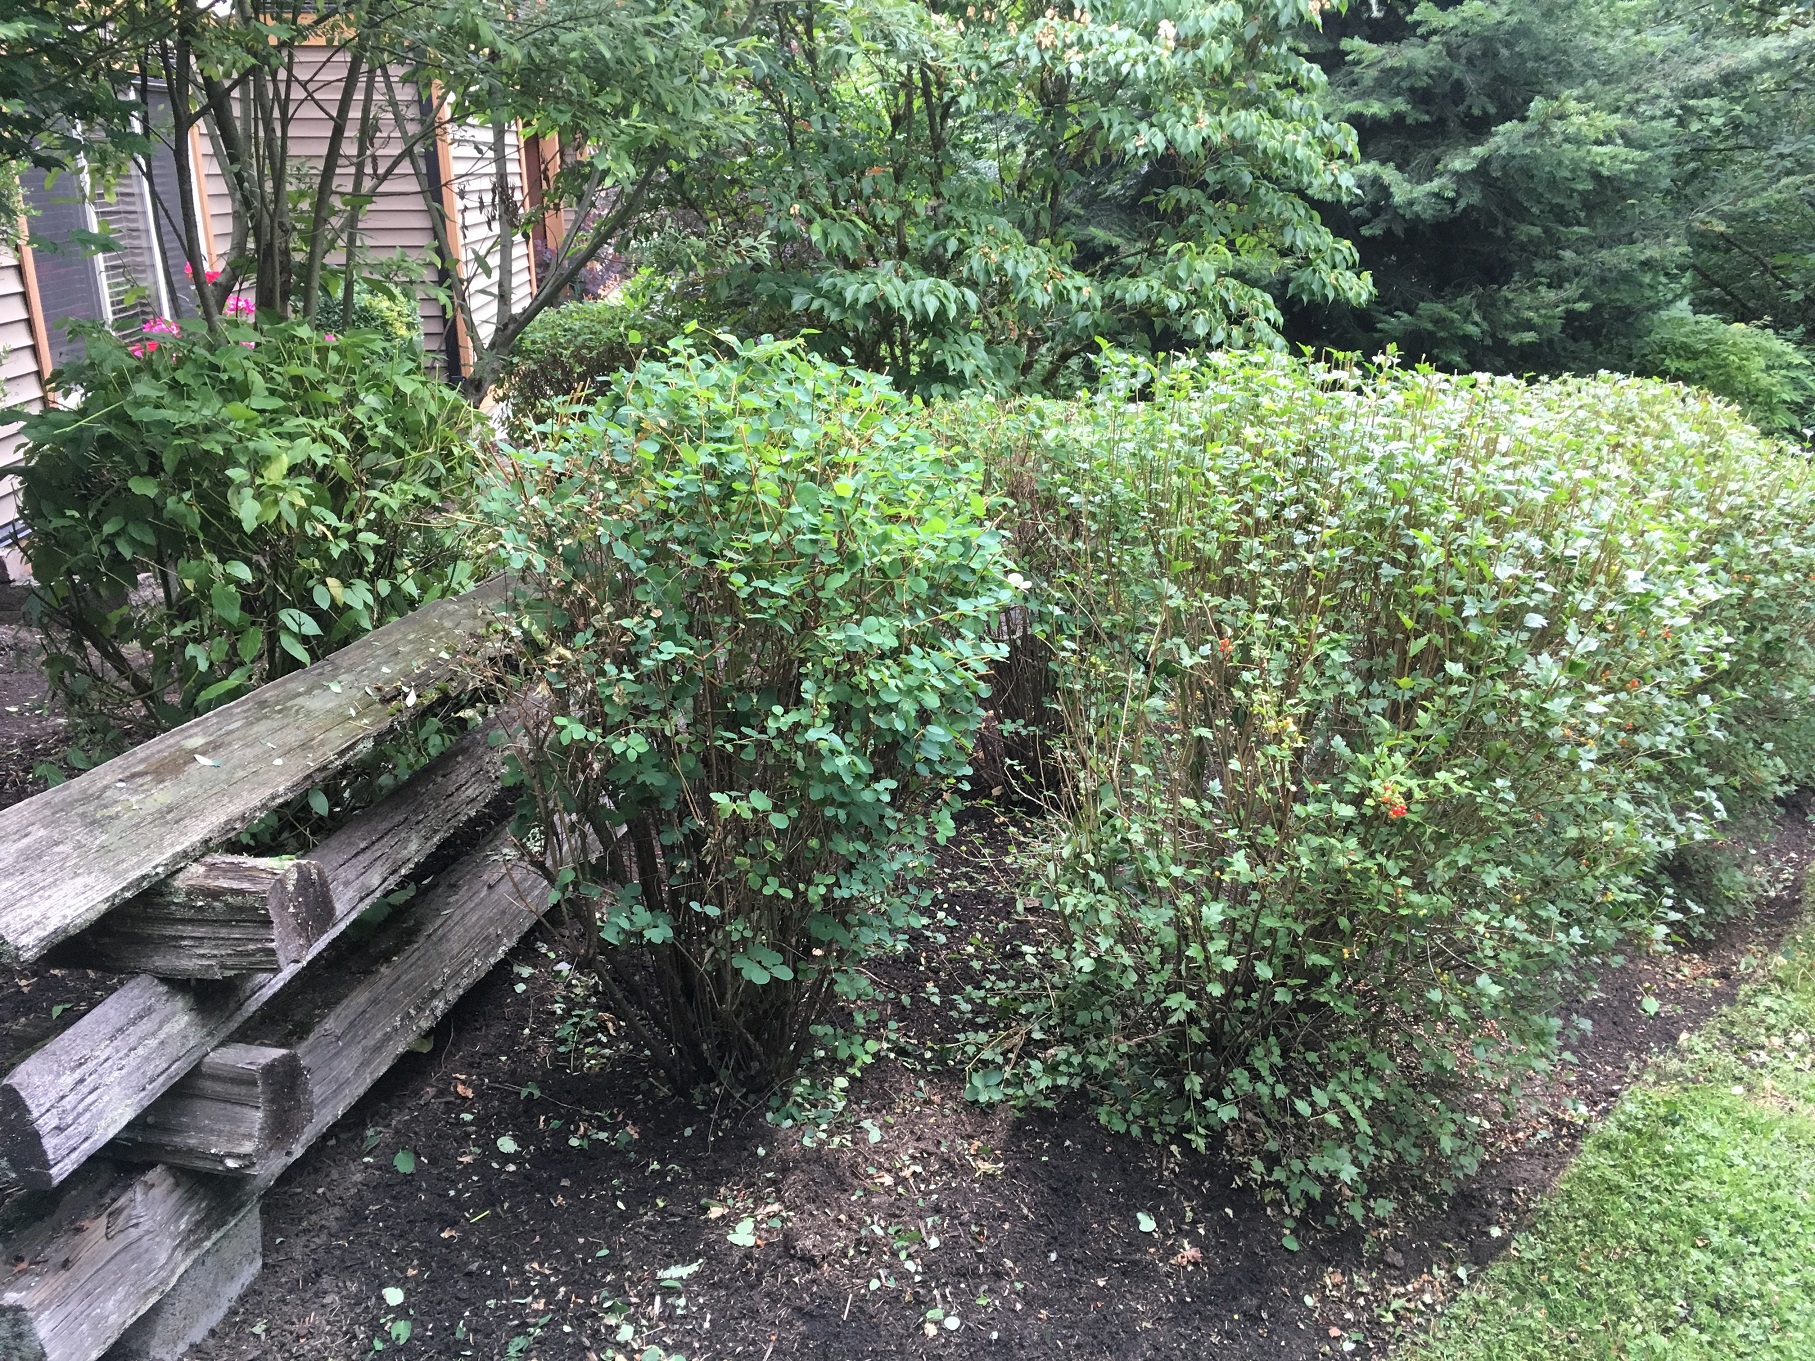
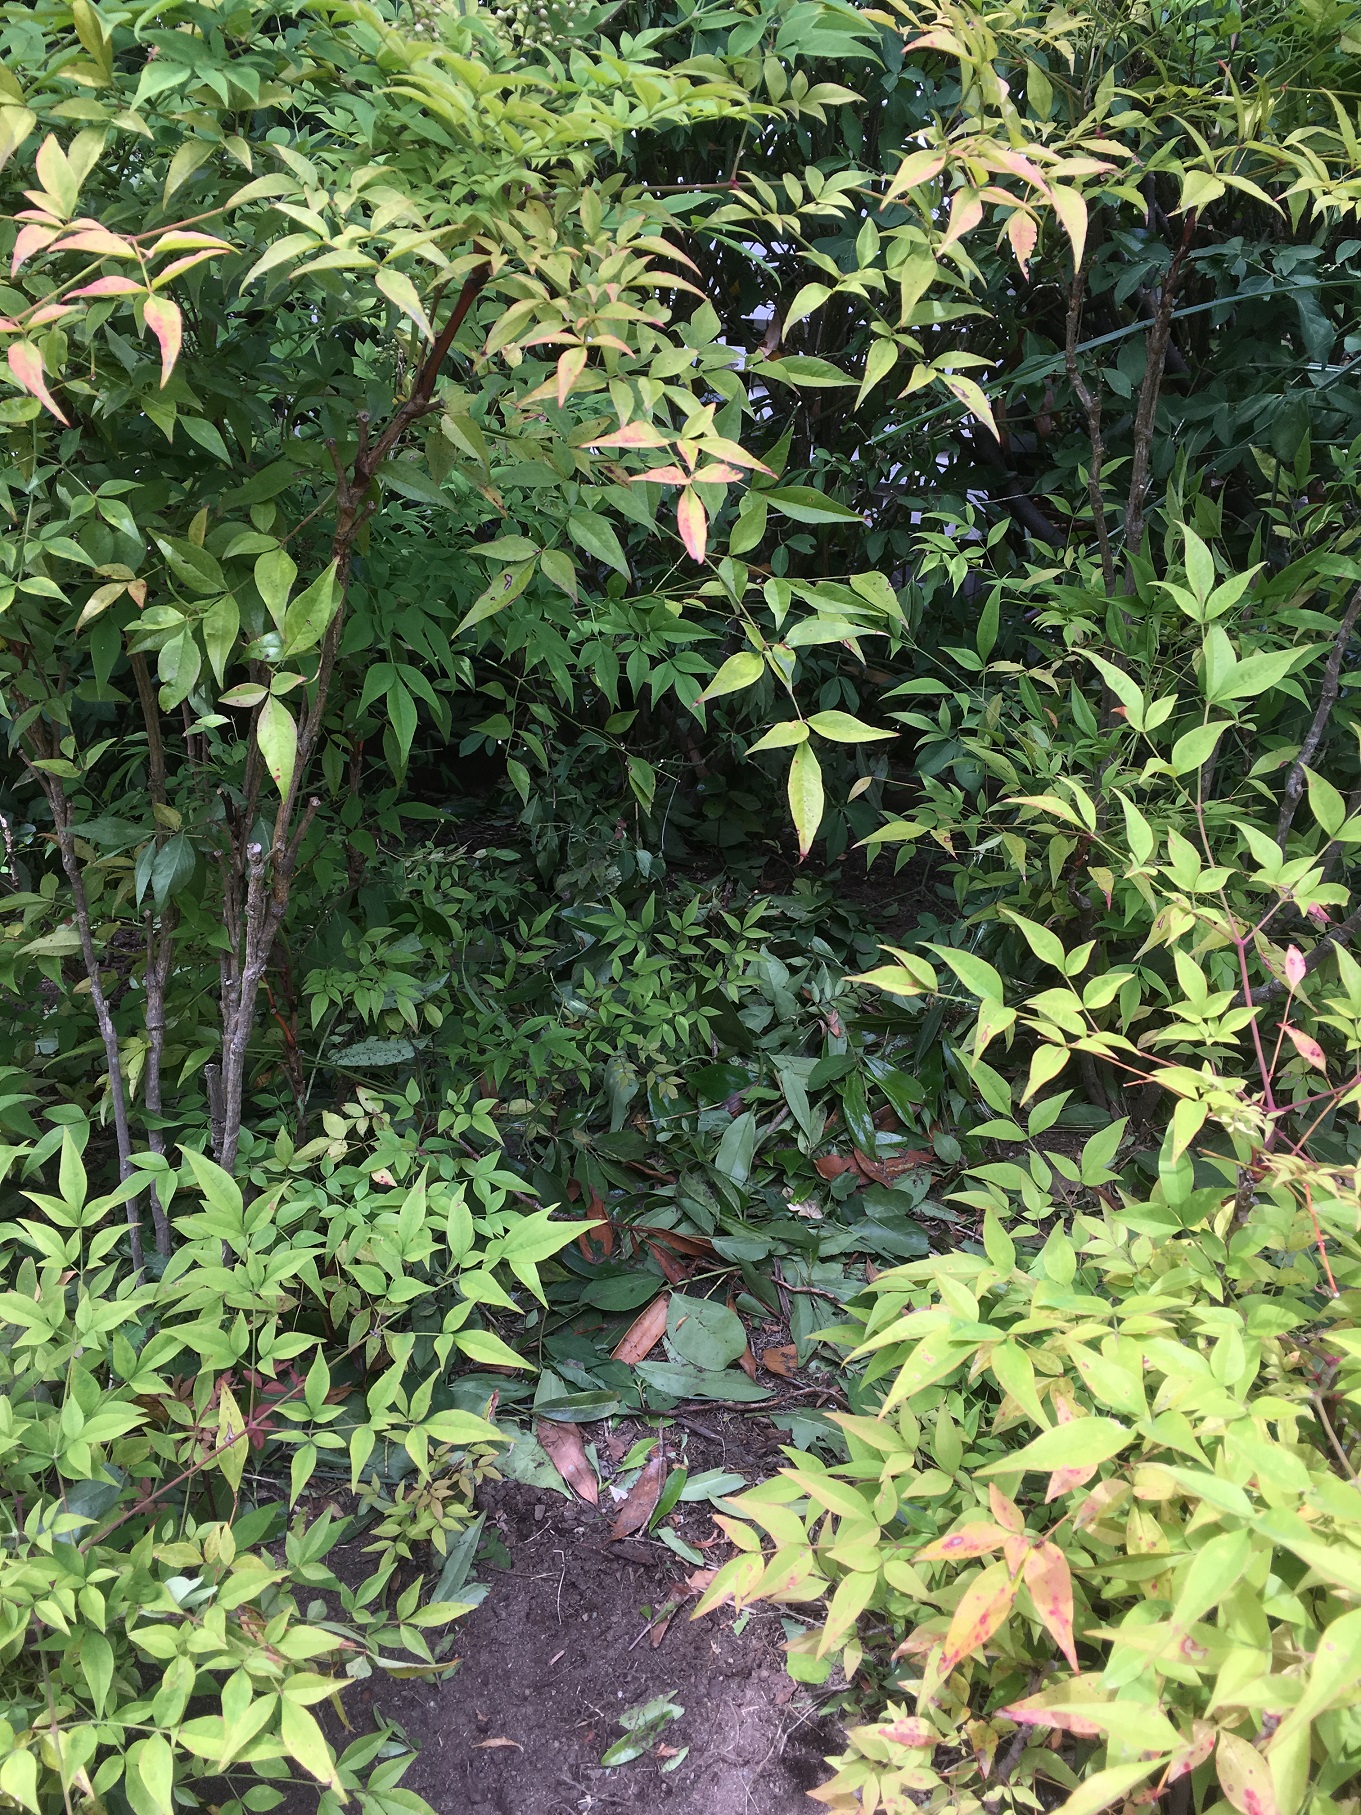
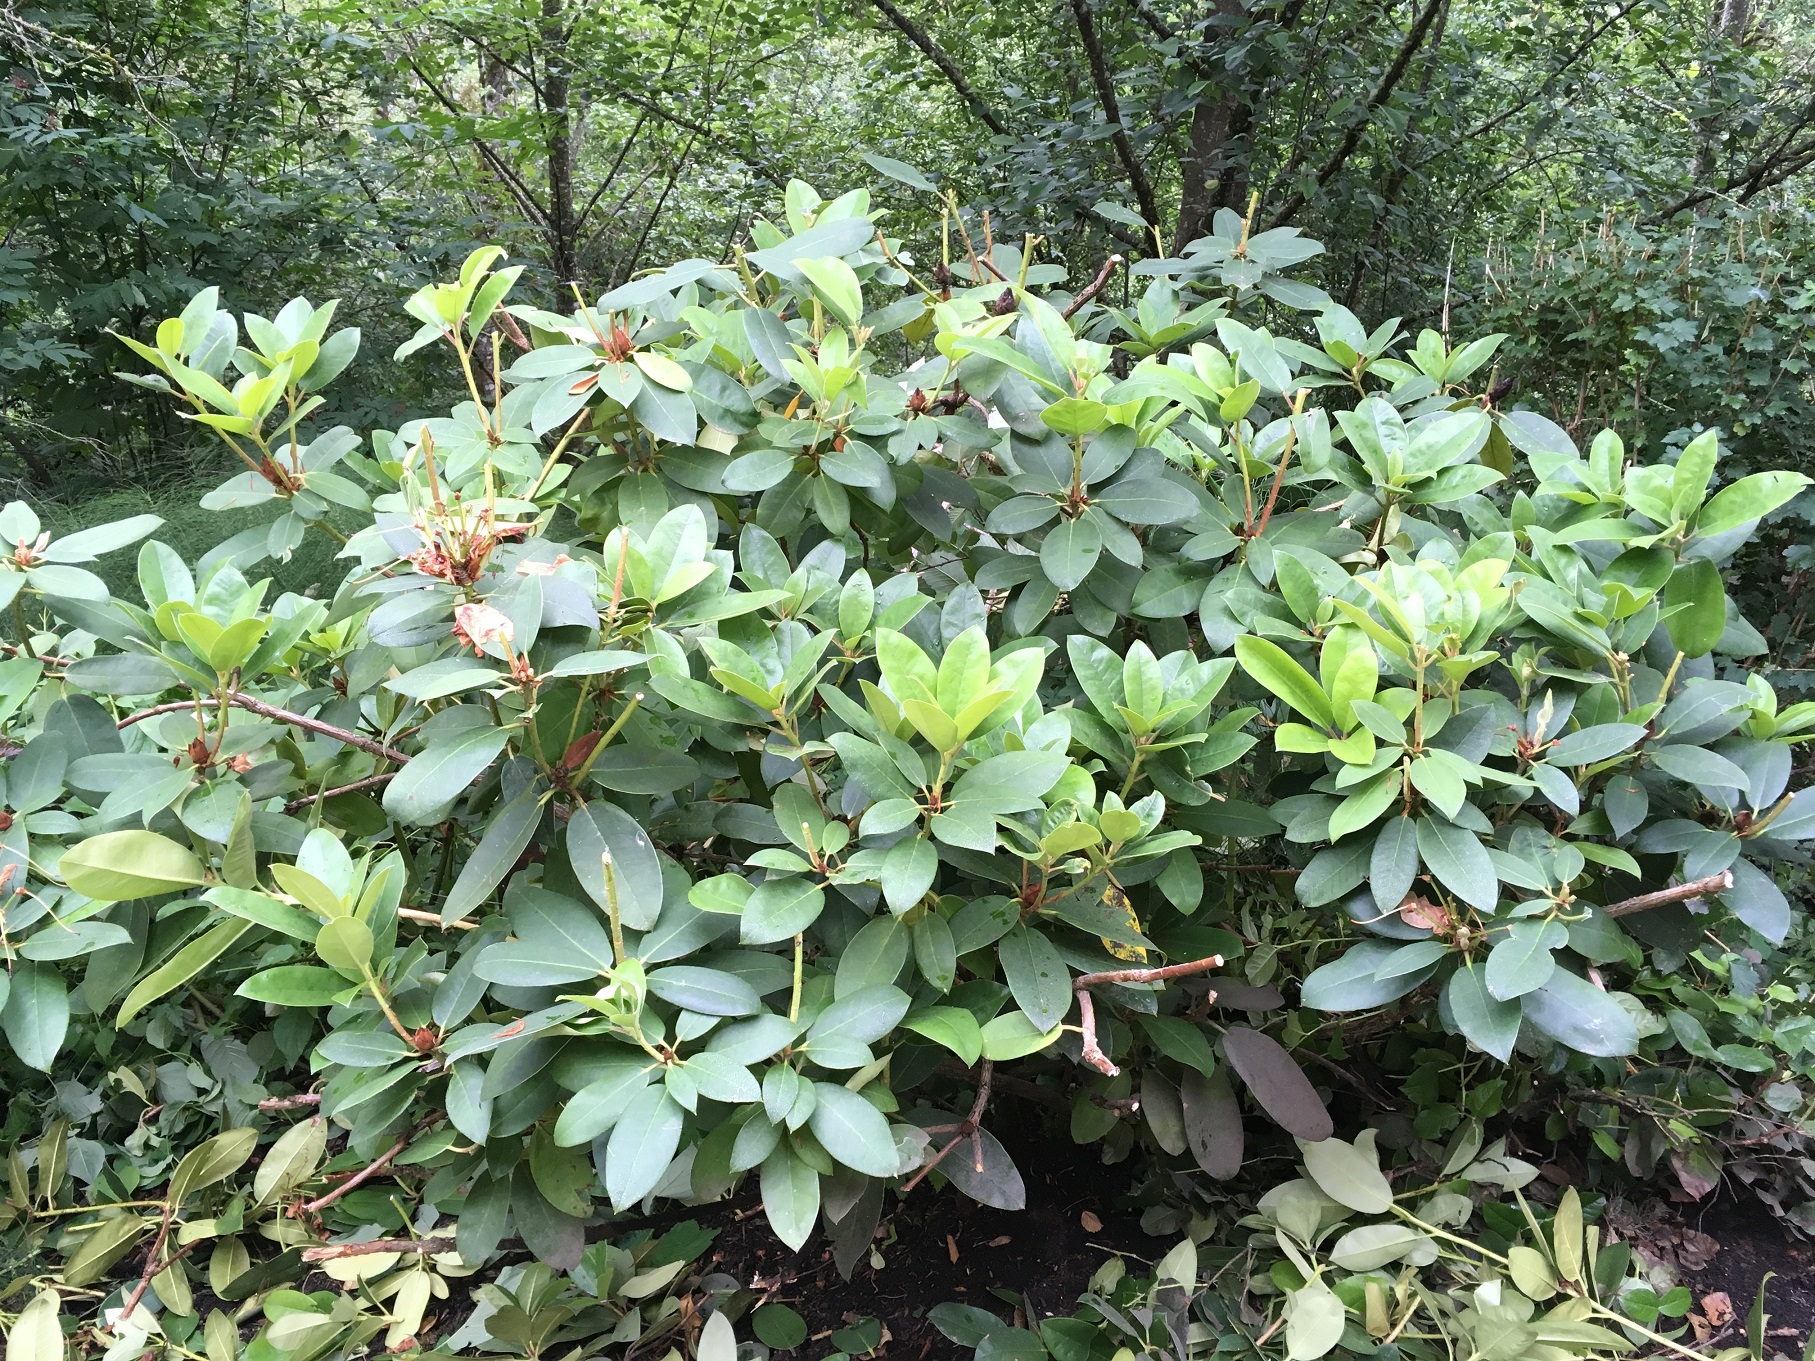
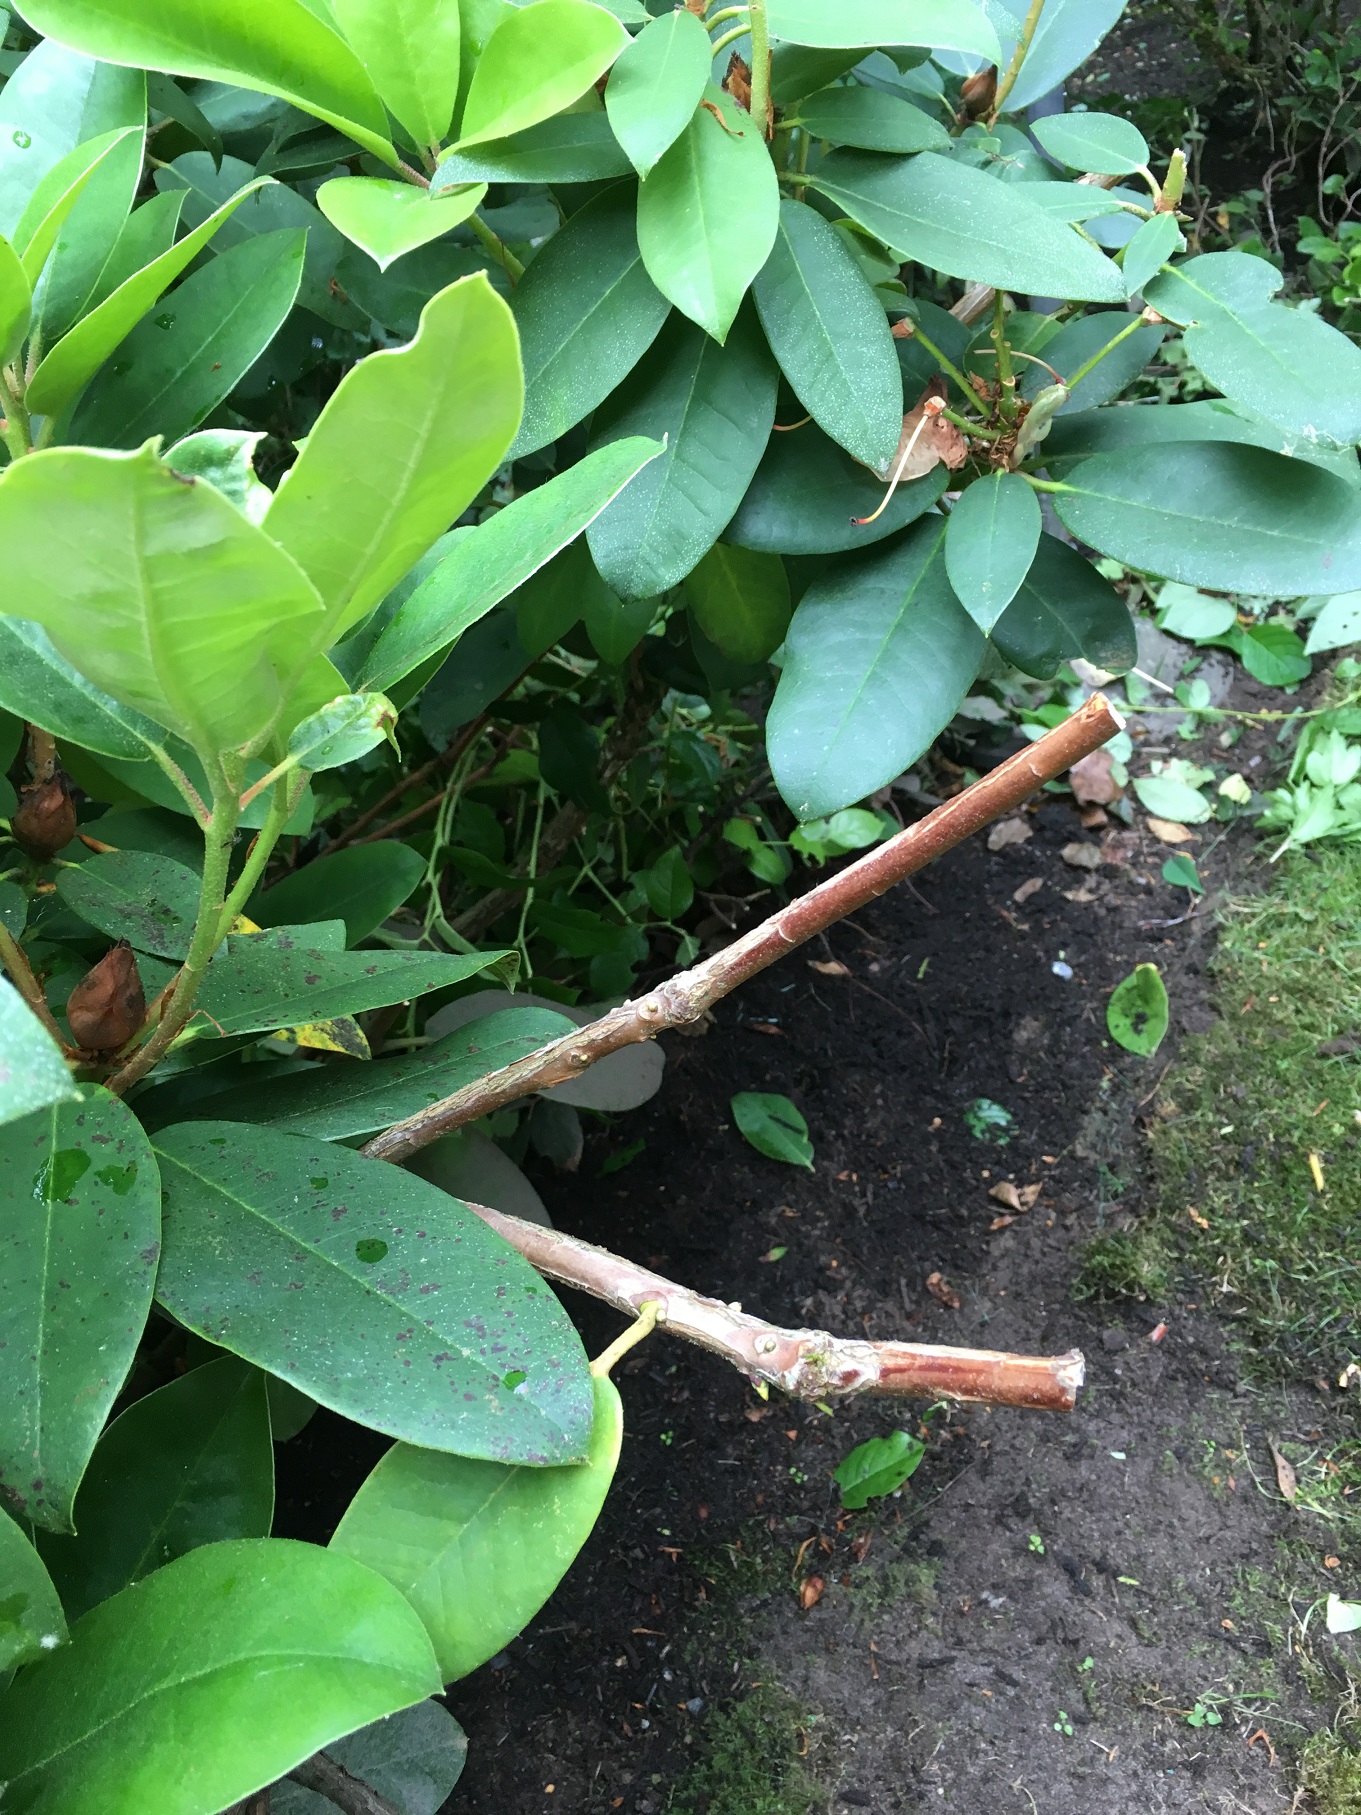
The owner hacked back his Hydrangea and most of the old canes went missing.


Landscapers are also guilty of taking too much old wood in their struggle to manage shrub sizes inside strata complexes. Strata unit owners notice when their favourite Hydrangeas fail to flower. I made this mistake early in my landscaping career and I still remember the old lady complaining to my manager about her missing flowers. And I never forgot that lesson.


IMG_9521

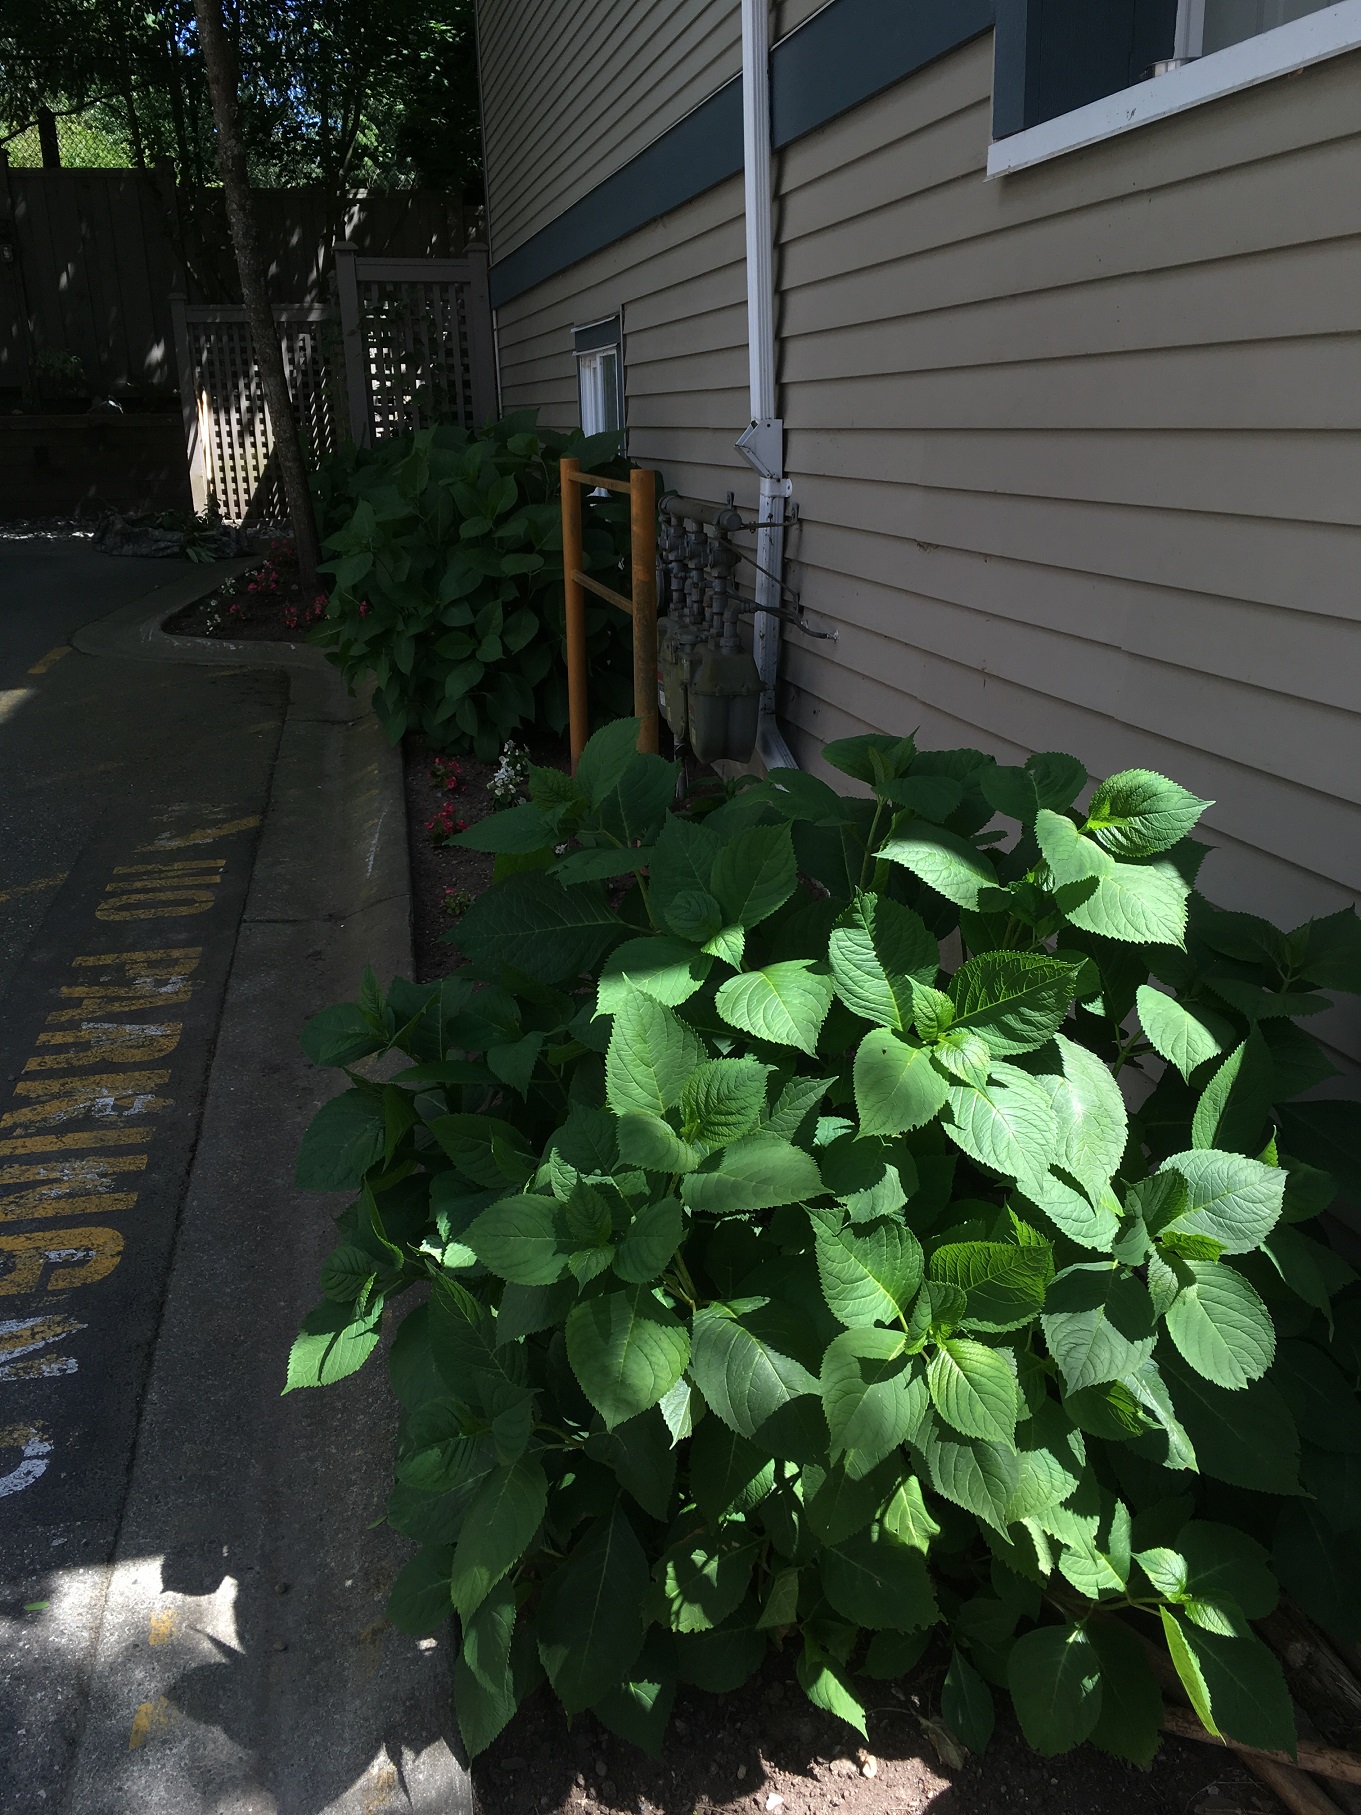
Not much of a show, is it? I’m almost certain these shrubs were cut back too much last year. You can expect flowers next season.


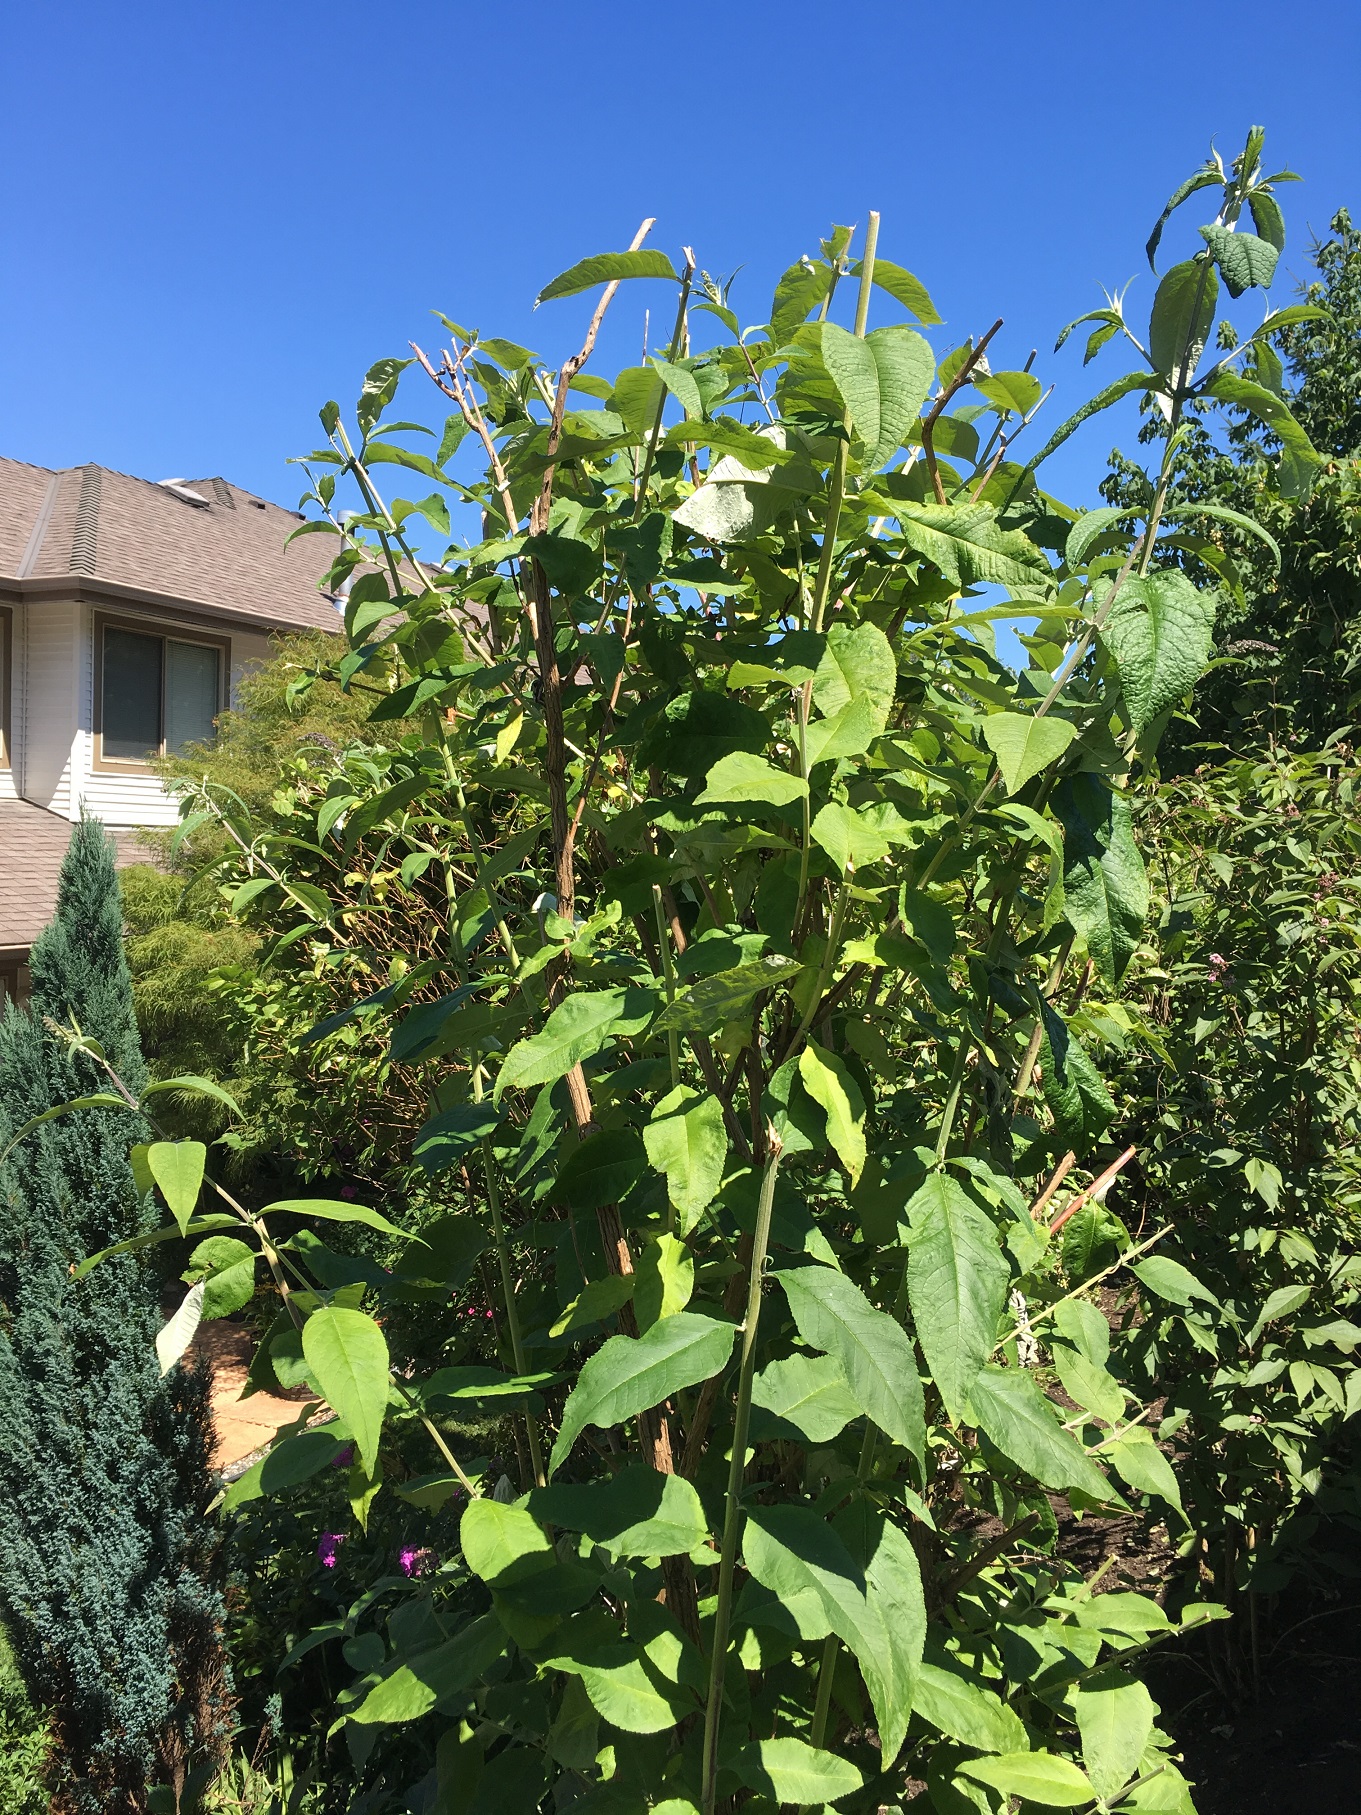
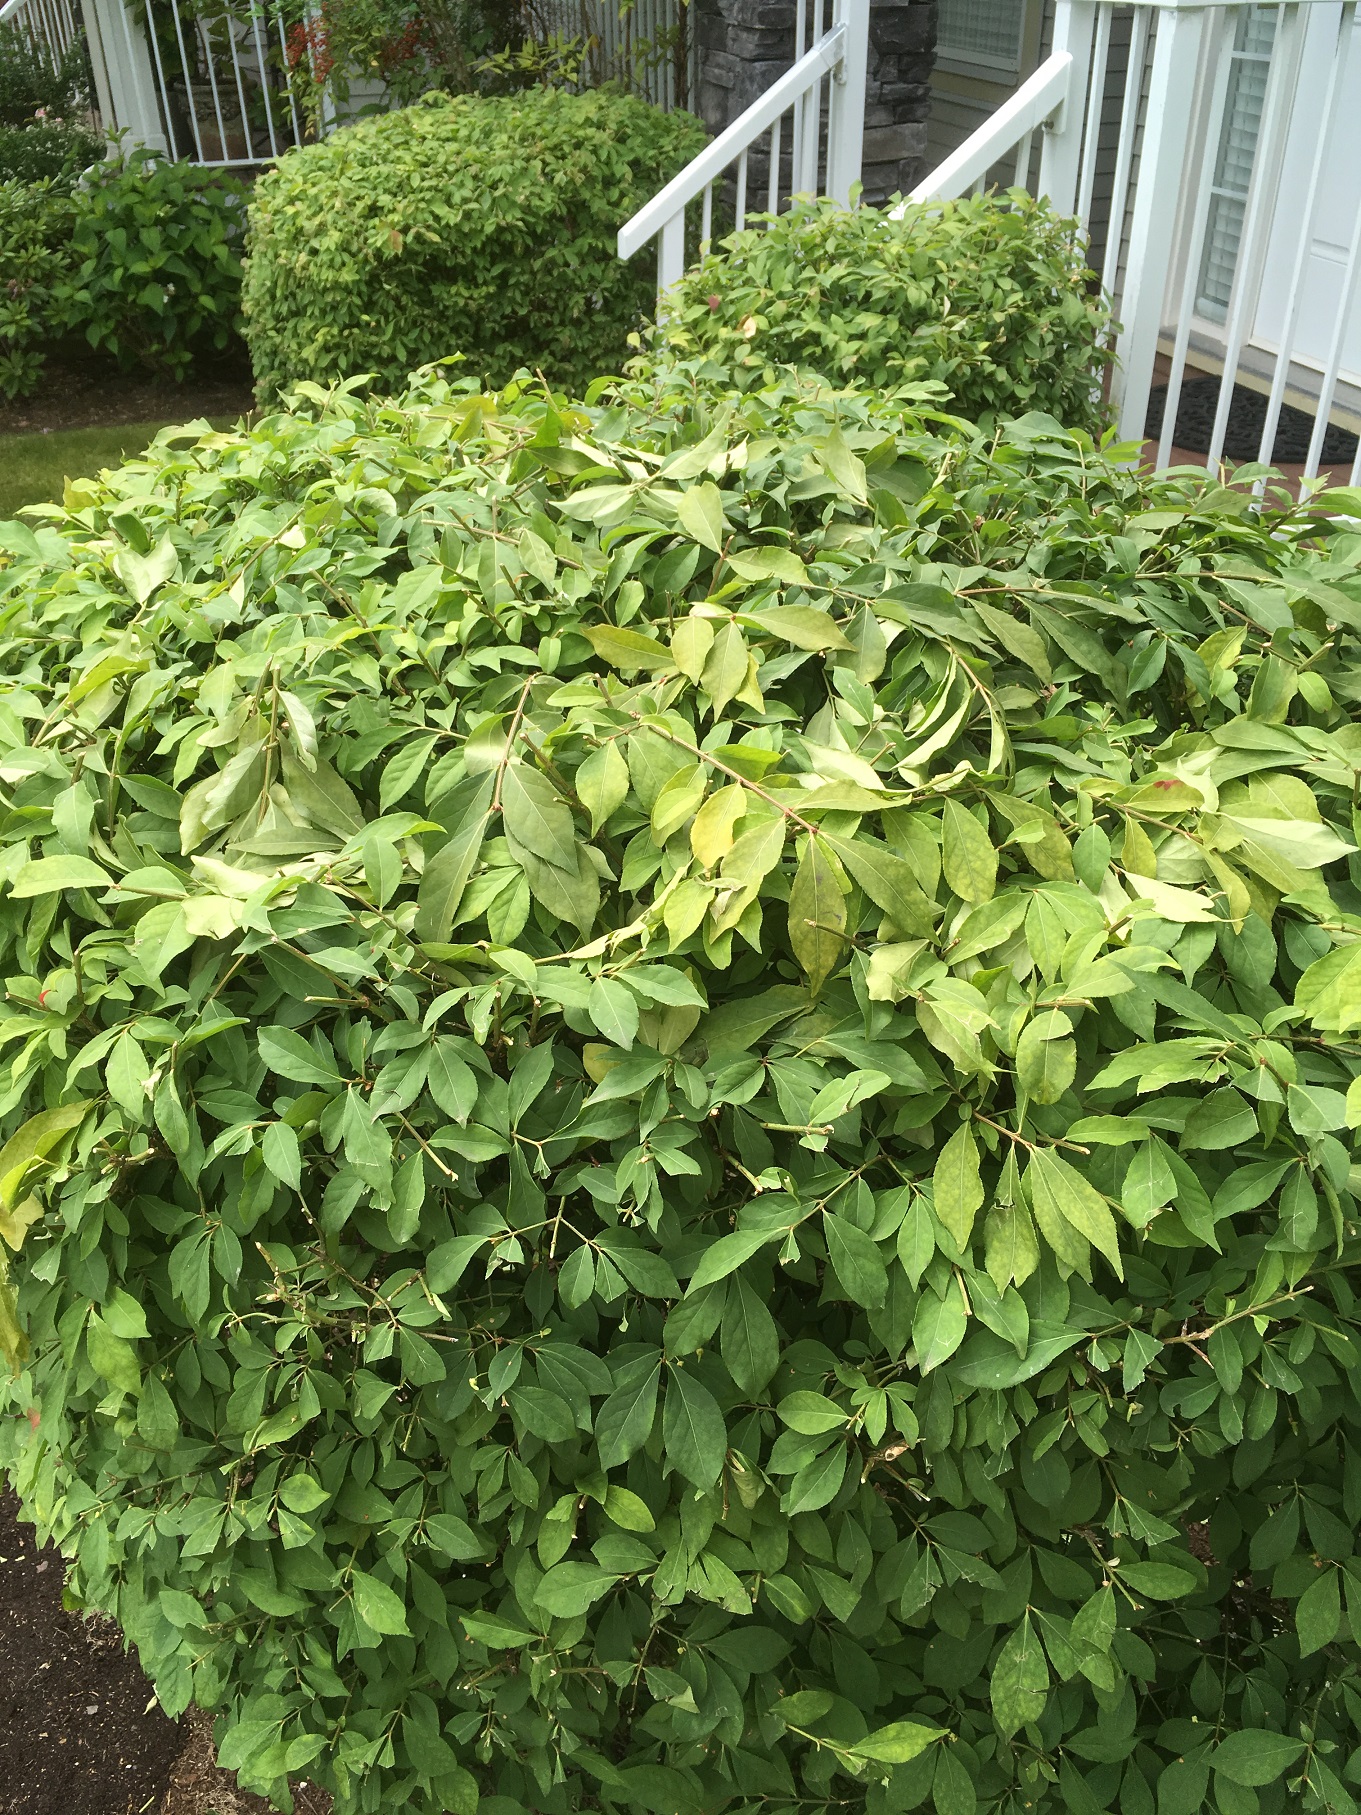
I saved the worst example for last. This is a high-profile walkway and the strata complex’s Facebook group lit up with negative comments soon after this pruning job. And for good reason.

The timing is all wrong because these Hydrangeas are flowering nicely. Why remove flowers at their peak?

The other problem is the severity of the pruning job. I would have at least left some green or alternatively, removed entire canes. Looking at severed canes while the rest of the shrub is still intact and flowering is a bit weird.


IMG_0003


It would be best to wait until the flowers fade and then remove maybe the top third of each cane, roughly 2-3 buds down. When you do this, you can also select the 1-3 biggest canes and prune them right down at ground level. Otherwise the old wood accumulates; what we want is nice straight canes growing out of last year’s wood.


Conclusion

So please remember that Hydrangeas flower from canes growing on second year wood. If you cut back the older canes too hard you will only get green foliage the following season and your clients will wonder what happened to their annual flower show.

Prune your Hydrangeas after flowering and cut back your canes down by 2-3 buds. That should guarantee another flower show next year and that’s why we plant Hydrangeas in our landscapes.

If your Hydrangeas aren’t producing flowers this season then I would be willing to bet that your pruning last year was too harsh.

A perfect mower for small lawns

By | Lawn Care, machines | No Comments

There I was cutting long stretches of lawn on a huge strata site when I hit the corner pictured below with my commercial Honda mower. I took one quick look at the reel mower by the wall and dismissed it as a toy for homeowners. But I’ve been thinking about it and now I feel like reel mowers deserve their own blog post.


IMG_7897


Lawn size

Lawn size determines the right type of mower to use. Considering the miles of lawn I had to cut on this day, using a reel mower would have been out of the question. But reel mowers are perfect for small lawns. Like this one.


IMG_9327

This is a perfect lawn for reel mowers.


Reel mower

A reel mower is a mower in which the blades spin vertically (north to south) and use a scissoring action to cut the blades of grass. A reel mower should have between three and seven blades, depending on the model type. Don’t forget to get them sharpened once in a while for a nice, clean cut.

Modern reel mowers are light-weight, easy to maneuver and they start every time! They are quieter and since they don’t burn gasoline they are cleaner. Using a reel mower is a great form of exercise and you don’t have to suck unhealthy exhaust fumes.

You can check out the various reel mower models available here. The owner of the reel mower above sounds perfectly happy with it. He cuts his small lawn between our weekly cuts so his lawn stays nicely cut and he gets his exercise.

And all this happens without generating any kind of pollution. According to the Audubon Society, 800 million gallons of gas are used to power lawn mowers annually in the United States, which produces significant amounts of carbon dioxide and other greenhouse gases.

So the next time I run into a reel mower parked against the wall, I won’t dismiss it. I just wish I could use it to cut the miles of lawn I have to cut.  Sadly, it won’t happen. But if you have a small lawn, don’t even think about buying a gas-powered mower. It would be expensive overkill.


Pruning 101: consider shrub peak flowering before pruning

By | Pruning | No Comments

Today I found out about an interesting pruning “mishap” from which we can learn several lessons. It starts out like many other mid-season pruning jobs with extendable power shears and fully flushed out shrubs. The foreman went in and pruned everything, especially off the tops.

But there is a glitch. You can’t treat all of your shrubs the same way because different species grow and flower differently. This is another clear illustration of the importance of plant identification. It’s crucial knowing a little bit about all of your shrubs on site.

And keep in mind the rule: it’s normally best to prune after flowering.

Home gardeners

Home gardeners look out at their gardens all year, season after season and they enjoy their flowering shrubs. When you come in and eliminate their one annual flower show, they get angry. Beware of home gardeners!

So, this blog post covers three shrub species: Callicarpa bodinieri, Philadelphus and Buddleja davidii. Only the Philadelphus was past its flower peak which normally runs from June to July on the West Coast. In this landscape example the shrub was clearly past its flowering peak and therefore a reasonable target for pruning.


IMG_9926

Power-sheared Philadelphus


IMG_9779

Philadelphus flower example


Unfortunately, the other two shrubs were poor pruning targets for July. Buddleja davidii flowers from June to September and clearly the few remaining flowers after pruning are still immature.


IMG_9930

Look closely and you will see a few developing flower spikes.


So the gardeners know they will miss out on their usual flower show which would have looked something like this.


Buddleja davidii

Buddleja davidii flower spike.


The third shrub, Callicarpa bodinieri, was by far the worst choice for July pruning because it reaches its flowering peak from June to August AND the flowers turn into showy purple fruits from September to October. I personally find the fruits much nicer than the flowers but we have to keep the flowers on to get fruit.

Luckily, the Callicarpas aren’t as imposing as the other two shrubs so only their tops went missing. But of course for veteran home gardeners any dimished flower show is apocalypse.


IMG_9928

Callicarpa bodinieri flower


Callicarpa bodinieri

Callicarpa bodinieri fall fruits.


Clean-up

To make matters worse, the clean-ups were rough and many other plants got trampled during the procedure. We’ve already covered pruning debris clean-up in an earlier blog. Clean-ups must be perfect to match perfect pruning.


Conclusion

This was an extremely useful lesson showing how:

a) pruning must be timed for after peak flowering times

b) all shrubs can’t be pruned at the same time as if they were the same species

c) pruning debris clean-up must be perfect just like the pruning work and care must be taken not to destroy other garden plants during clean-up

d) plant identification skills are extremely important, don’t stop learning

European chafer beetle battles: critical June-July

By | landscape maintenance, Lawn Care | No Comments

This past June as I walked to my car in the morning I noticed a fat European Chafer beetle heading for the nearby lawn. Of course! June is the time the beetles fly into nearby trees to mate and then head back to delicious-looking lawns to deposit their young.

June

The European Chafer beetles aren’t going anywhere anytime soon. We’re stuck with them. I could have stepped on the beetle with my Stihl boots but that would have been a nasty start to my day. So instead of incorporating the beetle into the sidewalk, I observed her. Once she hit the lawn she disappeared very quickly.


IMG_8014


IMG_8015


IMG_8016


IMG_8017


This picture sequence should remind you to order nematodes from your local garden centre. More on this later.


July 8, 2018

While helping my buddy with his wild backyard I turned over unused garden beds. And in the process I dug up many beetles and a few young grubs. The grubs will mature in lawns and beds before emerging as beetles next summer. And to mature they will feed on grass roots which in turn attracts animals. Crows, birds and raccoons will happily dig up your lawn looking for these juicy grubs.


IMG_9718

European chafer beetle larvae 2018.


What can you do?

Step one, take better care of your lawn. My buddy is way too busy to “baby” his lawn. He has previous chafer related lawn damage that never got fixed. All three municipalities in the Tri-Cities recommend raking over your damaged lawn and then applying topsoil and over-seeding with deep-rooted grass. Water your lawn daily unless there are watering restrictions in place. Once your lawn is established water 1-2 times per week. Keep your lawn at least 6 cm high and leave clippings on the lawn.

Step two is optional and it involves applying nematodes in the third week of July. The basic idea is for the microscopic nematodes to chase down the grubs and eat them from the inside. You can read my blog about the procedure. There is one catch which makes clients nervous: you will have to apply the nematodes every year.


The chafer beetles are here to stay but you can help your lawn by keeping it healthy.


CanWest Hort Show 2018 September 26 & 27

By | Education, Events | No Comments

I make it a point to attend the CanWest Hort Show every year and I’m lucky to have a boss who gives me time off and support. I am convinced that all professional landscapers, horticulture students, career changers and landscape company owners in British Columbia should attend this two-day event.


Symposium


IMG_1485


I usually attend the full-day Urban Foresters Symposium because it gives me access to excellent tree-related lectures and it gives me CEUs towards recertification. Lunch is included in the hefty $225 fee but the networking you can do is priceless.

This year there are three speakers and two of them are Ph.Ds. Four lectures:

1.Trees on development sites

2. Professional practice: report writing

3. Moisture stress in the landscape

4. New and underutilized street and landscape trees


Last year, a gentleman in the lunch line-up recognized my name; he had read many of my blogs! Now I’m a member of his Landscape Horticulturists Facebook group. Easy.

Once the conference is over, there is usually enough time to go over to the plant ID test booth and take the free exam. This year I hope to make it a third 100% score in a row. I also distribute the blank plant list to our employees.


IMG_1475


Short courses

There are many shorter seminars offered as well so pick the ones that interest you and learn. Check out the full course line-up at the CanWest Hort Show website.


Booths

Walking the trade floor is a lot of fun. You can see stuff on sale, services offered and nurseries have plants set-up in their booths which is perfect for plant ID work. Most booths offer free candy and I usually help myself.

There is also a job board if you need workers or a new job. You can also buy food and drinks. The Tradex in Abbotsford has tons of free parking and it’s easy to find.

See you there!


Lawn care mastery: beginner tips 2018

By | Lawn Care | No Comments

Lawn care is the first thing new recruits get to do and they must master it before they can graduate on to other machines. The list below is intended for beginner landscapers.


Exceptions


IMG_7618


Watch out for exceptions! Normally the left wheels would be on the sidewalk but here the lawn is extremely high above the sidewalk. If you put the left side wheels on the sidewalk you will scalp the grass, effectively erasing it. And that’s the ultimate sin in lawn care. Instead, position the mower the way you would on a soft edge between bed and lawn. The line trimmer will take care of the rest. Your mowing should always be stress-free so watch out for exceptions.


Tarps


IMG_7621


Here the worker correctly brought a tarp close to his mowing area but then he left. Before you move on, always pull out your full tarps to the road for easy collection. Sometimes blowers missed them and then people call to complain about missed tarps. And that’s embarrassing. So always pull out your tarps for easy collection. They are the worker’s responsibility.


Exiting your lawn area


IMG_7624


This is a common mistake. Here I had to go back the way I came so I followed my existing laser lines. DO NOT cross your beautiful straight lines on the way out. Yes, it would be the shortest way out but it would destroy your presentation. Always exit using the existing lines. Never cross your mow lines.


Collisions with trees


IMG_7245

This tree is getting hit repeatedly by mowers and line trimmers. It stresses it out and it may not survive the abuse. Stay away from trees.


Yes, trees are very resilient but repeated hits from mowers and trimmers stress and eventually kill trees. Never collide with trees. Stay away.


All done?


IMG_9211


So you made it! You got through your mowing assignment. Now you just have a few more steps to take.

One is deck clean-up. Before you move the blades, undo the spark plug cable (it’s in front of the mower) to avoid any accidental blade engagement. Then remove all debris so the machine is ready for the next day.

Also, refuel the mower with straight gas and do it on a tarp just like the deck cleaning.


IMG_9213

That’s a lot of debris from one deck.


Remember, lawn care should be stress-free! Just follow the hints above for nice, stress-free lawn care life. Once you master lawn mowing you will get to use other machines. It’s all about quick skill acquisition. Have some fun.

The one key for mid-season pruning success

By | landscape maintenance, Pruning | No Comments

Late June on the West Coast means mid-season pruning and, depending on site size, there can be a lot of pruning to do. Especially woody shrub pruning. And while landscapers do a great job with pruning, I am finding that the clean-ups often don’t match the beautiful precise pruning work. If you want mid-season pruning success then the key is great clean-up.


IMG_9612

Pruned and cleaned-up Japanese holly (Ilex crenata).


Mid-season pruning 101

Most of the mid-season pruning involves shrubs which tend to push out new growth and make people panic. They also tolerate power shearing fairly well. One example is pictured below. Cornus (dogwood), Symphoricarpos albus (Common snowberry) and Ribes. All three are shrubs and tolerate shaping with power shears. Give them a few weeks and they will start to look like they were never pruned.


IMG_9400

Left to right: dogwood, snowberry and currant


For best results, always use good quality power shears with sharp blades. If you have lots to do, always bring a jerry can with you and keep it close by so there isn’t any unnecessary walking. Ear and eye protection is mandatory and I’m assuming everyone is always protected.


Exceptions

If you know your site well then this won’t be a problem. But when I prune on a new site for the first time I always ask about exceptions because they do exist. For example, some clients prefer more natural looking shrubs so you have to prune gently. Other exceptions are laurel hedge tops to be left almost untouched because they block parking stall car light beams.


IMG_9484


IMG_9485


The KEY

I can not overemphasize this: great clean-up work that matches the pruning job is a must. I often have to go behind our crews and double-check because inevitably two big problems arise.

One problem is debris left on top. It looks fine on your pruning day but one week later you start noticing brown branches on top of green shrubs and hedges. And your clients notice, too. So always train your crews to pick debris off the tops.


IMG_8794

Note the debris left on top of the shrub. It will look way worse once it dries out and turns brown. Always check the tops after pruning.


Another problem is clean-up raking. This is where many workers struggle because they have to clean-up really well without removing too much soil; and they have to reach into tight spots which often gets very old. And quickly.

Again, it’s the foreman’s job to double-check before workers move on.

The ultimate sin is skipping clean-up altogether, say, in tight spaces between shrubs. There is no easy way to do the clean-up. It must match the pruning job.

Below are some examples of finished clean-up jobs. Yes, finished. It’s obvious the workers skipped the clean-up and the foreman didn’t check. The effect is horrific; it’s not even close to average when what we need is world class.


IMG_8800

Judging from the piles on the ground, this section was completely skipped.


IMG_8803

I have no idea how this pile got missed.


IMG_8808

Another “finished” section. Yes, it’s tedious but it must be done.


IMG_8811

Corrected.


Conclusion

Mid-season pruning can be extremely demanding, especially when sites are huge. The key to mid-season pruning success is perfect clean-ups. Nothing can be skipped and the aim should always be to match the clean-up with your pruning job quality. Aim for world class!

58 and still hustling

By | Landscaping | No Comments

“58 and still hustling” were the only words accompanying the picture below in a Facebook group post. Love it or hate it, Facebook groups can be worth your while. I ignored the smart comments from various group members and started thinking about the larger issue of workplace ageism.


30411863_1882822411751270_422553463994449920_n


Ageism

According to an article by Nicole Gallucci published in the Globe and Mail newspaper ( May 2, 2018, section B10 Careers), ageism is becoming a challenge for businesses. It’s defined as “prejudice or discrimination on the basis of a person’s age.”

In landscaping, age-related comments are often laughed off but the article states that 25% of employees make judgements about their co-worker’s and supervisor’s abilities to do their jobs based on their age alone. This rate goes up to 39% among millennials. I knew it.

So the young dudes are rushing up the ladder, trying to skip rungs and veterans like me know full well what kind of fight it was to make it up the ladder to a supervisory position. It took me about fifteen seasons to become a landscape professional with enough experience to pass the Red Seal Journeyman Horticulturist examination.


IMG_3172

Landscape professional Vas.


Ladders

Most workers try to move up to relief and full foreman jobs where leading a crew comes with more money and responsibility. My job as supervisor is to help them transition into their new roles mainly by working on their technical and leadership skills.

But what about the older workers? Gallucci writes that often companies forget about their older workers and their need to stay sharp and motivated. Personally I have plenty of motivation and I constantly seek out new courses and seminars so I can stay sharp and current.

Since landscaping is physically demanding I also try to stay in good physical shape. I know that the young dudes are watching; and I also know that not all of them are ready to sweat. Some are clearly spooked by their own sweaty T-shirts.

Tasks

If you’re lucky, your boss is thinking about proper task assignments. For example, one day we had two important tasks after lawn care: installation of boulders and plant installation. I can definitely move boulders but as an experienced supervisor it made more sense for me to do the plant install. In addition, I was asked to show my young female helper how to plant new plants properly. We had a perfectly fine afternoon together and she went home with new skills.


IMG_6134

This was a pleasant planting task for me and a young female helper.


The young dudes eagerly moved the boulders into place and everything got done.


IMG_6140

Rocks in place.


This example illustrates how it should be done in the field. Gallucci calls it an “egoless team of minds“. One team working together; all generations bringing in their talents and learning from each other.

The young guys bring energy and I bring experience and technical knowledge. That’s how the company advances toward world class work.

How to rescue stepping stones from encroaching turf grass

By | Landscaping, Lawn Care, machines | No Comments

Regular readers of my landscape blogs will know how much I love the blade edger machine. The machine can redefine hard and soft landscape edges and it can prevent turf grass from swallowing stepping stones and drains.

So I got to make myself happy recently when I filled in for our regular foreman on a small strata site. As always, lawn care came first; mowing and line edging. Then when I did the blade edging I noticed many stepping stones and drains on site with turf grass creeping over the edges. Left alone, the grass will eventually cover up the stones thereby defeating their original purpose. And that would most likely give me a nasty rash.

Luckily, I was on the case armed with a brand new blade. New blades are best for soft edges between lawn and beds. For hard edges you can always use older blades and grind them down to “stumps” that can be later recycled.


IMG_9418

For best results use fresh blades for soft edging and stubborn overgrown stepping stones.


Distress

Take a look at the picture below. It’s not a complete disaster, yet, but the stones could look sharper. Now. Right now. And I had time because the site was small and I was filling in for the regular foreman.


IMG_9411

It’s not a complete disaster yet but these stepping stones could use some redefining.

Step 1

Blade the edges just deep enough to re-establish the hard edges. If you go too deep you will kick up a lot of dirt. Remember, you’re not building a ditch.

I normally run the entire right line out, then the left side back before finishing each stone. Doing each stone separately makes me dizzy.


Step 2


IMG_9422


Stubborn edges like these must be raked out. If you just rely on your blower you will have to make a debris pile anyway. The rake worked just fine in this case.


Step 3


IMG_9423


Blow off the stones and note how beautiful they look with their sharp edges; separated from the lawn. This should be done periodically between May and November when the lawn grasses are the most active. This is NOT a weekly task. This work should hold for several weeks.

And don’t forget round drains while you’re at it. They actually serve a more crucial function in the landscape so keep an eye on them.


IMG_9426

A rescued drain.


If you have yet to fall in love with a blade edger, I hope this blog post will inspire you. It’s important to check lawn creep around drains and stepping stones and redefine all hard edges periodically.

Can you really machine gun your rhododendrons?

By | Pruning | No Comments

June on the West Coast means mid-season pruning and on large strata (multi-family) sites there can be a lot of it. So we’re busy power shearing shrubs and making sure the clean-ups are as good as the pruning.

Shrubs like dogwoods, snowberries and currants are easy to power shear into shapes because they’re fairly soft and they grow back very quickly. Almost too quickly.


IMG_9400

Left to right: Cornus, Symphoricarpos and Ribes, all are easy to power prune.


But what about rhododendrons? Can you really power shear rhodos like the other shrubs? I witnessed this recently and I don’t think it’s a good practice. I know, there is often very little time for mid-season pruning on large sites. It’s almost stressful to get everything under control and looking decent. But still, compared to the other shrubs rhodos are like the one-percenters. They give us a great show when they’re in bloom, they’re woodier and they deserve better treatment. I say spend the extra time on them.


IMG_6414

Not a bad show.


Also, unlike the shrubs mentioned above, they don’t grow as quickly. There is no need to rush rhodo pruning. I’m convinced that if you want a good-looking rhodo in your garden you must hand-prune it. Keep your power shears for softer shrubs.

Take a good look at the rhodo below. This is the finished product before clean-up and I can’t say I would recommend this approach to anyone.


IMG_9396

I hate the look of this because there are too many “sticks” and shredded woody branches poking out.


IMG_9399


This specimen was power-sheared along with the other shrubs which I believe was a mistake. Note the shredded wood and branch ends poking out. It’s not pretty.

If you take a bit more time you can prune it properly. First, remove any dead wood. Then, check for any nasty crossing and rubbing branches. After that, remove any branches that are touching the ground.

If you’re worried about height then clip off the newest growth with your snips. And if you have even more time, hand pick the spent flowers carefully without damaging the new buds. By taking extra time for rhodo pruning you can shape it nicely without creating unsightly wood forks.