Category

landscape maintenance

Lace bug infested rhododendrons

By | gardening, landscape maintenance | No Comments

As frequently happens, I get interrupted from my tasks to attend to strata owners’ requests. Today was a statutory holiday in British Columbia so we hit the site with a California-style mow-blow-go service. Of course, this also meant that residents who would normally be at work were home.

And off we went to see the lady’s front entrance rhododendron. The owner said it’s been suffering with white flies for five seasons. She gives it fertilizer and prunes it twice a year to keep the height in check. It doesn’t flower much. Aha, I could feel a blog post brewing in my head.

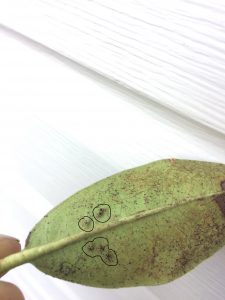
Bugs on leaf undersides

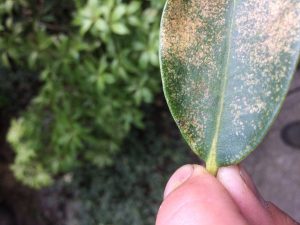
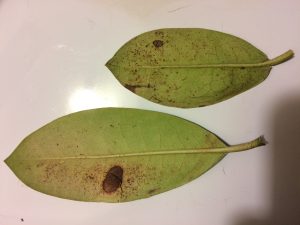
I examined the leaf undersides but found lace bugs instead of white flies. Since both bugs are sucking insects I knew sprays are usually employed to control them. So I snapped a few photos and made a note to do some research when I got home. I’m also fortunate to have great contacts to reach out to when I need help. One is municipal gardener Tracey Mallinson and another is Dr. Linda A. Gilkeson.


IMG_5668ed

The lace bugs are clearly visible.


IMG_5670

Clearly the work of sucking insects.


IMG_5698


Rhodo


IMG_5673ed


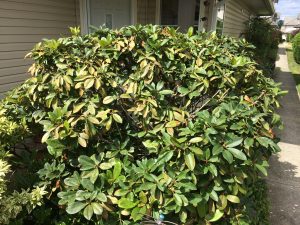
Let’s examine the rhododendron. It appears to be in too-sunny a location. Rhododendrons in shadier spots don’t suffer as many infestations. This goes for Azaleas and Pieris japonicas.

The shrubs looks OK from distance but the insect damage is obvious up close. Flipping the leaves upside down, it was easy to spot the lace bugs. The Pieris japonica on the left is also affected.

I have no idea how much rhododendron fertilizer the plant gets but I’m assuming the owner follows the label. Another suggestion online was to keep the roots moist.

The owner prunes the rhodo twice a year to keep its height in check. She enjoys the privacy she gets but doesn’t want to be overwhelmed. This made me think of Japanese gardeners who refuse to prune trees and shrubs that show signs of weakness. Instead they ask the owner to nurse the plant back to health.


Solutions

Best course of action in July would be direct forceful blasts of water on the underside of leaves. I’m sure there are commercial insecticidal sprays but once you go the chemical route you’re stuck. Dr. Gilkeson states that the sprays must be repeated 10-14 days later and there is some danger that the sprays could burn the leaves. We don’t have that problem with water; water is also considerably cheaper.

The best solution would be for natural predators to arrive and feast on the lace bugs. Patience!


Examining details in the landscape

By | landscape maintenance | One Comment

In my capacity as landscape supervisor I continuously examine landscapes and look for details. Here is what I found last week.


Tree suckers


IMG_5308edIMG_5309ed


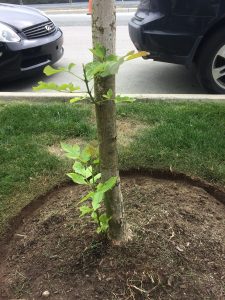
Since we don’t want branches developing this low on our boulevard trees it’s best to snip them off. I always carry snips on my belt so this was a quick job. One exception would be really young trees. On young trees the lower branched shield the bark from potential sunshine damage. We can leave lower branches on, noting their eventual removal in subsequent seasons.


Lawn care rookies

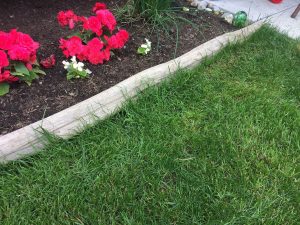
Staff training never really ends. I like to gently point out mistakes and suggest corrections. As soon as possible. Just remember that some skills require significant amount of time to master. This applies to line trimming. Our new girl is still terrified of causing damage so she lacks the required aggression. Driftwood is fairly solid so we can take some liberties and get close enough to remove the shaggy grass edge. If driftwood chips fly off, we are obviously too close. We’ll give her more practice time on the line edger and she will improve. I know it takes time.


IMG_5312ed

Our new worker will eventually get close enough so the shaggy edge is removed down to mower height. Practice time required.


IMG_5326ed

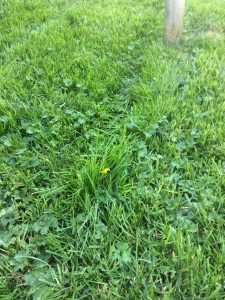
This massive “Mohawk” is hard to explain.


Weak trees

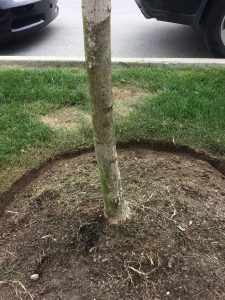
It’s easy to spot the one weak red maple (Acer rubrum) on this street. Then you have to ask why it’s so weak when its sisters are doing fine. We found out the cause when we attempted to plant boxwoods around the weakling. The soil was so waterlogged we delayed the boxwood planting.

Water displaces oxygen in the soil and if nothing changes, plants suffocate and die. I believe the water leak problem has been corrected so we’ll see what happens with the red maple. My fingers are crossed.


IMG_5324ed

One weak Acer rubrum surrounded by thriving sisters.


Cedar hedges


IMG_5321ed

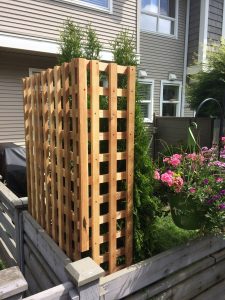
I personally planted these two cedars (Thuja occidentalis ‘Smaragd’). So I check on them when I can to see if they’re getting watered. Cedars are thirsty in their first year.

Then this week I noticed a wooden trellis around the cedars. The owner had installed it to protect the cedars. But all I see is shading. The trellis blocks light and will most likely lead to browning. That’s not what the lady wanted to hear.

The above is what I noticed on my sites last week. Pay attention to landscape details.

What did you notice?


Obstruction in the landscape

By | landscape maintenance, Pruning, Strata Maintenance | No Comments

Obstruction in the landscape is a well-known theme but it’s often missed or ignored. Especially by newer crew leaders and workers. So let’s examine some cases of obstruction and learn from them.


Spring rains

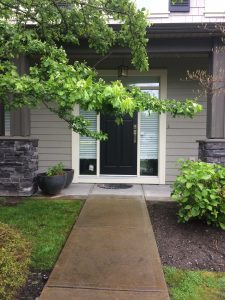
This is what happens after spring rains and early season growth. All of a sudden we have obstruction everywhere. Immediate corrective action is required by people’s front doors.


IMG_3201ed


Walkways

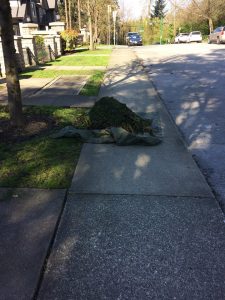
It happens all the time. Your new worker concentrates on his lawns and in his rush to complete the work places his tarps on walkways. Then a senior citizen pulls up in a motorized scooter and we have a problem. If you think senior citizens aren’t capable to angry outbursts and middle finger salutes, think again. Never block walkways.


18119349_10203111679748423_6949587408846556966_n

This isn’t the best place for a tarp.


IMG_4381ed

Much better and stress-free!
 

Signs

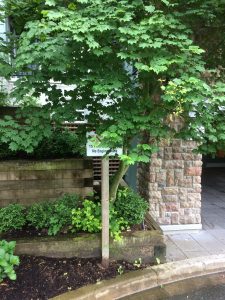
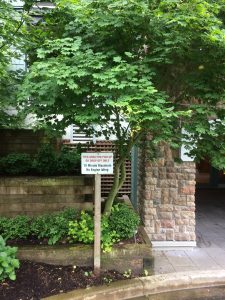
Signs exist because they have a message to convey. It’s easy for vegetation to obscure them so check your sites and take action. This is especially true for sites you have recently taken over.


IMG_4202ed


IMG_4203ed

Much better.


Exits

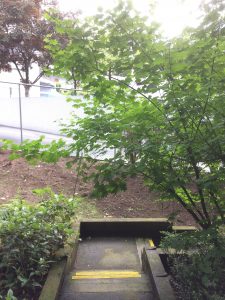
All exits should be clear. This example is from a neglected strata site. I pruned off the offending maple tree (Acer circinatum) branches in a few minutes. The residents must have been ducking here for months.


IMG_4472ed


IMG_4676ed

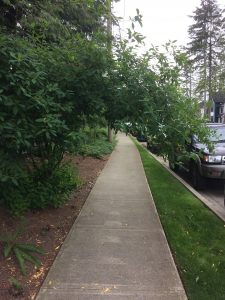
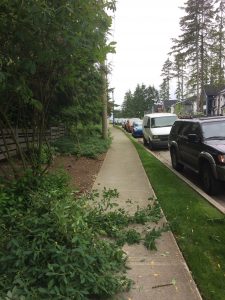
Another walkway example with Indian plum going wild.


IMG_4677ed

Problem solved!
 

Peonies

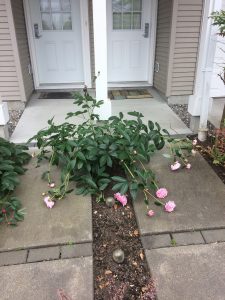
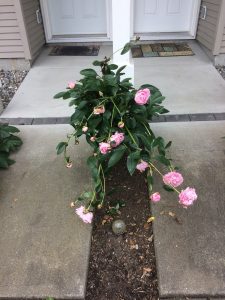
Peonies usually require staking and more space. I used a bit of string and two minutes.


IMG_4689ed


IMG_4704ed


Parking stalls

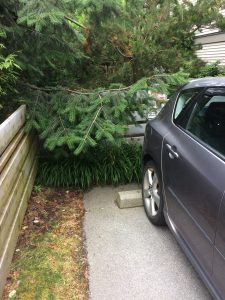
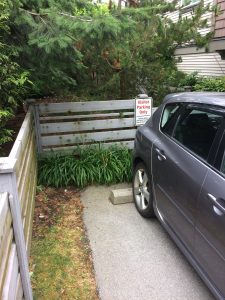
Parking stalls should always be clear of any obstructions. This took one cut with my snips.


IMG_4889ed


IMG_4890ed

Done!


Vehicle site lines

This one is much harder to spot. Residents driving out couldn’t clearly see other approaching vehicles so I had to prune the maples. Note that you should be able to see through Japanese maples (Acer palmatum) anyway.


IMG_4758ed


IMG_4760ed


Dog waste

This is a most disagreeable topic but let’s not be shy. This is what it looks like on the ground for landscape maintenance workers. The ignored long grass indicates the presence of large dog waste piles. So in this case the obstruction is created by the owners.


IMG_4691ed

Dog waste in the open, urine soaked lawn and hidden inside shaggy islands.


Future obstruction

This is an interesting small yard. I once took the liberty of pruning a few branches off this Magnolia so we could get through the gate. The owner had a fit, calling us nasty names. Unjustly, I believe. She planted two Magnolias in her small yard never bothering to read the tree tags still attached to the trees. Considering the future size of these trees I fully expect this owner to beg me to prune her trees in the future. Always consider the mature size of your new trees before planting them.


IMG_4947ed


Obstruction in the landscape is a well-known theme. Train your workers to spot it and correct it.

Landscape maintenance without discrimination

By | landscape maintenance | No Comments

Good landscape maintenance dictates that we periodically cover the entire site. On small sites this can be accomplished weekly. On larger sites, you can work out a four-week rotation. But the goal should be complete coverage without discrimination.

This was going through my head recently when I was asked to prune and clean up many parking stall inlets on a large site. This wasn’t a new idea; the work was on the site to do list for quite some time. But because the parking stall inlets are lower profile, they get pushed back. It’s not sexy work.

I am convinced we have to fight this discrimination. I treated every single parking stall as I would the main entrance and clubhouse areas. That’s what professionals do.


Parking stalls


IMG_3389edit3


Take a few minutes to examine the picture above. It’s hardly an inspiring area. You can see how workers would gravitate toward a clubhouse area with nice grass and plants. So the boss sent me in. Supervisor Vas on the case. No big deal. I don’t discriminate.

Step 1: set out tarps on the river rock because once cedar clippings get stuck in the rock they are extremely difficult to clean up. Raking is brutal and blowing is effective only up to a point. The clippings will get lodged in the rocks. Definitely set out two tarps to avoid headaches later.

Step 2: shear the hedges like you normally would, tight on top and lighter on the sides. All signs must be clearly visible. Once a year should suffice. Twice is OK.

Step 3: clean up and cultivate at the base of the cedars; try not to remove too much bark mulch. Also check the river rock areas for weeds. I found one that required extra time for weeding. Again, aim for complete coverage. Never discriminate. Even low profile parking stall river rock areas should be weed-free. The last thing we want is weeds producing seeds.

Step 4: watch for parked vehicles so you don’t cause any damage. You can always come back later.

Step 5: gently blow off all edges when you do your site courtesy blow.


Discrimination by design

Some landscaping companies give their workers tight deadlines so they have no choice, they have to discriminate. When this is the case, most maintenance tends to happen at high-profile areas like entrances and clubhouses.

Again, this is a bad idea. Very bad idea. Good landscape maintenance is done without discrimination. I’ve seen this at a Burnaby site that went downhill fast. Two low-budget European workers had exactly two hours to spin their magic. And there wasn’t much magic.

By contrast, we have six workers at a neighbouring site all day! Our work involves a three-week rotation so that the entire site is covered. Parking stalls included. No discrimination.

Conclusion

Cover 100% of your work sites periodically so there isn’t any discrimination. Treat lonely corners the way you would high-profile clubhouses. This will lead to happy clients and renewed contracts.

Tree well mulch mountains disaster

By | Arborist Insights, landscape maintenance | No Comments

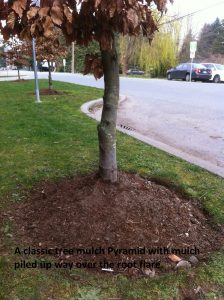
Mulch mountains in tree circles is a disaster that just won’t go away. I had written a short blog post about this in 2015. Fast forward to February 8, 2017. Sitting in on a lecture by Dr. Bruce Fraedrich of Bartlett Tree Experts, I was reminded of this issue again.

According to Dr. Fraedrich, he has been talking about this issue for over 25 years! The issue isn’t going away. In his presentation he showed one tree well mulch mountain with his child; the other photo was with his grandchild. Point made.

Why mulch?

There are many benefits to putting mulch into tree wells. If it’s installed properly. Four key benefits are listed below.

  1. Water conservation.
  2. Weed reduction, assuming we install the mulch at a decent depth. Going light on mulch can actually encourage weeds to grow.
  3. Improved soil quality.
  4. Enhanced plant growth.


The key issue


IMG_5742ee


The installation workers, presumably landscapers, piled the mulch way over the root flare. It looks pretty. But it’s bad for the tree. Why?

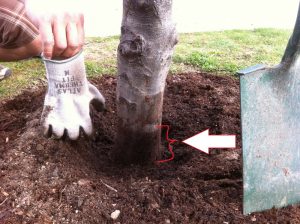
Piling mulch against the trunk of trees and shrubs creates a dark, moist, low oxygen environment to which above-ground tissues are not adapted. See the picture below. Fungal diseases require precisely this kind of moist environment to grow and reproduce; and to eventually enter the plant.

Opportunistic pests are also more likely to invade a plant whose bark is wet due to excessive mulching.

It is also possible to get adventitious roots developing in the moist zone. These roots grow and circle the tree potentially causing girdling.


IMG_574ee0


Solutions

Extend the existing tree circle out farther, if possible. Then remove all excess mulch from the trunk and use it in the extended circle zone. If the circle can not be enlarged then still remove the excess mulch and use it elsewhere.

The look we want is donut-shaped. This will protect  the soil environment and above-ground tissues.

Include this work in your regular landscape maintenance. Periodically check your tree wells and remove any excess mulch from tree trunks. Train all staff.

Coordinate with installers. Sometimes they are young labourers with strict time guidelines. Sometimes companies send people to blow mulch in. They need good directions and supervision.


How to achieve privacy with yew hedging

By | landscape maintenance, Strata Maintenance | No Comments

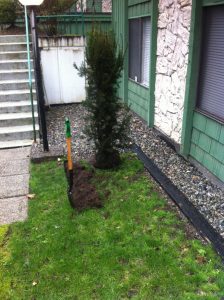
Privacy is a huge issue at some multi-family strata complexes. One way of achieving privacy is through hedging. This then was my task late in March. I’m not sure why the previous landscape maintenance company didn’t complete this project. It was clearly near the top of the strata list. It took me one day to complete it. I hope the residents appreciate their new privacy.

Step 1 Supplies

The first step obviously involved shopping for supplies. I picked up pre-ordered yews (Taxus x media ‘Hicksii’) at Specimen Trees in Pitt Meadows, a wholesale tree and shrub supplier. I love this place because it’s full of labelled trees and one of friends works there. Since it rained heavily, off-roading in my company truck was a huge bonus.

I also picked up a yard of soil amender. KEY: always top-dress your new installs for instant great look and to give the new plants a nice ‘kick’ with fresh soil.


IMG_2541

Pre-ordered yews at a wholesale nursery


Step 2 Bed preparation

This step was fairly easy because there used to be a row of cedars providing privacy; until they died. This meant that the new grass wasn’t as established and the soil underneath was good. KEY: Considering the recent summer heat wave and winter snow load damage done to our landscape cedars (Thuja occidentalis ‘Smaragd’), companies are switching to sturdier yews (Taxus x media ‘Hicksii’).

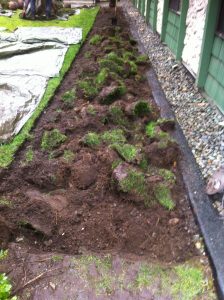
First, establish a deep edge line with a ninety degree edge. Then, dig up the turf and remove it. Warning: not all facilities consider grass chunks as green waste so ask first. It’s still fairly cheap to dump it but make sure it’s on the correct pile, especially if there are rocks attached.

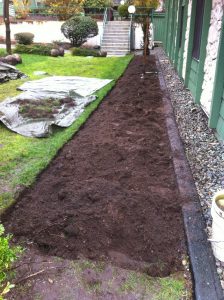
Complete your bed preparation by levelling off the soil.


IMG_2543

Establish deep edge.


IMG_2545

Remove all grass chunks.


IMG_2548

There used to be a cedar hedge here so the soil is fairly good.


Step 3 Yew install

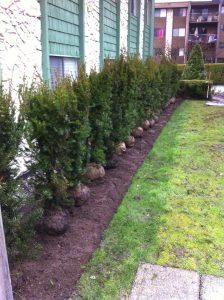
I set out all twenty yews in the bed to make sure the spacing was correct. Then I installed the yews one by one. Each yew was treated the same exact way. Each plant was set in the hole and positioned so its best side faced the walkway. Who wants to look at stems? Make sure the plant is nice and green and full on the high-profile side.

Next, cut the string and remove it. Also remove the top third of the burlap. Then plant the yew slightly higher in the hole because the root flare is slightly hidden in the clay root ball; and remember, we will be top dressing everything at the end.

KEY: Backfill your planting holes with the original soil. It might be tempting to use the nice new amender from the truck. Don’t do it. Water will find it easier to enter the planting hole, it will waterlog and your yews will fall down like joysticks. Always use the original soil for back filing.


IMG_2549

Set it out and check for correct spacing


Step 4 Double-check and top-dress

Almost done! Double-check every single yew for positioning and then top-dress with soil amender. KEY: Make sure the plant root flares aren’t covered in inches of soil. Install the soil so it doesn’t cover the root flare. Then, touch up your deep edge, collect any debris or garbage and do a courtesy blow.


IMG_2553

All done!


Conclusion

Projects like this can be very satisfying. The residents get some privacy back and your helpers get to break their landscape maintenance monotony. The yews should perform better than the original cedars.


Lawn aeration: start with why

By | landscape maintenance, Landscaping Equipment, Lawn Care | No Comments

My introduction to lawn aeration wasn’t the best. My employer at the time, a prominent Lower Mainland landscape maintenance company, forced me to aerate roughly one half of their many strata properties. Incredibly, nobody even told me why we were putting holes into lawns. And the days were so busy I forgot to ask. I was that new to landscaping. It usually took two crews three weeks to aerate all of the properties.

Start with why

Now, many years later, I get to train new workers in the field. Before they even got to touch the lawn aerators, I made sure they knew why they were doing it. Armed with this knowledge, their physical punishment is easier to take. It also limits corner cutting. Once the dudes get tired, the number of holes and their depth decline. Don’t let up. Push on.

The one best thing

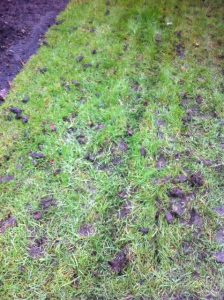
If you don’t do anything to your lawn all year, definitely aerate it in spring. Aeration allows air and water to reach the grass root zone which improves growth. Leave the cores on the lawn. They will disappear in no time.

Home owners without regular landscape service will probably get a knock on the door from a young guy with a pamphlet and machine in the driveway. Most strata landscape maintenance contracts include this service automatically with lime application.


photo 5 (6)

Aerated lawn. leave cores in place


Hands vs machine

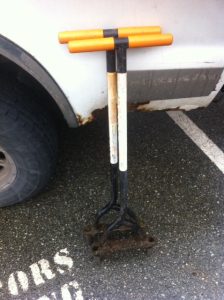
If you have a smaller lawn you can easily hand-punch it with a hand core aerator. I love the Fiskars model because it’s larger and doesn’t get blocked with debris like smaller models. I use it on smaller client lawns where renting a machine wouldn’t make sense.


photo 4 (6)

Fiskars core aerator for small lawns and inaccessible corners


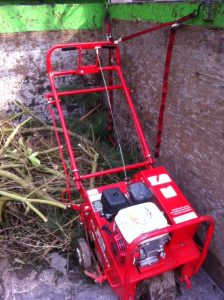
If you have larger lawns, you will need a machine unless you have a teenager at home with energy to burn. It’s fairly simple to operate. Just remember to slow down as you approach pavement and fencing. The big hog needs a second to slow down.

The machine comes with weights so use them to get nice deep cores. Skip the extra weights if your lawn is soft. Remove them when loading and unloading the machine!


photo 5 (7)


Conclusion

Let’s review. Lawn aeration allows water and air to reach the grass root zone and should result in a healthier lawn. If you don’t do anything to your lawn all year, at least aerate it. It’s worth the effort. Your lawn will thank you for it.


Five hernias, really!

By | health and safety, landscape maintenance | No Comments

Five hernias! That was the news an experienced landscaper delivered to his boss. That’s not good. Experienced, senior workers are expected to do a lot in the field. When they go down, production can suffer. Sometimes hernias require surgeries and rehab. They definitely lead to light duties for affected workers. For months.

I’m not a medical doctor, nor is this blog about diseases and ailments. But we must note that hernias happen when abdominal muscles fall out of place. There are many types of hernias. Not one of them is fun.

Key issue: you can get a hernia by lifting heavy objects improperly. That definitely applies to landscaping.

The worker above is incredibly stubborn and set in his ways. By examining his mistakes we can educate future landscape workers and thus avoid future medical issues.


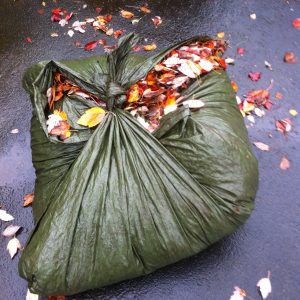
  1. Don’t make tarp “bombs”! If your company uses tarps to collect green debris do a simple pull test once in a while. Can you still pull your tarp along? If it’s becoming difficult, tie it up using slipknots and get a new tarp. This is especially important when you work in hard to access corners of your landscape.
  2. Don’t be a hero! If you or your team mates made a tarp “bomb”, get help lifting it. You won’t look soft. You definitely won’t be a hero in a doctor’s office. Get help with heavy tarps. Big bombs can happen when you are short on tarps, for example. Whatever. Just try not to make them.
  3. Don’t be a tarp slave! Move your work truck closer to your tarps or use a good commercial wheelbarrow. Do not be a tarp slave. It destroys your back and can give you a hernia. It’s also inefficient. Consider my favourite story: working on a boulevard with my crew, weeding and cultivating, I looked up and saw four workers walking away. Each worker had a tarp on his back and I didn’t see them for another 15 minutes or more. That was extremely upsetting since we had a wheelbarrow 15 meters up the boulevard from me. One worker could have done the trip to the truck, maybe two. Not four.


IMG_5635edit

Vas as tarp slave, only do this for short distances


IMG_9524

Note slipknots for easy release; if it’s too heavy, get help