Deep edging is an easy but labour-intensive landscape task. It gives our planted beds a nice definition and, if you read this blog regularly, you will know how to do it.
Deep edging 101
Grab an edging shovel and drive it into your bed edge at ninety degrees. This will give you a nice sharp edge.
The depth depends on conditions and your needs. Personally, I love deep, ankle-busting edges but it makes me extremely unpopular at work.
If your edging generates grassy chunks, shake off the soil and discard the grass.
The last step is cleaning up the chunks with a rake or cultivator so the bed surface is nice and smooth without visible chunks.
One exception
There are exceptions in life and in landscaping. I’m repeating myself a little bit but only because I ran into this one deep edging exception last week.
Pro tip: Training never really ends. Pay attention to all new workers.
Everything ran smoothly for hours until we hit a nicely mulched bed. This is where we have to disconnect the autopilot. The edging chunks landed on top of the mulch and now this blog post is called a deep edging faux pas.
It’s a mistake because the chunks mess up the nice, ordered look of the mulched bed. Instead, we have to do one of two things.
Deep edge the bed but do not kick the soil up. Just leave it dislodged so we can manually remove it without messing up the bark mulch.
Or you can rake the bark mulch away from the edge, deep edge, remove any excess soil and, lastly, rake the bark mulch back into its original place.
In this particular case, we didn’t do any major harm. I picked up the chunks and cultivated the bark mulch to incorporate any soil into the mulch. And the client will never know.
Conclusion
Deep-edging is an easy landscape task but be careful when you deep edge freshly mulched beds. You have to take a few extra steps to deep edge these areas.
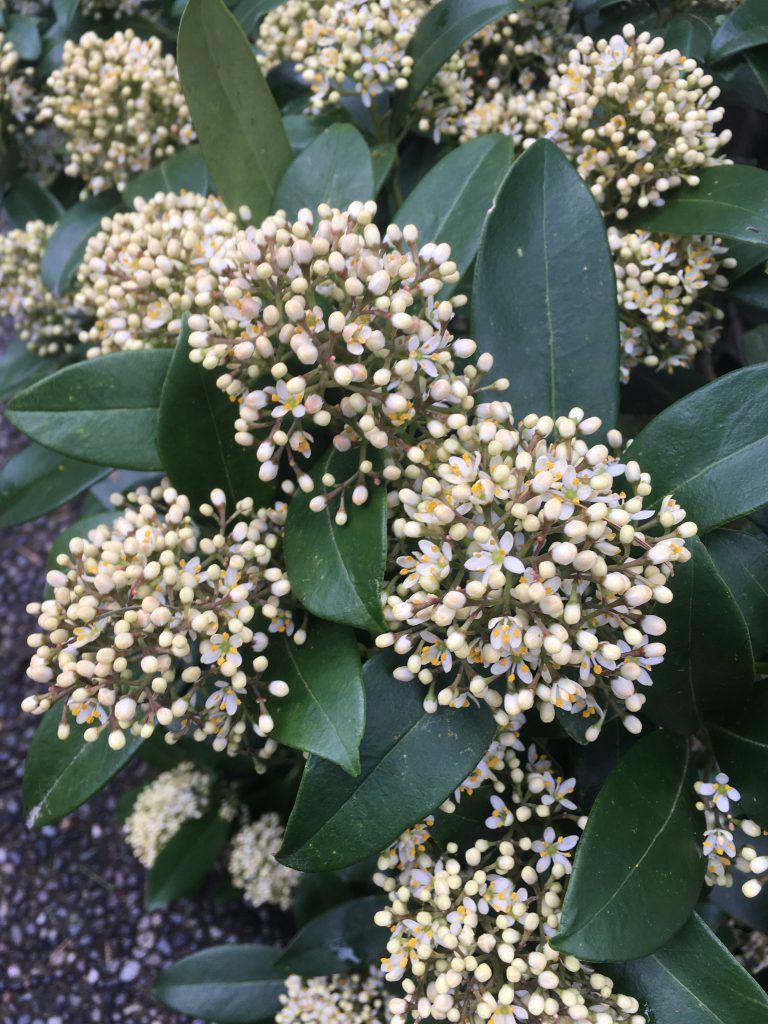
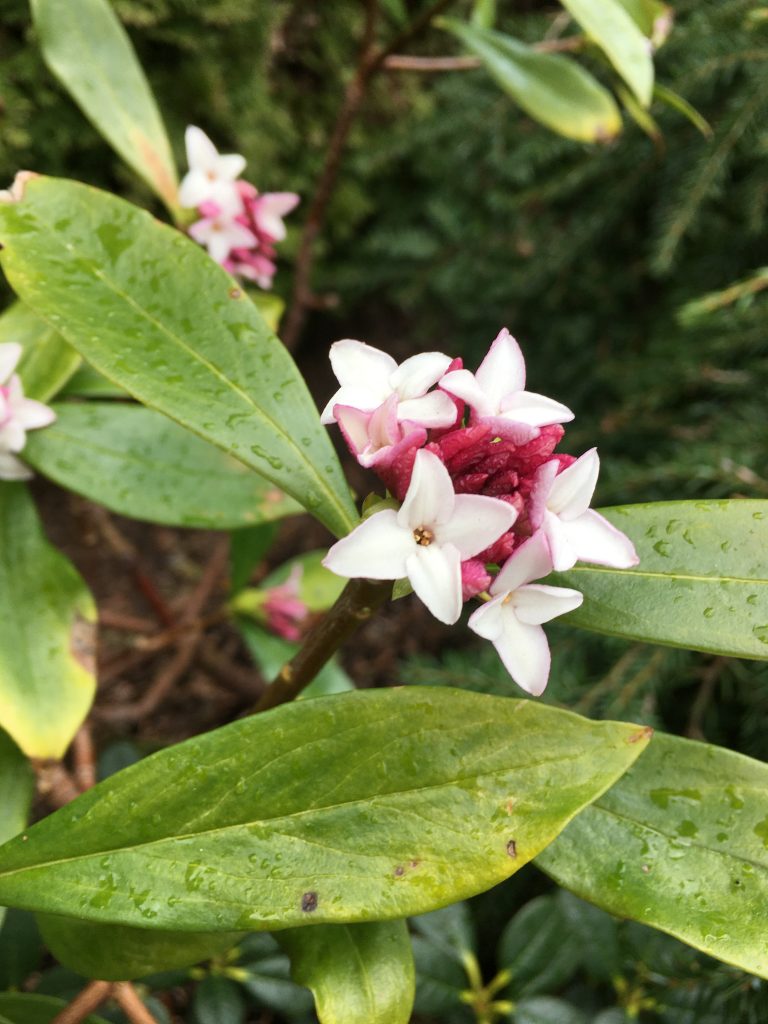
Spring 2020 is a bit strange because of the coronavirus but we can still enjoy the new spring colours as they emerge. Some of the plants are also super fragrant, like Skimmia and Daphne.
Doronicums are very happy, simple flowers, I first encountered when I worked for a municipality in 2014. Mass-planted they look stunning in the early season landscape. Why I still don’t have any on my patio is a mystery. Full sun.
Camellias are landscape favourites and it’s easy to see why. The flowers are beautiful and the foliage glossy.
Skimmias are super fragrant at the moment. I noticed the fragrance before I noticed the source of it. Then, I stole a bit of company time to enjoy the scent until the resident behind the window started wondering about me.
Oxalis is an all-star for shady corners, especially when mass-planted as it was here, correctly, under Rhododendrons. In small clumps it could be mistaken for a weed.
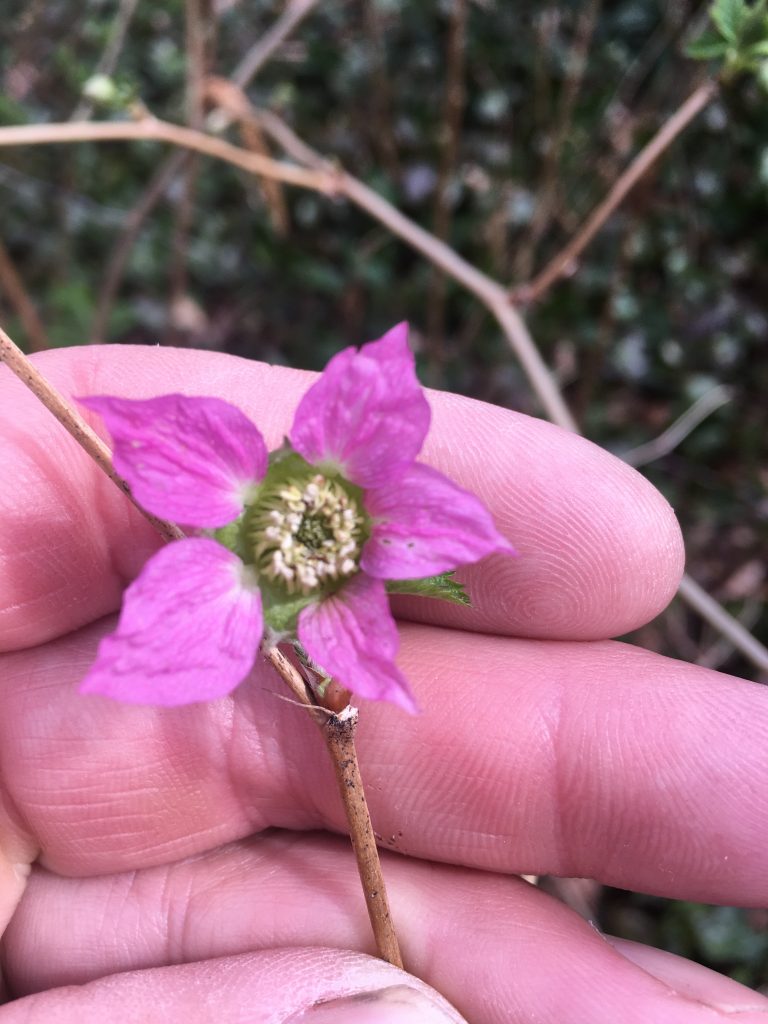
Salmonberry (Rubus spectabilis) is a West Coast native shrubs. The flowers eventually turn into edible berries. Local bears love them but I had to talk my little kids into trying them.
Daphne is also very fragrant but I had to get closer to catch the pleasant scent. Trust me, get closer.
Viburnum tinus is a nice shrub but it’s often attacked by the beetle Pyrrhalta viburni.
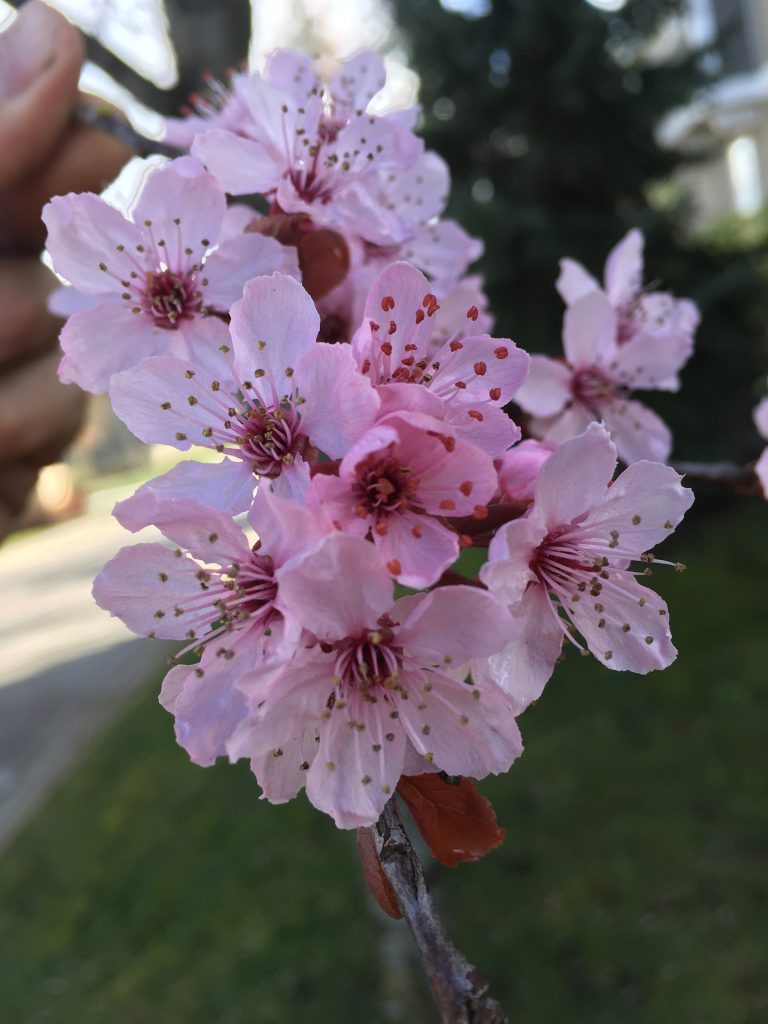
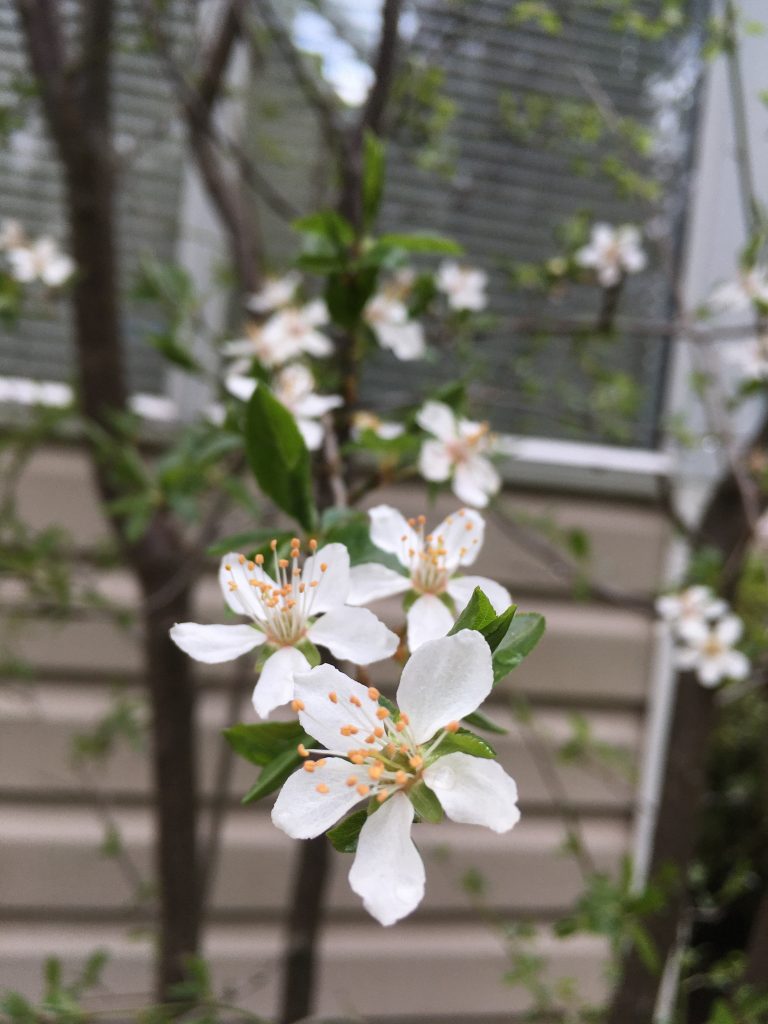
Plum blossoms are just as beautiful as cherries and they remind me of my time in Japan. Here the tree brightens up the entrance.
Conclusion
What plants are you enjoying this spring? COVID19 may be dominating the news and affecting our lives but it’s important to stop and enjoy the colour in our gardens. For me it’s a dose of the familiar, in a super strange season. The odd fragrant plant also helps. Enjoy the spring!
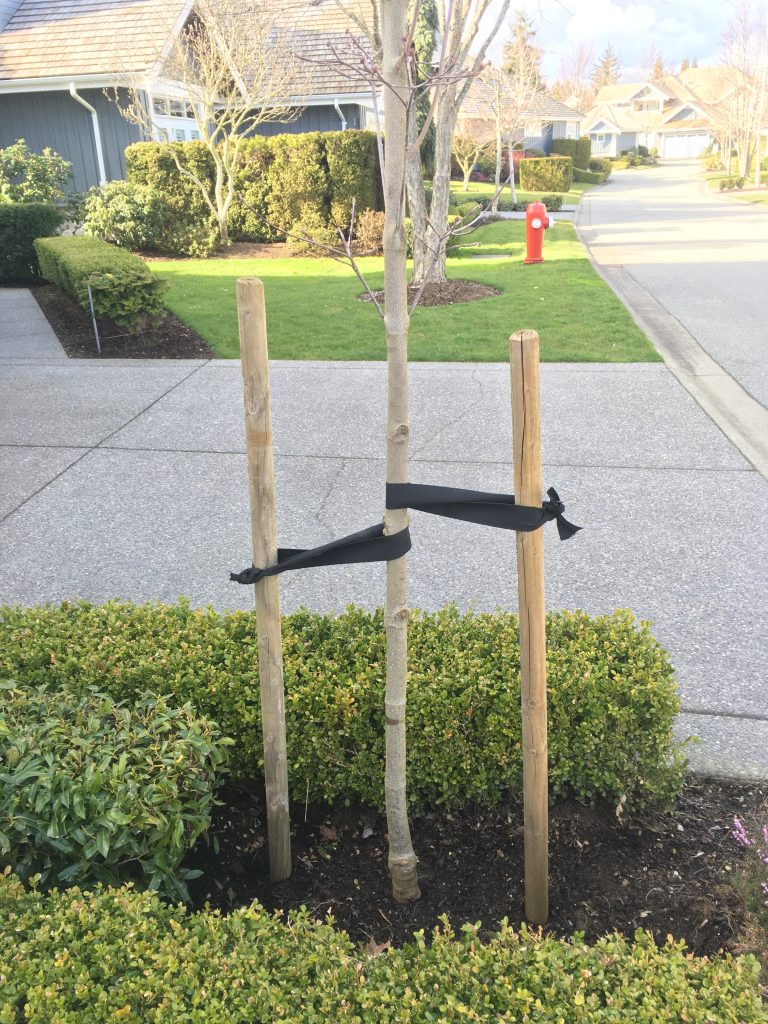
Tree staking seemed really easy to understand and pull-off. Ever since I started landscaping in 2000, I’ve used two or three stakes with good quality arbortie to stake newly planted trees.
But now, thanks to my landscape professional friends in the United States, I know that there is more to staking than meets the eye. And I love the idea of learning new techniques even twenty seasons later.
Pro tip: Always be open to new ideas and techniques. There’s so much to learn.
Regular staking
I have had lots of practice with tree staking because I have twenty seasons in the field; and because I went through the Landscape Industry Certified program. There, one of the practical stations was tree planting and staking. Let’s ignore tree planting for now. I will cover it in a separate blog.
Depending on the specifications, I had to drive the tree stakes just outside of the root ball or inside. To pull it off, you’ll need a metal stake pounder and ear protection.
First, the pounder goes on the top of the stake and then you stand it up, line it up and drive it in. As the metal pounder hits the stake, it gets very loud quickly. That’s why my failure to wear ear protection during testing cost me points.
Incredibly, I would need three attempts to pass this practical station.
Second, you secure good quality arbor tie to the stakes and loop it around the tree. It should be just tight enough; not too tight and not too loose.
Pro tip: Tree stakes should only stay on for a maximum of 14 months. Beyond that the tree will get “lazy”; it won’t form the reaction wood it needs to grow strong and withstand future wind storms.
One example of standard tree stakes.
Staples
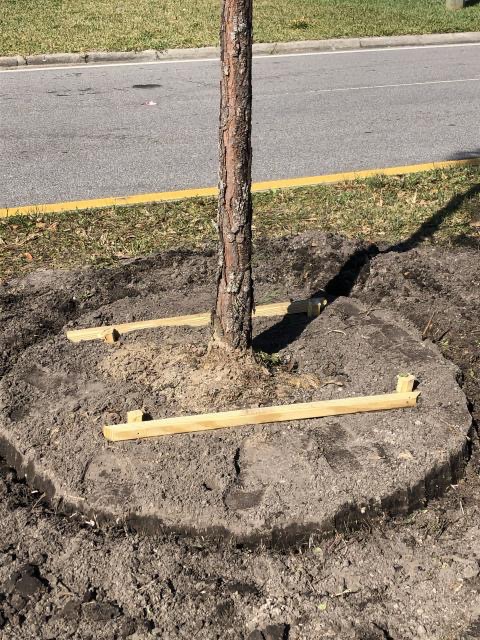
Stapled pine tree in Florida.
This was news to me. Instead of above-ground stakes this pine in Florida is stapled with stakes. First, four stakes are driven into the root ball and then both pairs are connected together.
Obviously, the wood size would increase with a bigger root ball. Here it’s a 2×2″.
Advantages
The stakes are mostly hidden so they don’t stick out like regular wooden stakes, which many people consider unsightly.
The tree develops reaction wood as it moves in response to wind events. In this example, the pine survived a recent hurricane storm that hit Florida.
There’s no need to go back and remove the stakes.
Nobody will forget to remove the stakes.
There is zero chance of girdling because there is no arbor tie connecting branches to the stakes.
Conclusion
Keep your eyes and mind open to new ideas and techniques. I was blown away by the stapling technique even though it’s not new. It was new to me and I would love to try it one day.
I love Honda commercial lawn mowers because the engines are great and the mowers stand up to a lot of beating during the season. And now Honda came out with a great new push mower model: HRN 216.
The new HRN 216
Recently I got to use the new Honda HRN 216 push mower as our cutting season started. And just barely, with the COVID19 pandemic raging in British Columbia and everywhere else.
Honda put a new powerful GCV170 engine into this new mower and I’m sure it will do well all season with heavy weekly use.
Improvements
There are some important improvements to note. One, this new mower produces finer clippings which means that more clippings fit into the bag. This results in less time spent emptying the mower bag and more time mowing. I suspect this will make all landscape company owners very happy.
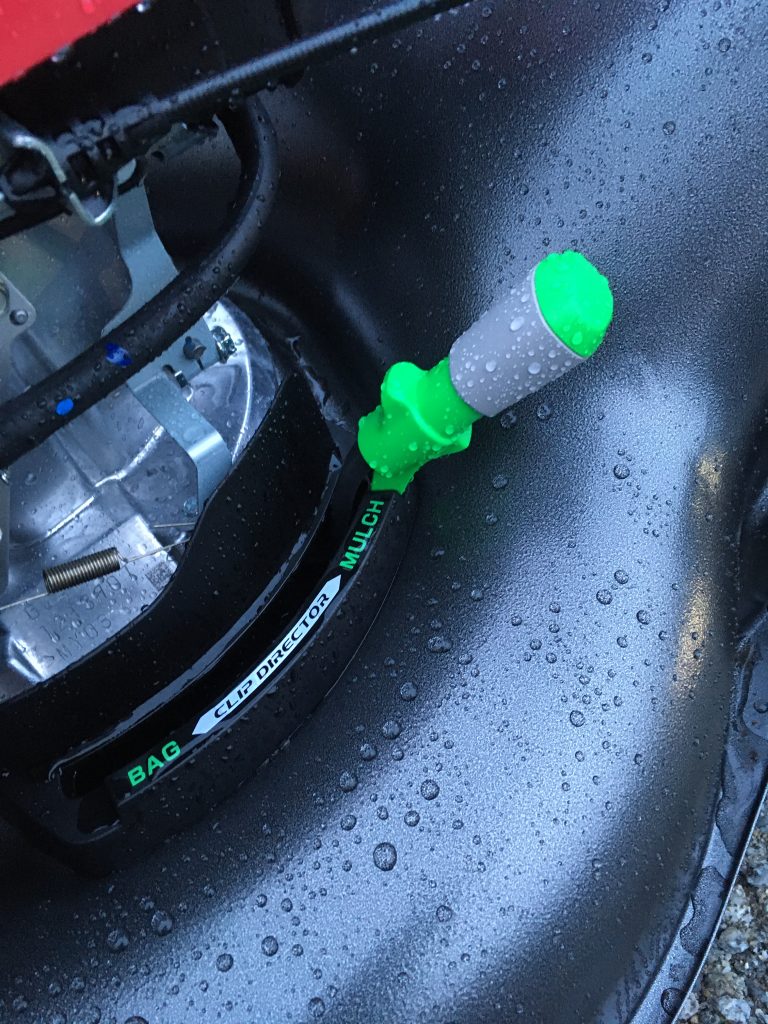
And two, because the mower produces finer clippings, they become better mulch. And finer clippings means that fewer clumps are created and grass distribution is better.
Remember, mulching grass clippings is free fertilizer and I recommend it. One problem with mulching has always been the clumpy look on top of the lawn and this new beast should eliminate the problem. (I have yet to try the mulching function.)
The green mulching lever is easy to use and doesn’t require any tools.
Three, Honda shows clogging tests on their website and promises superior clogging toughness. Maybe I will get to test it in the field, especially on wet days.
Weak point
While Honda produces great engines, one problem (not exclusive to Honda mowers) has been the wheel adjustment levers. As the mowers see heavy use, the wheel adjusters become loose or break right off.
The new HRN 216 has dual-lever height adjustments which means that you only have to worry about two levers, not four.
Conclusion
In conclusion, I can’t wait to test this new Honda mower more extensively in the field. I want to see the finer clippings and less clogging. Assuming Honda delivers on its promises, this new mower will be a beast.
The Red Seal Journeyman Horticulturist program is a win for everybody involved and this blog post is for those considering the four year apprenticeship. Becoming Red Seal certified is a worthy goal.
In exchange for their hefty sponsorship, employers lock-in their apprentices for four seasons. And because it’s slow in winter, they can afford to lose their workers for six weeks.
Apprentices avoid the nastiest part of the season and go to school for six weeks. Then, for the rest of the year they work alongside genius landscape supervisors like me, absorbing world-class knowledge. (With little kids at home, I challenged the Red Seal exam because I had multiples of the required 9,700 hours in the field; and couldn’t afford to take time off. Doing the full four-year apprenticeship is much better.)
Lastly, British Columbia gains certified trades people who provide great service to their employers and clients. In theory, they should also make more money and move up. In practice, this is trickier than it looks.
Lynda
If you follow my blogs you will already know about Lynda, our star landscape horticulture apprentice. She kindly shared her experiences after levels 1 and 2, so I begged her to continue after completing her level 3. And I mean I begged her.
Lynda shearing and listening to Ariana Grande. Always use proper ear protection.
Question: How does level 3 differ from 1 and 2?
Answer:
Level 3 was different from level 1 and 2 in the sense that it was more practical. You studied subjects that were more relevant to what you would actually do on the job. You would go out and actually identify the plant on site, instead of trying to identify it from a picture in a slideshow. There was a lot more “heavy lifting” when it came to level 3. A lot of level 3 was more centered around landscape construction and hardscape compared to level 1 and 2, which centered around the science of plants.
Q 2: What did you enjoy the most?
A: I probably would say I enjoyed the landscape construction labs the most. But it’s hard to say. This year was hard with lots of tough information. I was more concentrated on just getting through the class.
Q 3: What did you struggle with?
A: I struggled with all the math involved in the course. Compared to level 1 and 2, there is significantly more math to learn in level 3.
A: The atmosphere at KPU is different. It’s relaxed but stressful all at the exact time. The work load and all the information is the stressful part, but getting to know your classmates and working with them on projects, and in study groups is great to help ease the mind of some stress that comes with taking this course.
Q 5: Are all of the instructors cool?
A: No, not all of the instructors were cool. Most of them were, but there were a couple teachers that I personally had problems with.
Q 6: How was the ITA final?
A: The ITA final was difficult. ITA can be tricky with their tests. They like to add things, that you wouldn’t think is important to remember. It is important to remember to look at literally everything as best as you can.
Q 7: What advice would you give to someone about to take level 3?
A: The only advice I can give, try to stay organized, it helps temper your stress if you stay organized. As well as, make connections with your classmates. Start study groups. Work together on stuff. It will make you feel so much more confident and comfortable for these gruelling six weeks.
Irrigation lab.
Now that landscapers can get their Red Seal Journeyman Horticulturist trade papers, it makes sense to go for it by asking your employers for sponsorship. Winter is slow anyway so they won’t miss you. Just don’t forget to thank them later.
Regular readers of this blog will know that I preach about great clean-ups in landscape maintenance all the time. When I prune, I want the clean-up to match the pruning. No excuses, just great pruning and clean-up. Period.
Cedar hedges
On the West Coast we prune cedar hedges (Thuja plicata and T. occidentalis) from early fall until late winter. It gives us work to do in the slower part of the year and it’s better for the hedges because it’s cooler.
But the power shearing generates a lot of clippings and makes the clean-ups extremely annoying. This is because the clippings get stuck everywhere, including in the hedges.
Cones
Cedar cones are especially difficult because you have to use a ladder for the job. This makes it awkward to dislodge any larger clippings from the tree. Just switching from power shears to a rake is time consuming; and using a rake messes up the look of the cedar.
Smaller rectangular cedar hedges are easier in that we can brush off the debris from the tops before finishing the job. Large cones are tricky.
Secondary drop
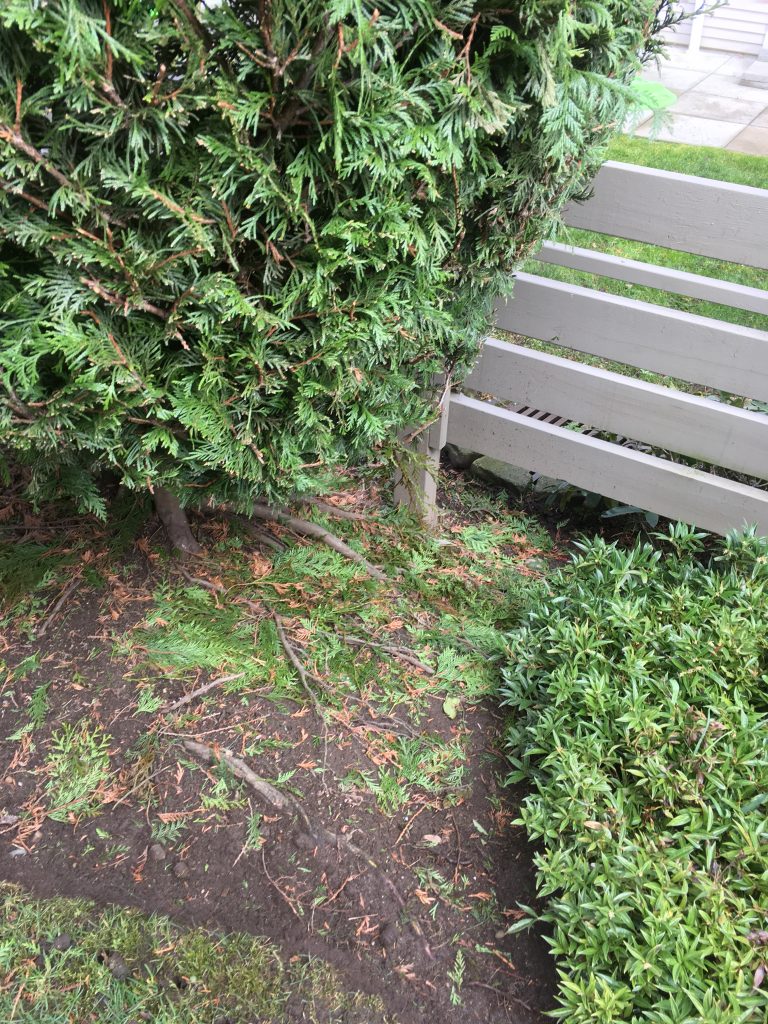
The debris at the base of this cedar looks terrible. It would make any normal landscape foreman freak out and haul his workers back in to re-do it. But not so fast; I took this this photo weeks later. So, we’re seeing the dreaded “secondary drop“.
Secondary drop refers to debris that falls down after the initial pruning and clean-up. It comes with the job so there’s no need to freak out. We have to accept that some debris will fall off the cedars later. We can’t help it.
Pro tip: I know that some people will disagree with me but I am convinced that the bottoms of cedar hedges should be kept shaggier. This is to protect the roots from intense summer sunlight. In the wild, Thuja plicata trees are starting to suffer from more intense summer heat waves.
When you prune cedars, clean-up the clippings as best as you can knowing full well that there will be some secondary drop for you to clean-up later.
It always feels good to test out a new machine and Stihl’s new KM 94 R combi engine worked fine when I tested it recently.
The first thing you will notice is the light weight. All of the combi engines I’m used to are bigger and heavier. This engine is light which is perfect for some awkward jobs; and it’s perfect when you have to shear or edge for many hours at a time. I also think that female employees will appreciate having this lighter unit at their disposal.
On the day I tested this unit, I had to shear tall cedar cones at what I consider to be the top of my tolerance height. So, it helped to have a light engine in my hands.
The second thing you will notice is the power output. It’s a bit of a change from the other engines where the power is noticeable. But, I contend, that this is just habit. Most professional landscapers will get used to it. The KM 94R is not a toy, it does the job.
Also, note that the handle has Ecospeed which allows you to control the engine speed.
The third thing you will notice is that the fuel tank is small. But, if you work like a professional, you will have a jerry can close by ready for re-fuelling. Plus, according to Stihl, this engine is 20% more fuel efficient and spits out significantly less exhaust. I like that.
The unit I tested wasn’t firing as quickly as I would have liked. Other than that, it worked really well. It will cost you just over C$400 and it’s a great addition to your operation because it is light.
Working on a cedar like the one below makes you appreciate having a lighter engine. With the engine at top speed it pruned the cedar like any other machine; and obviously, sharp shears help as well.
Visit your local dealer and add this engine to your operation. You will be glad you did!
My favorite dealer is Tri-City Power Equipment, in Coquitlam, BC. Please visit them at 98 Fawcett Road, Coquitlam, BC or call (604)520-3000. Ask for Gary. They also have awesome mechanics.
Tell them Vas sent you!
(Disclaimer, sometimes I score free Stihl hats for posting this.)
I love it when I get to run field tests on my sites by chance. One such test involved used bulbs. This was the question: are tulip bulbs reliable past the first season? Can you use them over and over?
Fall 2019
In late fall 2019, I did maintenance at a small Port Moody, BC, strata (multi-family) site where the garden liaison stopped me. Would I be able to plant her saved tulip and daffodil bulbs in the dead space I was weeding? Yes, of course.
Mass-planting bulbs is very easy. You just dig a hole deep enough to match the bulb size 2.5 times. And that’s what I did because there wasn’t enough time for individual planting. I find mass-planting better anyway, especially with daffodils.
Always make sure the bulbs are pointing up the right way and try to plant at a consistent depth. This way they will pop more or less in unison.
Pro tip: Try to plant a section by yourself, because your helpers will, inevitably, plant slightly higher or lower. We need consistency so do your section and let them plant other sections close by.
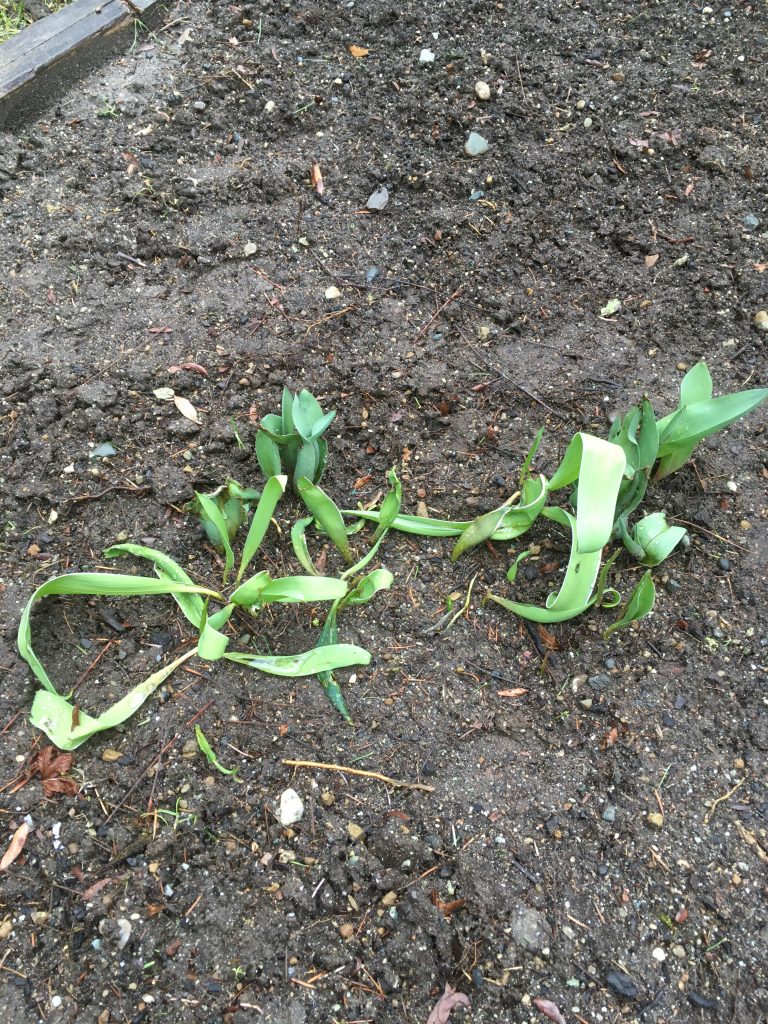
Spring 2020
This is the look in spring 2020. What conclusions can we draw?
Recycled tulips.
A) Tulip bulbs are not reliable past one season. They may or may not pop and this test proves the point. So, why not toss the tulips and design a new display every year? The bulbs aren’t expensive and you’ll get to have more fun. Like me.
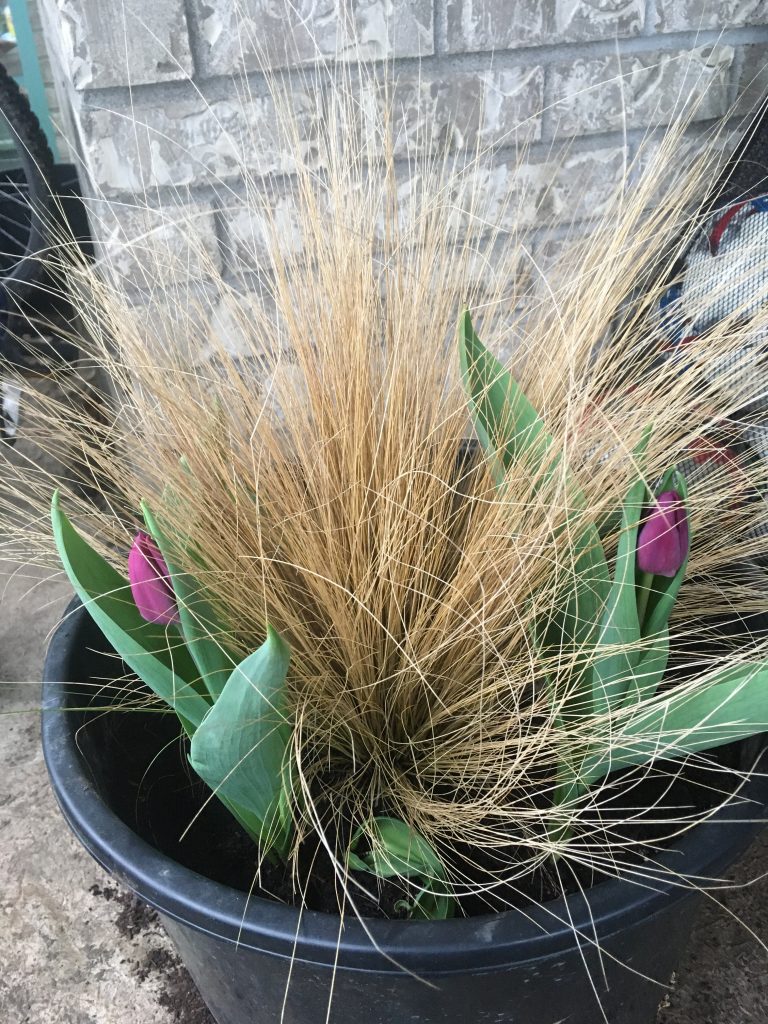
This is what happens when you read too many magazines. As soon as I saw the row of Mexican feather grasses flanked by deep purple tulips, I was hooked. Sadly, my humble patio only allows small pots so I created just one.
See, you can have lots of fun with new tulip combinations.
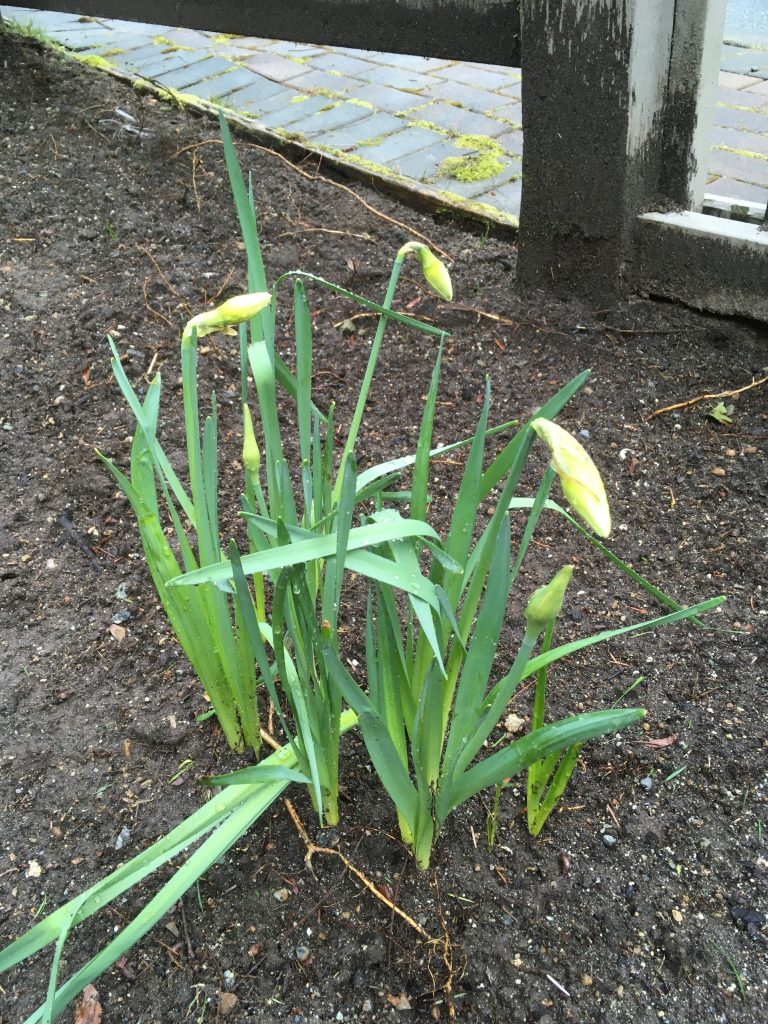
B) Daffodils are rock stars. They look good in my test plot and they will continue to pop every year unless something crazy happens to them. Daffodils, unlike tulips, can be naturalized. I even found some daffodils in the woods recently, where they were left for dead by careless gardeners.
Pro tip: Never discard unwanted plants in the woods. That’s how plants turn into invasives.
Conclusion
Get one good show from your tulips and toss them. Then design a new display for the following year. This way you’ll get to have more fun and you won’t have to worry about all of the tulips looking great in season two.
Landscape supervisors have more fun because they often get to escape from routines. For example, today, I spent the entire morning on requests while the crews deep-edged and finessed beds.
Because I’m the extra man in the field, I can handle requests that would otherwise distract site foremen from their weekly plan. And I’m happy to help out. Let’s take a look.
Hedge reduction
The owners of the cedar hedge (Thuja plicata) below felt boxed-in so they requested a significant 12-18 inch reduction. Armed with sharp new shears and Stihl’s new KM 94 R engine, I bravely attacked the hedge.
The key is establishing the new height and marking it in the hedge. Then the shearing can begin. Luckily, I didn’t run into any huge stems. When you do, use loppers to eliminate them, not your shears.
I managed to catch the owner as she retrieved her newspaper and she was pleased with her “new” hedge. When you reduce cedar hedges drastically you must accept the brown wood look on top. Over time, it won’t look so freaky.
As always, the clean-ups should be as nice as the pruning. In this case, the debris filled four tarps. The last step involved a clean-up blow and putting all patio furniture and pots back to their original places.
Sarcococca
This request was nice and quick. It’s common for people to complain about overgrown shrubs by entrances so I grabbed my shears and went to work.
Note that Sarcococca flowers in winter and produces an attractive scent at a time when nothing much is happening in the landscape. So, now at the end of March it’s fine to prune this shrub.
Pro tip: Pruning after flowering is a common rule for most shrubs.
Grasses
Here, again, the homeowners didn’t like the look of their grasses so I took them down by hand. Yes, it’s slower but using long extendable power shears in tight spots is awkward. The other issue was power cables on the ground.
Pro tip: Don’t rush your tasks. Look around for dangers like outdoor light cables.
Dogwood tree
The last request involved a dogwood (Cornus) tree. The idea was to reduce the height of the crown and I pulled it off easily. One, I could reach the top branches without a ladder; and, two, because the tree is multi-stemmed reducing the top-most branches still leaves the tree looking natural.
The whole job took maybe ten minutes.
Mornings like this are gold for landscape supervisors. They almost don’t feel like work. Supervisors have more fun!
Today was the first mow day of the season and it was surreal. With the novel coronavirus raging around the globe, I had to take precautions like never before. My mouth was covered by a mask, my hands were washed and covered in clean gloves, and I kept everybody at least six feet away.
By the time I got home, my in-box was full of messages encouraging me to stay home.
White plants
Everywhere I went this morning, I saw white plants and they lifted my spirits. So, let’s take a look at five species and see if you know any of them.
Azalea (Rhododendron sp.)
Azaleas are everywhere in our West Coast landscapes and for a good reason. They look great when they’re in bloom.
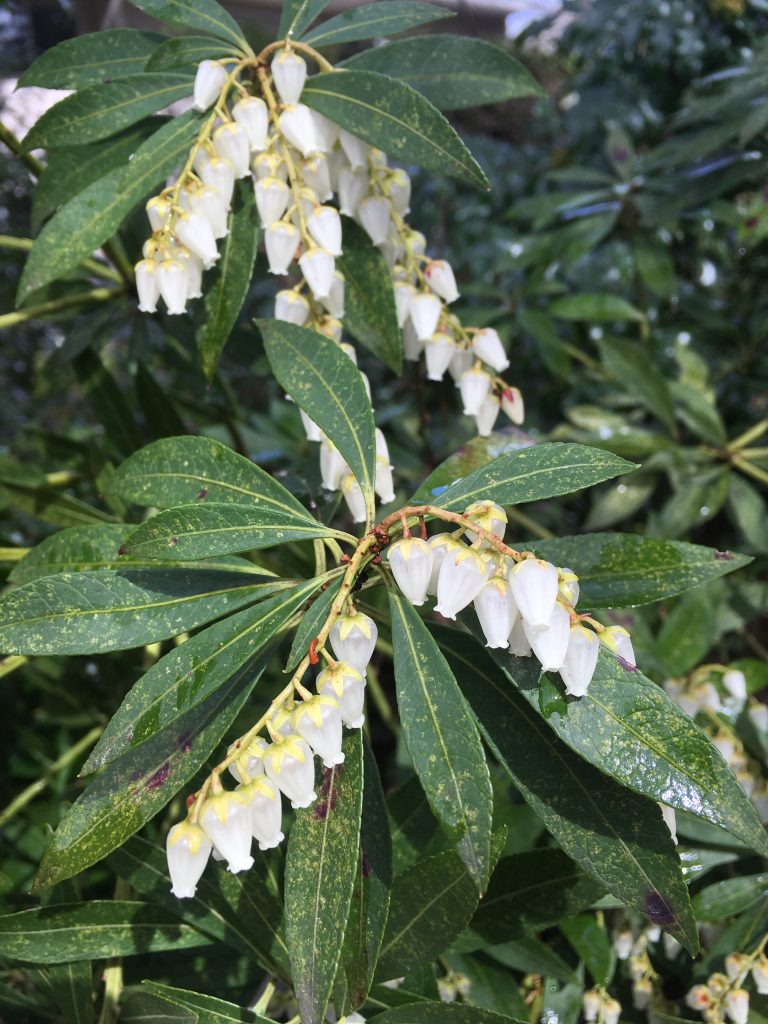
Pieris japonica
This is another well-known shrub in our landscapes.
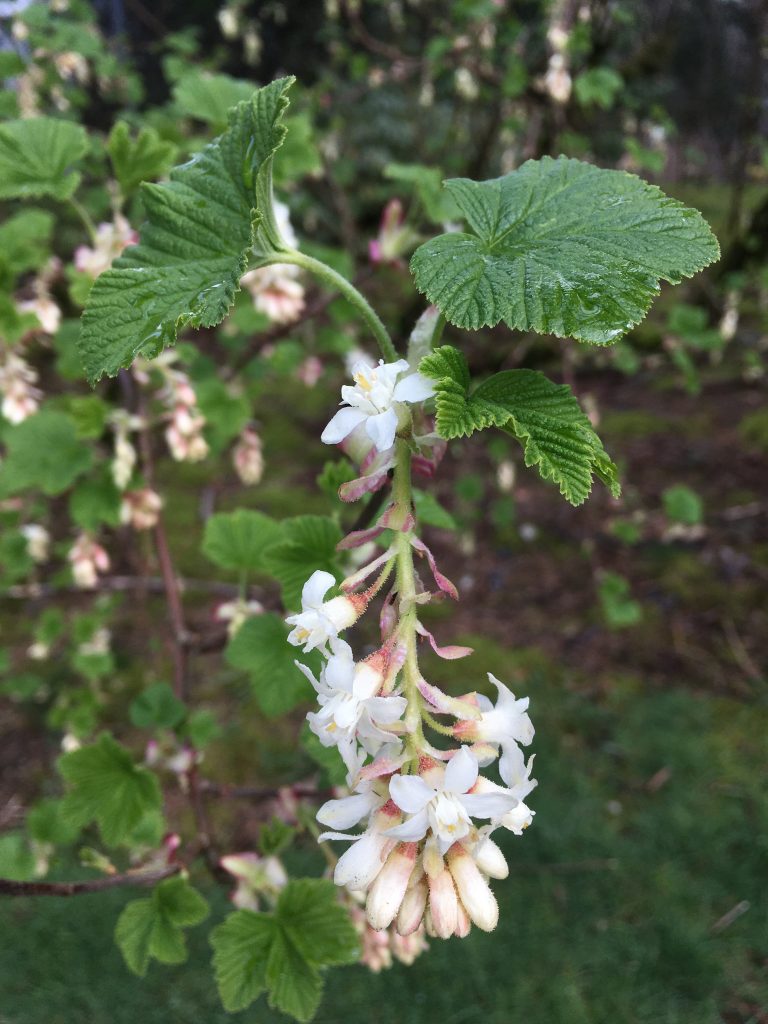
Ribes sanguineum (Currant)
This white variety isn’t as common as the pink one but perhaps it should be. Currant pops in early spring and is also well-known.
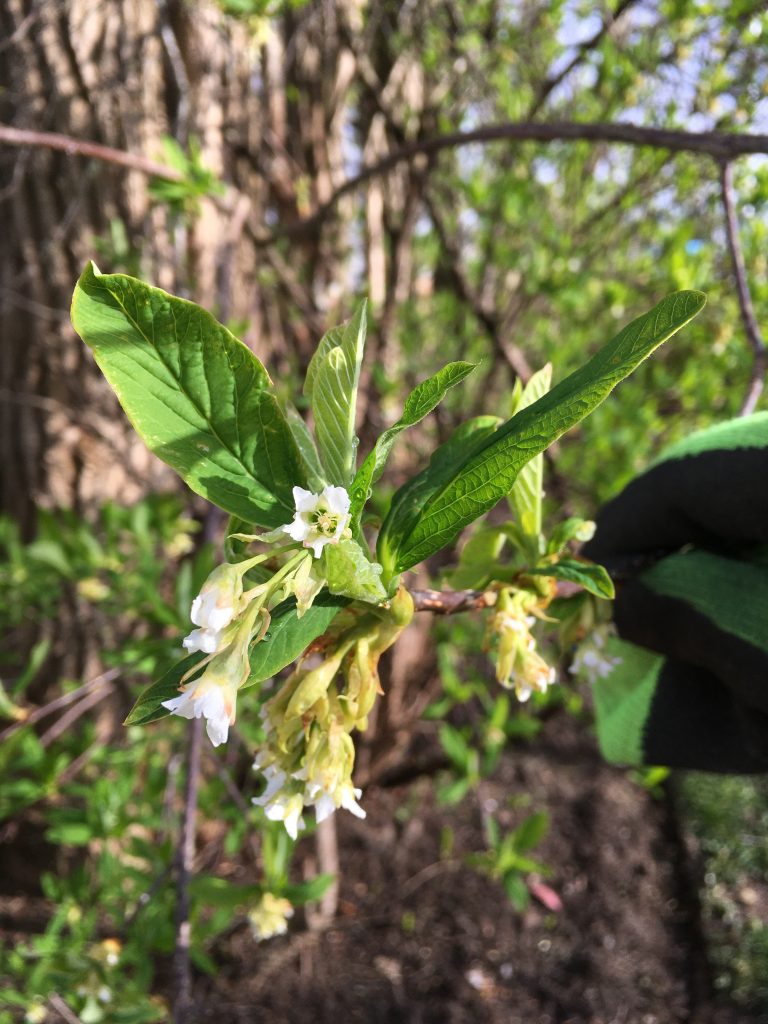
Oemleria cerasiformis (Indian plum)
Indian plum is a native plant and the blooms will eventually turn into edible berries. It brightens up the landscape nicely at the moment. You can read my blog post dedicated to this native shrub with additional pictures.
Pyracantha coccinea
I saved the toughest plant to identify for last. When I shot the picture I wasn’t completely sure what it was. Then, I noticed the familiar skinny and super sharp thorns. Ah, yes, firethorn. I know it intimately from pruning and moving it.
The thorns are so annoying, I was once asked to plant Pyracanthas by a parkade which suffered from frequent break-ins. I never heard back if my plantings actually deterred the bad boys.
If you don’t recognize the white flowers, don’t worry. I’m sure you’ve seen the orange clusters of berries that come later.
These are strange times for the entire globe but in the landscape there are always elements that can lift your spirits. Like my white morning.
For now, medical experts recommend that we stay home.