All Posts By

Vas Sladek

Little Giants

By | Species | No Comments

Today I got to plant a new cedar variety on a strata site! It’s always nice to get a little surprise like this. I’m used to planting cedars. We mainly plant Thuja occidentalis ‘Smaragd’ that form so many of our landscape hedges in the Lower Mainland. They get sheared once a year and look good. However, many of these cedars died in nasty heat waves and companies are starting to plant yews (Taxus x media ‘Hicksii’) instead.


IMG_4023edit

I planted lots of these Thuja occidentalis ‘Smaragd’


Little Giants

One of my many tasks today was to install three Thuja occidentalis ‘Little Giant’ cedars. Excellent! Something new for me. So let’s meet the little giant just in case you have to plant it or decide to after reading this blog post.

This cedar is a slow growing, compact, globe shaped evergreen. It sports soft feathery bright green foliage. It works well as a small hedge or as foundation or border accent.

Its average size is 90-120cm tall and 90-120 wide.

Zone 3

It doesn’t flower.

Keep it moist in sunny locations. I planted them on a hot sunny day and watered them after planting. Then I encouraged the home owner to keep her little giants moist. Considering the condition of her begonias, I had my doubts. Cedars require water in their first year to establish well. Most companies are on site once a week and watering new installs isn’t very practical. Irrigated sites get watered twice a week in Metro Vancouver.

Little pruning is required but I’m sure I will eventually get to shear the little giants into globes.

This cedar needs acidic soils which is fine in the Vancouver area. It is suitable for containers.

Good companion plants are: Barberry, Dogwood, Potentilla, Spirea, Lilac, Sumac and Weigela.

Retail cost $39.99 plus tax in British Columbia. Nurseries will most likely give you a better deal, assuming they have stock.


IMG_4021edit

Thuja occidentalis ‘Little Giant’


IMG_4022edit

Field sales call survival

By | Arborist Insights, Pruning | No Comments

Spring. It’s a time of renewal and, as the Tri-City News reminded me recently, it also brings out salesmen. But don’t worry, you don’t have to let them in. And you have thirty days to change your mind if your purchase is over $50. Good to know.

I was thinking about this after I had a salesman visit me in the field. The guy simply drove by my work site and saw my piles of branches. My goal for the day was to thin out Robinia pseudoacacias. So he stopped and searched out the sweaty arborist. Normally, I brush salesmen off but in this case, I was very happy to talk to him. As it turned out, he had lots of ‘toys’ in his truck.

Arborist ‘toys’

Doug pulled out a telescoping pole saw which was awesome. It’s a bit heavy but the telescoping is nice. The hand saws had me drooling. I especially liked the hand saws that attach to your leg for easy access. One day, when budget allows, I will invest in one.

Right now I am happy with my Samurai hand saw I purchased in Japan for about $35. Always get good quality steel. Having a nice, sharp saw is critical. I still remember a seminar I took at the UBC botanical garden years ago. They had an arborist doing a demonstration in a tree and his hand saw was gorgeous. Light reflected off the saw and it made a beautiful sound when it cut through the wood. I wanted one like that ever since.

Later on, the same arborist pointed out that his hard hat is worn to separate himself from landscapers. Aha! I was insulted and too shy to interrupt the demonstration. Hard hats are for safety. There are many professionals like me who are both ISA certified arborists and landscapers. Skilled, total professionals. My focus is on good quality work, not on separating myself from anybody. Remember, be so good so they can’t ignore you!

Sales details

I am very happy to plug a green salesman in a blog post. Always help others succeed. Unfortunately, many companies have go-to dealers so it’s up to the salesman to spin his magic and develop new relationships. Saws get dull and abused. You will need new ones.

Doug Cox of Calmac Saw & Supply can be reached at 604-816-6915 or calmacsaw@gmail.com. Please tell him you found him through this blog. Perhaps he can demonstrate his saws for you.


IMG_2228

Doug Cox’s beautiful saws. Always use sharp saws when you work.


IMG_2229

Landscape maintenance without discrimination

By | landscape maintenance | No Comments

Good landscape maintenance dictates that we periodically cover the entire site. On small sites this can be accomplished weekly. On larger sites, you can work out a four-week rotation. But the goal should be complete coverage without discrimination.

This was going through my head recently when I was asked to prune and clean up many parking stall inlets on a large site. This wasn’t a new idea; the work was on the site to do list for quite some time. But because the parking stall inlets are lower profile, they get pushed back. It’s not sexy work.

I am convinced we have to fight this discrimination. I treated every single parking stall as I would the main entrance and clubhouse areas. That’s what professionals do.


Parking stalls


IMG_3389edit3


Take a few minutes to examine the picture above. It’s hardly an inspiring area. You can see how workers would gravitate toward a clubhouse area with nice grass and plants. So the boss sent me in. Supervisor Vas on the case. No big deal. I don’t discriminate.

Step 1: set out tarps on the river rock because once cedar clippings get stuck in the rock they are extremely difficult to clean up. Raking is brutal and blowing is effective only up to a point. The clippings will get lodged in the rocks. Definitely set out two tarps to avoid headaches later.

Step 2: shear the hedges like you normally would, tight on top and lighter on the sides. All signs must be clearly visible. Once a year should suffice. Twice is OK.

Step 3: clean up and cultivate at the base of the cedars; try not to remove too much bark mulch. Also check the river rock areas for weeds. I found one that required extra time for weeding. Again, aim for complete coverage. Never discriminate. Even low profile parking stall river rock areas should be weed-free. The last thing we want is weeds producing seeds.

Step 4: watch for parked vehicles so you don’t cause any damage. You can always come back later.

Step 5: gently blow off all edges when you do your site courtesy blow.


Discrimination by design

Some landscaping companies give their workers tight deadlines so they have no choice, they have to discriminate. When this is the case, most maintenance tends to happen at high-profile areas like entrances and clubhouses.

Again, this is a bad idea. Very bad idea. Good landscape maintenance is done without discrimination. I’ve seen this at a Burnaby site that went downhill fast. Two low-budget European workers had exactly two hours to spin their magic. And there wasn’t much magic.

By contrast, we have six workers at a neighbouring site all day! Our work involves a three-week rotation so that the entire site is covered. Parking stalls included. No discrimination.

Conclusion

Cover 100% of your work sites periodically so there isn’t any discrimination. Treat lonely corners the way you would high-profile clubhouses. This will lead to happy clients and renewed contracts.

Dream hedge trimmers for demanding professionals

By | Landscaping Equipment, Reviews | No Comments

Last week I had to do some power shearing and the boss handed me a new unit to try out. Great! It’s always nice to test out new models.

(Disclaimer: we use Stihl equipment at work; I am in no way associated with Stihl. Any review blog posts are just that, my personal reviews.)

The new unit was Stihl’s hedge trimmer HS 82R with a 24″ cutting bar.
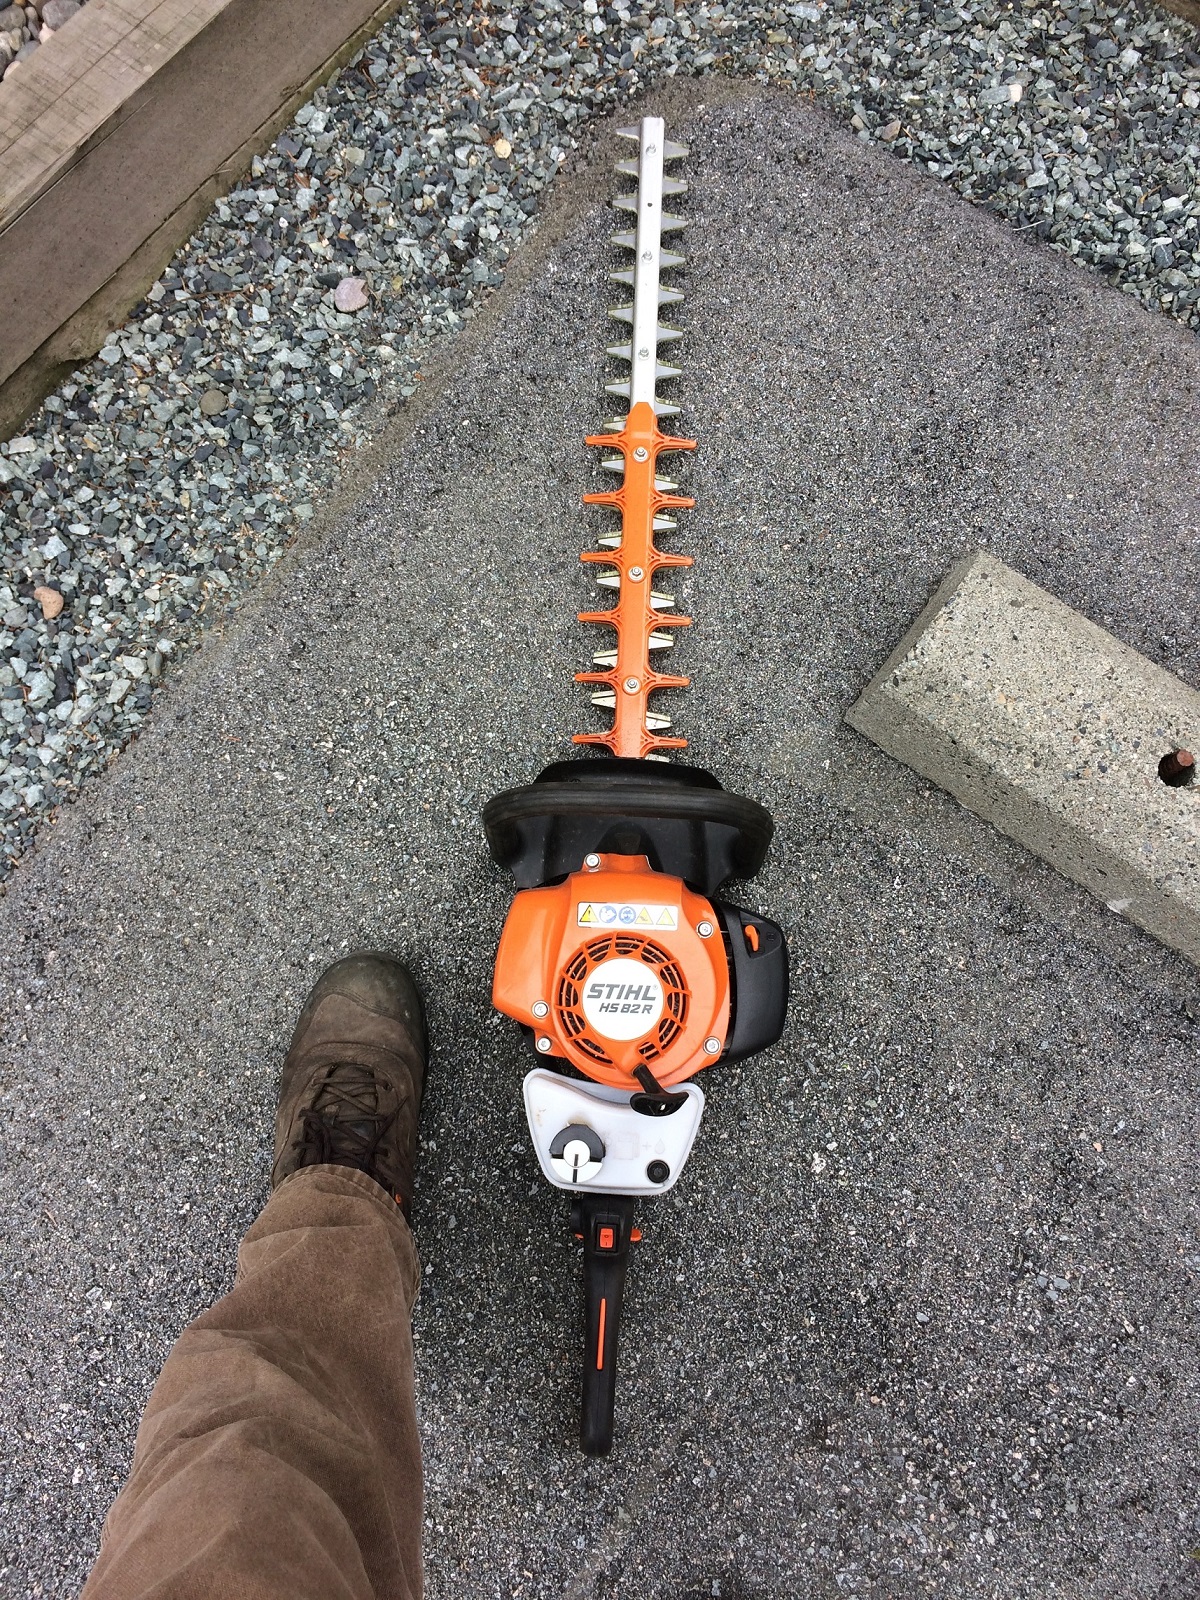
 

IMG_3399edit2

Stihl HS 82R


Notes from Stihl

“This professional unit replaces the HS 81 R with the latest in STIHL technology. Equipped with stratified scavenging engine technology that reduces fuel consumption by 20% and fulfils all emission regulations, long life air filter for prolonged engine protection, double-sided, sharpened cutting blades for a high quality cut, adjustable multi-function handle and a tool-less fuel cap. This hedge trimmer is an innovative unit designed with the demanding professional in mind. ”


What I noticed right away

As you shear you notice a certain softness, kind of like riding a full suspension mountain bike after riding a hard tail for ages. I noticed it because this was my first experience with anti-vibration technology. And I loved it.

The Stihl website states that “intense vibration at the handles of power tools can lead to long-term effects on blood vessels in the hands and arms. STIHL has therefore developed an effective anti-vibration system whereby the oscillations from the machine’s engine are dampened which significantly reduces vibrations at the handles.”

This feature alone is worth the retail price of $669.95. Again, get to know your dealer and score some well-deserved discounts. The manufacturer suggested retail price is just that, suggested.


IMG_3401ed

Notes four springs. The anti-vibration system rules!


One problem

Given the 24″ cutting bar, this unit isn’t exactly light. I used a ladder for my shearing work so I wouldn’t have to raise the shears above my shoulders. The cheaper Stihl hedge trimmers are lighter. But hey, if you’re like me, you will welcome the workout for your muscles.

I was blown away by the anti-vibration technology feature. This unit is designed for demanding professionals and it delivers.

Katsura tree with too many leaves

By | Arborist Insights, Pruning, Trees | No Comments

“Every year this tree makes too many leaves.” That is a direct quote from the strata owner whose patio looked out on a nice Katsura tree specimen (Cercidiphyllum japonicum). I almost laughed. The tree makes too many leaves every year? Really? I talked to her politely and agreed that some thinning cuts were in order. But too many leaves? That deserved a blog post.

Thinning cuts

On a multi-stemmed tree like this one, thinning cuts are totally fine. Just pick a branch that rubs or crosses with others and remove it. You should be able to create some openings in the crown while still preserving a natural tree look. I didn’t have any trouble with this. It was easy to see crowded spots.

Just remember not to go too crazy. You can always come back next year. I made a few cuts on every tree and assessed it before taking more. And I will assess it again once the trees leaf out.

Too many leaves

This is a joke. Trees know what to do. We can’t tell them how many leaves to produce. What’s the big deal with leaves?

Trees use leaves as factories to make food from sunlight through photosynthesis. This is a free service which produces oxygen for us and removes carbon dioxide from the air. This process also releases water which affects local climate. Without leaves the tree can’t survive.

Once the food is made it is distributed throughout the tree. Upper branches can act as storage sites which is why pruning during drought can starve a tree. Under drought conditions, leaf openings called stomata close to prevent moisture loss. This, in turn, means that carbon dioxide can’t enter therefore food production stops. Then, here comes a landscaper with strata orders to prune trees. As he removes some of the upper branches, he removes food that was stored in them. Boom. Starvation ensues.

Leaves also serve as food for various animals and they act as cover for birds. For example, caterpillars munch on young leaves and are in turn eaten by birds.

Leaves also look great in the fall as they turn color. This katsura tree is no exception.

Too many leaves? Not likely. Let the tree do its thing.


Coquitlam rose

By | Events, Species | No Comments

I love the idea of one city buying the naming rights to a rose variety. But having said that, I’m not really a great fan of roses. Their fragrances are intoxicating and I love the feel of their petals. But it’s unlikely you will ever see me joining a rose society. I personally prefer trees and forests; and wild plants. Roses with their prickles were always associated with some princess getting pricked and falling asleep for a hundred years. And yet, the idea of having my own rose variety is appealing.

Coquitlam rose

As a landscape blogger I had to be there for the official unveiling of the Coquitlam rose. It happened at the beautiful Centennial Rose Garden at the Dogwood Pavilion. Incidentally, I have good memories from the adjoining parking lot. I visited many farmer’s markets there; and I maintained the green spaces when I worked for the parks department there in 2014.

The rose garden is well worth the visit. If you are in the area definitely stop by.


IMG_5187b


Having elected to not return to the City of Coquitlam, I hung back until the officials cleared out so as to avoid any awkward moments. Then I took as many pictures of the new Coquitlam rose as I wanted. And I surveyed the bowling green next door for chafer damage since I got to witness nematode applications there the year before.

The rose

The Coquitlam rose is salmon-colored and locally bred. It’s hardy, disease resistant and long blooming. That’s a nice list. The official unveiling took place at the Centennial Rose Garden at the Dogwood Pavilion. The Coquitlam rose is also planted at city hall and at the Inspiration Garden.

You can watch a video on the Coquitlam rose by Jennifer Urbaniak who runs the fun activities in Coquitlam parks. Jennifer also sat the Red Seal challenge examination with me at Kwantlen Polytechnic University. Our fear of failure and embarrassment pushed us in the right direction. We both passed! She snagged a sweet full-time job and I became a landscape senior supervisor in the private sector. Both Red Seals win!

Go visit the Coquitlam rose in 2017 and see what you think.


IMG_5177


How to give your lawn a facelift with power rake and soil

By | Lawn Care, Strata Maintenance | 3 Comments

Yes, it’s finally spring on the West Coast, so why not give your lawn a facelift? Perhaps you have bare spots showing in your lawns. Let’s add a light layer of top soil and over seed it. Or there is too much thatch and moss in your lawn. In that case, we can bring out a power rake and comb out the offenders from your lawn.

With moisture and higher temperatures your lawn should perk up very soon.

I did some of this work last week so let’s recap the steps so you can do it for your own lawn. Or you can hire a good landscape company that will do it for you Properly.


Power raking 101

The power rake doesn’t look like much but it packs a punch, if you let it punch. The key issue is the height level of your tines. If you drop them low, the machine will rip up your lawn. So be ready for some bare brown spots that will need an application of good, weed-free top soil and over seeding.

If you set the machine high, you will just tickle your lawn. So experiment and adjust the height depending on the condition of your lawn.

The key number two is clean up time. Don’t underestimate your clean up times. If you hit your lawn hard, expect to rake up a lot of debris. Budget your time accordingly.

If your lawn is fine

If your lawn only suffers from some bare spots, then skip the power raking step and move on to top dressing. We need good quality top soil, most likely turf blend. Turf blend contains a higher percentage of sand. It should also come from a good source and be weed-free. There is nothing worse than saving a few dollars per yard only to introduce weeds into your landscape.


IMG_2840


The rule for top-dressing is to rake the soil in nicely so that your bare spots are covered but the rest of your grass isn’t smothered. Rake the soil nicely into your existing grass. It should still be visible.

Over seeding is also very easy. Just beware of wind. Apply seed carefully around bed edges so you don’t create a headache for later. Monitor your lawn for seed germination and re-apply as required. With some moisture and higher temperatures everything should be fine.


step 1 power rake

IMG_2829 (1)


step 2 rake up

IMG_2834


step 3 top dress with soil

IMG_2831 (1)


step 4 rake in the soil

IMG_2830 (1)


step 5 over seed

IMG_2843 (1)


Your lawn will thank you for your hard work!

Stihl LawnGrips Pro 6 boots: the landscape tool for your feet

By | Landscaping, Reviews | 4 Comments

After destroying my Stihl LawnGrip Pro shoes in the field, it was time to upgrade. I finally found some time to visit my favourite dealer, Tri-City Power Equipment in Coquitlam. I had a pair of the NEW Stihl LawnGrips Pro 6 boots put away. They are designed specifically for landscape professionals and they look good.


IMG_2865 (1)


First impressions

These boots feel more like hiking boots compared to the previous LawnGrips Pro shoes and the shoelaces feel much stronger. On the previous model the laces would snap at the worst possible moment or they would come undone.

The outsole is the same and I know from experience that it does offer great traction on fresh-cut or wet turf.

Stihl also added four reflective bars on the side for extra visibility.


Stihl notes

  • 3-D ring closure pairs for better fit and easy boot entry
  • moisture wicking 300g Dri Tec lining
  • patented Grip-N-Go outsole engineered for superior traction on fresh-cut or wet turf
  • cushioned polyurethane midsole for all-day comfort and support on the job
  • steel shank and composite diffusion plate provides protection and stability
  • multi-directional, angled cleats are designed to keep you from slipping
  • steel toe complies with ANSI and ASTM standards
  • CSA Green Patch certified
  • constructed with naturally water-repellant leather (use of waterproofing products recommended


Why Vas loves these shoes

  • They are made specifically for landscape professionals!
  • Comply with safety standards; steel toe boots are mandatory
  • The outsole really prevents slips on freshly-cut or wet grass; this is important when you are pushing a mower
  • Decent retails cost. At $129.95 retail it’s still a good deal compared to other work boots; and other boots aren’t designed specifically for landscape professionals. If you get to know your dealer, you won’t have to pay exact retail. So get to know your dealer.
  • Stihl has great products, from machines to clothes.


If your work boots are getting old and you work in landscaping, give these new boots a try.


IMG_2864 (1)


IMG_2867 (1)


(Disclaimer: I am not associated in any way with Stihl Canada or Tri-City Power Equipment. This review is my personal take on these shoes.)


Equipment rodeos

By | Events | No Comments

Equipment rodeos irritate me because deep down, I’m not a machine guy. I prefer working with living plant material. So when private companies and municipalities organize machine rodeos, I laugh and shake my head in private.

Training rodeos

Just today I ran into a rodeo report on social media. Totallandscapecare.com reports that various LandCare branches in the United States ran machine training rodeos. Basically, new and returning workers use machines to negotiate various obstacle courses. In one example, two workers with backpack blowers attempt to blow tennis balls into garbage bins.

It’s a fun way to train new workers. Allegedly. I would disagree. I prefer to train new workers on actual work sites where I can guide them through actual work situations. Then, I observe them and use them to create new blog posts. It’s still fun but mostly for me. The workers get the pleasure of my company.

Real training

Instead of machine rodeos which create noise and air pollution we have come up with a better way to train new workers. Starting this season, we will take new guys to commercial sites and let them practice under my watchful guidance. These are real sites with real clients. The only difference is that minor mistakes will not be as critical as they would be on large strata sites. It’s a win, win situation because the workers get training and extra paid weekend shifts. When we send them out to our foremen they should be ready for lawn care and bedwork. Easy!

Ultimate rodeo

I experienced my first equipment rodeo when I worked at the City of Coquitlam. Several equipment operators were diverted from field work to create a machine “dance” complete with a music soundtrack. Since the city was competing in the Communities in Bloom competition, the idea was to take the judges and let them take in a unique equipment rodeo at the end of the tour.

And unique it was. With music blaring, several tractors and front loaders filed out onto the baseball field. There they danced and raised their buckets, nicely synchronized with the music. When a concerned tax payer voiced his disapproval of the spectacle I quietly laughed. None of the dozens of workers witnessing the rodeo would dare speak up. After all, it was the idea of a high-ranking manager. I can write this post now because I am no longer employed by the City of Coquitlam.

At the time I thought it was a crazy idea. I think so still. We all enjoyed the easy afternoon because once the rodeo was over, nothing much happened.

Happy ending

In the end, Coquitlam won! Unlike the equipment rodeo, the Communities in Bloom Canada competition is a brilliant idea. Judges tour cities and evaluate them on several categories like cleanliness and urban forestry. Competing cities are forced to examine and improve their urban environment. I just wish equipment rodeos would go away.

Tree planting with West Coast landscape professional Vas

By | Arborist Insights, Trees | No Comments

I love planting trees and shrubs. The world can always use more trees and shrubs. But don’t dismiss tree planting as easy. It has to be done right. The International Society of Arboriculture (ISA) sells a book called “The science of tree planting.” Case closed.

Our mission today was to plant trees on a wild bank to provide residents with a screen. As the trees mature they should obscure the power station visible in the distance.

We planted two tree species (Acer rubrum and Thuja plicata) and one shrub (Pieris japonica.)


Step 1 At the nursery

Always be nice to the workers at the nursery. You don’t want them loading your precious plants like pigs. My job was to count the plants and anchor them in the back of the truck. The key is to always handle your trees by the root ball not by the stem. Taking liberties with the stems could damage the tree.


IMG_2055n

I love tree nurseries! You can improve your plant ID skills and off-road in company trucks. Handle your trees with care.


Step 2 Digging

We predetermined our hole locations the day before. The digging was awful because of the wildness of the bank. The bank  was covered with woody debris, ivy and bramble. For this reason I used a tarp for “parking” soil from the hole. I used a shovel to measure the size of the root ball. I also had to adjust for the string and burlap wrapped around the stem. The root flare is actually lower than where the string and burlap meet.


IMG_2078n

Thuja plicata with wire cage, string and burlap. Watch your back, this required heavy lifting.


Step 3 Placing the tree

Once the hole was ready, we carefully placed the tree in the hole. Remember to handle the trees by the root ball NOT by the stem. Once the placement is correct, it’s time to anchor the tree by backfilling the hole to about half way. Another key is to backfill your planting holes with the same material you dug up and placed on your tarp. Some people are tempted to backfill their holes with beautiful new soil but it doesn’t work. Water finds it much easier to enter your planting hole than the surrounding soil and your hole will become waterlogged. This will turn your new tree into a joystick and it will crash down eventually. Use the original material from your digging.


IMG_2064n

Cut off string and burlap to the top of the cage. Bend wire edges back or cut them out.


Step 4 Removing string, burlap and wire

Once our tree was anchored in the hole, we cut and removed the string. The top of the wire cage is either cut away or bent back into the hole. The top third of the burlap is also removed. Use scissors or a knife.

Now you’re ready to complete backfilling your hole. Always make sure soil doesn’t go over the root flare. The root flare should be visible. Mounding soil over your stem leads to problems.

Cut all strings on the Thuja plicata stems to free the branches.


IMG_2066n

Partially backfilled for anchoring; note removed burlap and string, wire bent back and tree root flare located.


Step 5 Final touches

Remove all flagging and name tags. Top dress with aged mulch or soil amender. Also take pictures for your files. Monitor your trees just in case if staking is required. The Acer rubrums are tall and if they move, they will get staked. Just remember to remove the stakes after one season. Leaving them on longer prevents the tree from forming reaction wood.

With April rains expected to continue, no watering was required but it is a consideration if you’re planting during a warm, sunny spell.

Pick up any garbage and do a courtesy blow of your work area.


IMG_2070n

All done! Note power station in the background.


IMG_2073n

Two Acer rubrum trees. Note top-dressed tree wells. No staking required but landscape maintenance crews will monitor.


I’m curious to see how many seasons it will take for the trees to obliterate the view of the power station.